GRANT \[type of permission\] ON \[database name\].\[table name\] TO ‘\[username\]’@'localhost’;
REVOKE \[type of permission\] ON \[database name\].\[table name\] FROM ‘\[username\]’@‘localhost’;
``` GRANT ALL PRIVILEGES ON * . * TO 'newuser'@'localhost'; ``` ``` FLUSH PRIVILEGES; ``` ##### Check Grants ``` SHOW GRANTS FOR 'user'@'localhost'; ``` ``` SHOW GRANTS FOR CURRENT_USER(); ``` ##### Add user to 1 DB ``` GRANT ALL PRIVILEGES ON new_database . * TO 'newuser'@'localhost'; ``` ##### To drop a user: ``` DROP USER ‘newuser’@‘localhost’; ``` # Innodb recovery What we will need to do for the recovery is to stop mysql and put it in innodb\_force\_recovery to attempt to backup all databases. ``` service mysqld stop mkdir /root/mysqlbak cp -rp /var/lib/mysql/ib* /root/mysqlbak ``` ``` vim /etc/my.cnf ```You can start from 1 to 4, go up if it does not start and check mysql logs if it keeps crashing.
`innodb_force_recovery = 1` ``` service mysqld start mysqldump -A > dump.sql ```Drop all databases that needs recovery.
``` service mysqld stop rm /var/lib/mysql/ib* ```Comment out innodb\_force\_recovery in /etc/my.cnf
``` service mysqld start ```Then check /var/lib/mysql/server/hostname.com.err to see if it creates new ib's. Then you can restore databases from the dump:mysql < dump.sql
# MySQL Replication\*\*\* TESTED FOR CENTOS 7 \*\*\*
NEED TO HAVE PORT 3306 OPENED! -- MASTER = 10.1.2.117, SLAVE = 10.1.2.118
#### Master: ``` vi /etc/my.cnf ``` > \[mysqld\] > bind-address = 10.1.2.117 > server-id = 1 > log\_bin = /var/lib/mysql/mysql-bin.log > binlog-do-db=mydb > datadir=/var/lib/mysql > socket=/var/lib/mysql/mysql.sock > symbolic-links=0 > sql\_mode=NO\_ENGINE\_SUBSTITUTION,STRICT\_TRANS\_TABLES > > \[mysqld\_safe\] > log-error=/var/log/mysqld.log > pid-file=/var/run/mysqld/mysqld.pid ``` systemctl restart mysql ```If new server without db create before you grant permissions, if you already have a db running keep reading to see how you can move your db to slave.
``` GRANT REPLICATION SLAVE ON *.* TO 'slave_user'@'%' IDENTIFIED BY 'password'; FLUSH PRIVILEGES; USE mydb; FLUSH TABLES WITH READ LOCK; ``` Note down the position number you will need it on a future command. ``` SHOW MASTER STATUS; +------------------+----------+--------------+------------------+ | File | Position | Binlog_Do_DB | Binlog_Ignore_DB | +------------------+----------+--------------+------------------+ | mysql-bin.000001 | 665 | newdatabase | | +------------------+----------+--------------+------------------+ 1 row in set (0.00 sec) ``` ``` mysqldump -u root -p --opt mysql > mysql.sql ``` ``` UNLOCK TABLES; ``` #### Slave: ``` CREATE DATABASE mydb; ``` Now import the DB from the MASTER ``` mysql -u root -p mydb < /path/to/mydb.sql ``` vi /etc/my.cnf > \[mysqld\] > server-id = 2 > relay-log = /var/lib/mysql/mysql-relay-bin.log > log\_bin = /var/lib/mysql/mysql-bin.log > binlog-do-db=mydb > datadir=/var/lib/mysql > socket=/var/lib/mysql/mysql.sock > symbolic-links=0 > sql\_mode=NO\_ENGINE\_SUBSTITUTION,STRICT\_TRANS\_TABLES > > \[mysqld\_safe\] > log-error=/var/log/mysqld.log > pid-file=/var/run/mysqld/mysqld.pidTo add more DB's create another line with the db name: binlog-do-db=mydb2 in my.cnf
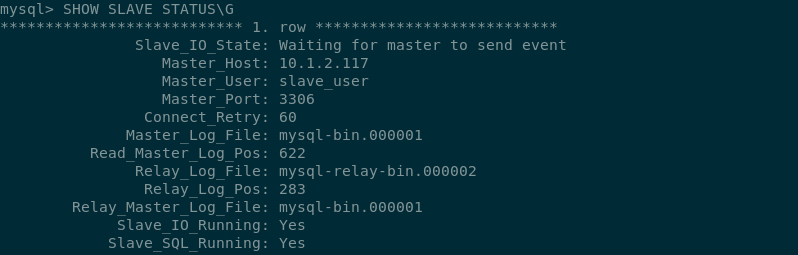
``` systemctl restart mysql ``` ``` CHANGE MASTER TO MASTER_HOST='10.1.2.117',MASTER_USER='slave_user', MASTER_PASSWORD='password', MASTER_LOG_FILE='mysql-bin.000001', MASTER_LOG_POS=665; START SLAVE; SHOW SLAVE STATUS\G ```Look at **Slave\_IO\_State** & **Slave\_IO\_Running** & **Slave\_SQL\_Running** & make sure **Master\_LOG** and **Read\_Master\_Log\_Pos** matches the master.
[](https://wiki.myhypervisor.ca/uploads/images/gallery/2017-12-Dec/Screenshot-20170723195816-798x255.png) If there is an issue in connecting, you can try starting slave with a command to skip over it: ``` SET GLOBAL SQL_SLAVE_SKIP_COUNTER = 1; SLAVE START; ``` # DRBD + Pacemaker & Corosync MySQL Cluster Centos7 [](https://wiki.myhypervisor.ca/uploads/images/gallery/2017-12-Dec/5.png)**On Both Nodes**
##### Host file ```callout vim /etc/hosts ``` > 10.1.2.114 db1 db1.localdomain.com > 10.1.2.115 db2 db2.localdomain.comCorosync will not work if you add something like this: ***127.0.0.1 db1 db2.localdomain.com*** - however you do not need to delete 127.0.0.1 localhost
#### Firewall ##### *Option 1 **Firewalld*** ```shell systemctl start firewalld systemctl enable firewalld firewall-cmd --permanent --add-service=high-availability ``` *On **DB1*** ```shell firewall-cmd --permanent --add-rich-rule='rule family="ipv4" source address="10.1.2.115" port port="7789" protocol="tcp" accept' firewall-cmd --permanent --add-rich-rule 'rule family="ipv4" source address="10.1.2.0/24" port port="3306" protocol="tcp" accept' firewall-cmd --permanent --add-rich-rule 'rule family="ipv4" source address="10.1.2.0/24" port port="5405" protocol="udp" accept' firewall-cmd --permanent --add-rich-rule 'rule family="ipv4" source address="10.1.2.0/24" port port="2224" protocol="tcp" accept' firewall-cmd --permanent --add-rich-rule 'rule family="ipv4" source address="10.1.2.0/24" port port="21064" protocol="tcp" accept' firewall-cmd --reload ``` *On **DB2*** ```shell firewall-cmd --permanent --add-rich-rule='rule family="ipv4" source address="10.1.2.114" port port="7789" protocol="tcp" accept' firewall-cmd --permanent --add-rich-rule 'rule family="ipv4" source address="10.1.2.0/24" port port="3306" protocol="tcp" accept' firewall-cmd --permanent --add-rich-rule 'rule family="ipv4" source address="10.1.2.0/24" port port="5405" protocol="udp" accept' firewall-cmd --permanent --add-rich-rule 'rule family="ipv4" source address="10.1.2.0/24" port port="2224" protocol="tcp" accept' firewall-cmd --permanent --add-rich-rule 'rule family="ipv4" source address="10.1.2.0/24" port port="21064" protocol="tcp" accept' firewall-cmd --reloadfirewall-cmd --reload ``` ##### *Option 2 **iptables*** ```shell systemctl stop firewalld.service systemctl mask firewalld.service systemctl daemon-reload yum install -y iptables-services systemctl enable iptables.service ``` iptables config ```shell iptables -F iptables -P INPUT ACCEPT iptables -P FORWARD ACCEPT iptables -P OUTPUT ACCEPT iptables -A INPUT -p icmp -j ACCEPT iptables -A INPUT -i lo -j ACCEPT iptables -A INPUT -p tcp --dport 22 -j ACCEPT iptables -A INPUT -s 10.1.2.0/24 -p tcp -m multiport --dports 80,443 -j ACCEPT iptables -A INPUT -s 10.1.2.0/24 -d 10.1.2.0/24 -p udp -m multiport --dports 5405 -j ACCEPT iptables -A INPUT -s 10.1.2.0/24 -d 10.1.2.0/24 -p tcp -m multiport --dports 2224 -j ACCEPT iptables -A INPUT -s 10.1.2.0/24 -d 10.1.2.0/24 -p tcp -m multiport --dports 3306 -j ACCEPT iptables -A INPUT -s 10.1.2.0/24 -p tcp -m multiport --dports 2224 -j ACCEPT iptables -A INPUT -s 10.1.2.0/24 -p tcp -m multiport --dports 3121 -j ACCEPT iptables -A INPUT -s 10.1.2.0/24 -p tcp -m multiport --dports 21064 -j ACCEPT iptables -A INPUT -s 10.1.2.0/24 -d 10.1.2.0/24 -p tcp -m multiport --dports 7788,7789 -j ACCEPT iptables -A INPUT -p udp -m multiport --dports 137,138,139,445 -j DROP iptables -A INPUT -m state --state RELATED,ESTABLISHED -j ACCEPT iptables -A INPUT -j DROP ``` Save iptables rules ```shell service iptables save ``` ##### Disable SELINUX ```shell vim /etc/sysconfig/selinux ``` > SELINUX=disabled ##### Pacemaker Install Install PaceMaker and Corosync ``` yum install -y pacemaker pcs ``` Authenticate as the hacluster user ``` echo "H@xorP@assWD" | passwd hacluster --stdin ``` Start and enable the service ```shell systemctl start pcsd systemctl enable pcsd ```**ON DB1**
Test and generate the Corosync configuration ```shell pcs cluster auth db1 db2 -u hacluster -p H@xorP@assWD ``` ```shell pcs cluster setup --start --name mycluster db1 db2 ```**ON BOTH NODES**
Start the cluster ```shell systemctl start corosync systemctl enable corosync pcs cluster start --all pcs cluster enable --all ``` Verify Corosync installationMaster should have ID 1 and slave ID 2
```shell corosync-cfgtool -s ```**ON DB1**
Create a new cluster configuration file ```shell pcs cluster cib mycluster ``` Disable the Quorum & STONITH policies in your cluster configuration file ```shell pcs -f /root/mycluster property set no-quorum-policy=ignore pcs -f /root/mycluster property set stonith-enabled=false ``` Prevent the resource from failing back after recovery as it might increases downtime ```shell pcs -f /root/mycluster resource defaults resource-stickiness=300 ``` ##### LVM partition setup**Both Nodes**
Create a empty partition ```shell fdisk /dev/sdb ``` > Welcome to fdisk (util-linux 2.23.2). > > Command (m for help): **n** > Partition type: > p primary (0 primary, 0 extended, 4 free) > e extended > Select (default p):**(ENTER)** > Partition number (1-4, default 1): **(ENTER)** > First sector (2048-16777215, default 2048): **(ENTER)** > Using default value 2048 > Last sector, +sectors or +size{K,M,G} (2048-16777215, default 16777215): **(ENTER)** > Using default value 16777215 > Partition 1 of type Linux and of size 8 GiB is set > > Command (m for help): **w** > The partition table has been altered! Create LVM partition ```shell pvcreate /dev/sdb1 vgcreate vg00 /dev/sdb1 lvcreate -l 95%FREE -n drbd-r0 vg00 ``` View LVM partition after creation ```shell pvdisplay ``` Look in "/dev/mapper/" find the name of your LVM disk ``` ls /dev/mapper/ ``` OUTPUT: ``` control vg00-drbd--r0 ```\*\*You will use "vg00-drbd--r0" in the "drbd.conf" file in the below steps
##### DRBD Installation Install the DRBD package ```shell rpm --import https://www.elrepo.org/RPM-GPG-KEY-elrepo.org rpm -Uvh http://www.elrepo.org/elrepo-release-7.0-3.el7.elrepo.noarch.rpm yum install -y kmod-drbd84 drbd84-utils modprobe drbd echo drbd > /etc/modules-load.d/drbd.conf ``` Edit the DRBD config and add the to hosts it will be connecting to (DB1 and DB2) ```shell vim /etc/drbd.conf ```Delete all and replace for the following
> include "drbd.d/global\_common.conf"; > include "drbd.d/\*.res"; > > global { > usage-count no; > } > resource r0 { > protocol C; > startup { > degr-wfc-timeout 60; > outdated-wfc-timeout 30; > wfc-timeout 20; > } > disk { > on-io-error detach; > } > net { > cram-hmac-alg sha1; > shared-secret "**Daveisc00l123313**"; > } > on **db1.localdomain.com** { > device /dev/drbd0; > disk /dev/mapper/vg00-drbd--r0; > address **10.1.2.114**:7789; > meta-disk internal; > } > on **db2.localdomain.com** { > device /dev/drbd0; > disk /dev/mapper/vg00-drbd--r0; > address **10.1.2.115**:7789; > meta-disk internal; > } > } ```shell vim /etc/drbd.d/global_common.conf ``` Delete all and replace for the following > common { > handlers { > } > startup { > } > options { > } > disk { > } > net { > after-sb-0pri discard-zero-changes; > after-sb-1pri discard-secondary; > after-sb-2pri disconnect; > } > }**On DB1**
Create the DRBD partition and assign it primary on DB1 ```shell drbdadm create-md r0 drbdadm up r0 drbdadm primary r0 --force drbdadm -- --overwrite-data-of-peer primary all drbdadm outdate r0 mkfs.ext4 /dev/drbd0 ```**On DB2**
Configure r0 and start DRBD on db2 ```shell drbdadm create-md r0 drbdadm up r0 drbdadm secondary all ``` ##### Pacemaker cluster resources**On DB1**
Add resource r0 to the cluster resource ```shell pcs -f /root/mycluster resource create r0 ocf:linbit:drbd drbd_resource=r0 op monitor interval=10s ``` Create an additional clone resource r0-clone to allow the resource to run on both nodes at the same time ```shell pcs -f /root/mycluster resource master r0-clone r0 master-max=1 master-node-max=1 clone-max=2 clone-node-max=1 notify=true ``` Add DRBD filesystem resource ```shell pcs -f /root/mycluster resource create drbd-fs Filesystem device="/dev/drbd0" directory="/data" fstype="ext4" ``` Filesystem resource will need to run on the same node as the r0-clone resource, since the pacemaker cluster services that runs on the same node depend on each other we need to assign an infinity score to the constraint: ```shell pcs -f /root/mycluster constraint colocation add drbd-fs with r0-clone INFINITY with-rsc-role=Master ``` Add the Virtual IP resource ``` pcs -f /root/mycluster resource create vip1 ocf:heartbeat:IPaddr2 ip=10.1.2.116 cidr_netmask=24 op monitor interval=10s ``` The VIP needs an active filesystem to be running, so we need to make sure the DRBD resource starts before the VIP ```shell pcs -f /root/mycluster constraint colocation add vip1 with drbd-fs INFINITY pcs -f /root/mycluster constraint order drbd-fs then vip1 ``` Verify that the created resources are all there ```shell pcs -f /root/mycluster resource show pcs -f /root/mycluster constraint ``` And finally commit the changes ```shell pcs cluster cib-push mycluster ```**On Both Nodes**
#### Installing Database ##### *Option 1* **MySQL**It is important to verify that you do not have a repo enabled for MySQL 5.7 as MySQL 5.7 does not work with pacemaker, you will not if you're using a vanilla image however some hosting providers may alter the repos to insert another MySQL version, so verify in /etc/yum.repo.d
```shell yum install -y wget wget http://repo.mysql.com/mysql-community-release-el7-5.noarch.rpm sudo rpm -ivh mysql-community-release-el7-5.noarch.rpm yum install -y mysql-server systemctl stop mysqld systemctl disable mysqld ``` ##### *Option 2* **Mariadb 10.3** ```shell vim /etc/yum.repos.d/MariaDB.repo ``` > \[mariadb\] > name = MariaDB > baseurl = http://yum.mariadb.org/10.3/centos7-amd64 > gpgkey=https://yum.mariadb.org/RPM-GPG-KEY-MariaDB > gpgcheck=1 ``` yum install MariaDB-server MariaDB-client -y ``` ##### Setup **MySQL/MariaDB** Setup MySQL config for the DRBD mount directory (/data/mysql) ```shell vim /etc/my.cnf ``` > \[mysqld\] > back\_log = 250 > general\_log = 1 > general\_log\_file = /data/mysql/mysql.log > log-error = /data/mysql/mysql.error.log > slow\_query\_log = 0 > slow\_query\_log\_file = /data/mysql/mysqld.slowquery.log > max\_connections = 1500 > table\_open\_cache = 7168 > table\_definition\_cache = 7168 > sort\_buffer\_size = 32M > thread\_cache\_size = 500 > long\_query\_time = 2 > max\_heap\_table\_size = 128M > tmp\_table\_size = 128M > open\_files\_limit = 32768 > datadir=/data/mysql > socket=/data/mysql/mysql.sock > skip-name-resolve > server-id = 1 > log-bin=/data/mysql/drbd > expire\_logs\_days = 5 > max\_binlog\_size = 100M > max\_allowed\_packet = 16M**On DB1**
Configure DB for /data mount ```shell mkdir /data mount /dev/drbd0 /data mkdir /data/mysql chown mysql:mysql /data/mysql mysql_install_db --no-defaults --datadir=/data/mysql --user=mysql rm -rf /var/lib/mysql ln -s /data/mysql /var/lib/ chown -h mysql:mysql /var/lib/mysql chown -R mysql:mysql /data/mysql ``` ```shell systemctl start mariadb ``` or ```shell systemctl start mysqld ``` Run base installation ```shell mysql_secure_installation ``` Connect to MySQL and give grants to allow a connection from the VIP ```shell mysql -u root -p -h localhost ``` Grant Access to anything connecting to root ``` DELETE FROM mysql.user WHERE User='root' AND Host NOT IN ('localhost', '127.0.0.1', '::1'); CREATE USER 'root'@'%' IDENTIFIED BY 'P@SSWORD'; GRANT ALL ON *.* TO root@'%' IDENTIFIED BY 'P@SSWORD'; flush privileges; ``` Create a user for a future DB ``` CREATE USER 'testuser'@'%' IDENTIFIED BY 'P@SSWORD'; GRANT ALL PRIVILEGES ON * . * TO 'testuser'@'%'; ``` ## MySQL 5.7 / MariaDB ```callout pcs -f /root/mycluster resource create db ocf:heartbeat:mysql binary="/usr/sbin/mysqld" config="/etc/my.cnf" datadir="/data/mysql" socket="/data/mysql/mysql.sock" additional_parameters="--bind-address=0.0.0.0" op start timeout=45s on-fail=restart op stop timeout=60s op monitor interval=15s timeout=30s pcs -f /root/mycluster constraint colocation add db with vip1 INFINITY pcs -f /root/mycluster constraint order vip1 then db pcs -f /root/mycluster constraint order promote r0-clone then start drbd-fs pcs resource cleanup pcs cluster cib-push mycluster ```**For MySQL 5.6** - You will need to change the bin path like this
```callout pcs -f /root/mycluster resource create db ocf:heartbeat:mysql binary="/usr/bin/mysqld_safe" config="/etc/my.cnf" datadir="/data/mysql" ```**Both Nodes**
```shell vim /root/.my.cnf ``` > \[client\] > user=root > password=**P@SSWORD!** host=10.1.2.116 ``` systemctl disable mariadb systemctl disable mysql ```Then reboot db1 and then db2 and make sure all resources are working using the command "**pcs status**" + "**drbdadm status**", and verify the resources can failover by creating a DB in db1, move the resource to db2, verify db2 has the created DB, then move back resources on db1. You can also do a reboot test.
Test failover ```shell pcs resource move drbd-fs db2 ``` ## Other notes on DRBD To update a resource after a commit ```shell cibadmin --query > tmp.xml ```Edit with vi tmp.xml or do a pcs -f tmp.xml %do your thing%
```shell cibadmin --replace --xml-file tmp.xml ``` Delete a resource ```shell pcs -f /root/mycluster resource delete db ``` Delete cluster