Linux
Linux
- Fedora 30 QEMU-KVM OVMF Passthrough
- Useful Commands
- Fail2Ban
- named
- Arch install notes (uEFI & Nvidia)
- Grub
- rdiff-backup
- OpenSSL
- Kubernetes cluster Administration notes
- Recover GitLab from filesystem backup
- Apache/Nginx/Varnish
- Nagios NRPE
- Verifying CMS versions
- Systemd
- LogRotate
- Let's Encrypt & Certbot
- MySQL
- DB's and Users
- Innodb recovery
- MySQL Replication
- DRBD + Pacemaker & Corosync MySQL Cluster Centos7
- Reset MySQL root password
- Regular expressions
- Raid
- Docker
- Ansible
- Firewall
- cPanel
- Cluster
- HaProxy
- DRBD + Pacemaker & Corosync NFS Cluster Centos7
- Keepalived LoadBalacing
- Distributed memcached on 2 Webserver [CentOS7]
- GlusterFS + Heketi [Ubuntu 18.04]
- Git
- Site-to-Site OpenVPN with routes
- LVM
- Fedora Build ACS Override Patch Kernel
- Chef notes
- Kubernetes the hard way
- Kubernetes install with kubeadm
- Docker Swarm (WIP)
- Ubuntu - Remove and Reinstall MySQL
- TargetCLI CentOS 7
Fedora 30 QEMU-KVM OVMF Passthrough
My Hardware
Motherboard: Z370 AORUS Gaming 5 (rev. 1.0)
CPU: Intel(R) Core(TM) i7-8700K CPU
RAM: 64 GB CORSAIR Vengeance LPX 2666
GPU: RTX 2080, GTX 1050
PSU: EVGA SuperNOVA 850 G3
STORAGE: 2 HDD's, 1 SSD, 2 NVME
Packages to install
sudo dnf install virt qemu kvm qemu-img libvirt virt-install
sudo usermod -a -G libvirt username
sudo systemctl enable libvirtd
Configuring Host before passing through
Make sure you do not have the GPU you want to passthrough in your slot #0 of your PCI lanes. This will alter the ROM as soon as the host is booted, and you will be unable to use your GPU properly on your guest.
The script below will show you all PCI devices and their mapping to their respective IOMMU groups. If the output is blank, you do not have IOMMU enabled.
#!/bin/bash
shopt -s nullglob
for d in /sys/kernel/iommu_groups/*/devices/*; do
    n=${d#*/iommu_groups/*}; n=${n%%/*}
    printf 'IOMMU Group %s ' "$n"
    lspci -nns "${d##*/}"
done;
Enabling IOMMU :
You will need to add a boot load kernel option :
vim /etc/sysconfig/grubAdd: rd.driver.pre=vfio-pci i915.alpha_support=1 intel_iommu=on iommu=pt at the end of your GRUB_CMDLINE_LINUX=
The grub config will look like this:
GRUB_TIMEOUT=5
GRUB_DISTRIBUTOR="$(sed 's, release .*$,,g' /etc/system-release)"
GRUB_DEFAULT=saved
GRUB_DISABLE_SUBMENU=true
GRUB_TERMINAL_OUTPUT="console"
GRUB_CMDLINE_LINUX="resume=UUID=90cb68a7-0260-4e60-ad10-d2468f4f6464 rhgb quiet rd.driver.pre=vfio-pci i915.alpha_support=1 intel_iommu=on iommu=pt"
GRUB_DISABLE_RECOVERY="true"
Re-gen your grub2
grub2-mkconfig -o /boot/efi/EFI/fedora/grub.cfgrebootUse script above // Example output :
IOMMU Group 0 00:00.0 Host bridge [0600]: Intel Corporation 8th Gen Core Processor Host Bridge/DRAM Registers [8086:3ec2] (rev 07)
IOMMU Group 10 00:1c.2 PCI bridge [0604]: Intel Corporation 200 Series PCH PCI Express Root Port #3 [8086:a292] (rev f0)
IOMMU Group 11 00:1c.3 PCI bridge [0604]: Intel Corporation 200 Series PCH PCI Express Root Port #4 [8086:a293] (rev f0)
IOMMU Group 12 00:1c.4 PCI bridge [0604]: Intel Corporation 200 Series PCH PCI Express Root Port #5 [8086:a294] (rev f0)
IOMMU Group 13 00:1c.6 PCI bridge [0604]: Intel Corporation 200 Series PCH PCI Express Root Port #7 [8086:a296] (rev f0)
IOMMU Group 14 00:1d.0 PCI bridge [0604]: Intel Corporation 200 Series PCH PCI Express Root Port #9 [8086:a298] (rev f0)
IOMMU Group 15 00:1f.0 ISA bridge [0601]: Intel Corporation Z370 Chipset LPC/eSPI Controller [8086:a2c9]
IOMMU Group 15 00:1f.2 Memory controller [0580]: Intel Corporation 200 Series/Z370 Chipset Family Power Management Controller [8086:a2a1]
IOMMU Group 15 00:1f.3 Audio device [0403]: Intel Corporation 200 Series PCH HD Audio [8086:a2f0]
IOMMU Group 15 00:1f.4 SMBus [0c05]: Intel Corporation 200 Series/Z370 Chipset Family SMBus Controller [8086:a2a3]
IOMMU Group 16 00:1f.6 Ethernet controller [0200]: Intel Corporation Ethernet Connection (2) I219-V [8086:15b8]
IOMMU Group 17 02:00.0 Non-Volatile memory controller [0108]: Sandisk Corp WD Black NVMe SSD [15b7:5001]
IOMMU Group 18 07:00.0 USB controller [0c03]: ASMedia Technology Inc. Device [1b21:2142]
IOMMU Group 19 08:00.0 Network controller [0280]: Intel Corporation Wireless 3165 [8086:3165] (rev 81)
IOMMU Group 1 00:01.0 PCI bridge [0604]: Intel Corporation Xeon E3-1200 v5/E3-1500 v5/6th Gen Core Processor PCIe Controller (x16) [8086:1901] (rev 07)
IOMMU Group 1 01:00.0 VGA compatible controller [0300]: NVIDIA Corporation TU104 [GeForce RTX 2080] [10de:1e87] (rev a1)
IOMMU Group 1 01:00.1 Audio device [0403]: NVIDIA Corporation Device [10de:10f8] (rev a1)
IOMMU Group 1 01:00.2 USB controller [0c03]: NVIDIA Corporation Device [10de:1ad8] (rev a1)
IOMMU Group 1 01:00.3 Serial bus controller [0c80]: NVIDIA Corporation Device [10de:1ad9] (rev a1)
IOMMU Group 2 00:02.0 VGA compatible controller [0300]: Intel Corporation UHD Graphics 630 (Desktop) [8086:3e92]
IOMMU Group 3 00:08.0 System peripheral [0880]: Intel Corporation Xeon E3-1200 v5/v6 / E3-1500 v5 / 6th/7th Gen Core Processor Gaussian Mixture Model [8086:1911]
IOMMU Group 4 00:14.0 USB controller [0c03]: Intel Corporation 200 Series/Z370 Chipset Family USB 3.0 xHCI Controller [8086:a2af]
IOMMU Group 5 00:16.0 Communication controller [0780]: Intel Corporation 200 Series PCH CSME HECI #1 [8086:a2ba]
IOMMU Group 6 00:17.0 SATA controller [0106]: Intel Corporation 200 Series PCH SATA controller [AHCI mode] [8086:a282]
IOMMU Group 7 00:1b.0 PCI bridge [0604]: Intel Corporation 200 Series PCH PCI Express Root Port #17 [8086:a2e7] (rev f0)
IOMMU Group 8 00:1b.4 PCI bridge [0604]: Intel Corporation 200 Series PCH PCI Express Root Port #21 [8086:a2eb] (rev f0)
IOMMU Group 9 00:1c.0 PCI bridge [0604]: Intel Corporation 200 Series PCH PCI Express Root Port #1 [8086:a290] (rev f0)
Isolating your GPU
To assign a GPU device to a Virtual machine, you will need to use a place holder driver to prevent the host from interacting with it on boot. You cannot dynamically re-assign a GPU device on a VM after you booted due to its complexity. You can use either VFIO or pci-stub.
Most newer machines will have VFIO by default, which we will be using here.
If your system supports it, which you can try by running the following command, you should use it. If it returns an error, use pci-stub instead.
modinfo vfio-pci
-----
filename:       /lib/modules/4.9.53-1-lts/kernel/drivers/vfio/pci/vfio-pci.ko.gz
description:    VFIO PCI - User Level meta-driver
author:         Alex Williamson <alex.williamson@redhat.com>
license:        GPL v2
In this case here I'm interested in the following groups to passthrough
IOMMU Group 1 01:00.0 VGA compatible controller [0300]: NVIDIA Corporation TU104 [GeForce RTX 2080] [10de:1e87] (rev a1)
IOMMU Group 1 01:00.1 Audio device [0403]: NVIDIA Corporation Device [10de:10f8] (rev a1)
IOMMU Group 1 01:00.2 USB controller [0c03]: NVIDIA Corporation Device [10de:1ad8] (rev a1)
IOMMU Group 1 01:00.3 Serial bus controller [0c80]: NVIDIA Corporation Device [10de:1ad9] (rev a1)
Adding their relevant IDs to the VFIO driver
After you completed the below steps, your GPU will no longer be detected by your host, make sure you have a secondary GPU available.
vim /etc/modprobe/vfio.confoptions vfio-pci ids=10de:1e87,0de:10f8,0de:1ad8,0de:1ad9Regenerate initramfs
dracut -f --kver `uname -r`rebootlsmod | grep vfio
----
vfio_pci 53248 5
irqbypass 16384 11 vfio_pci,kvm
vfio_virqfd 16384 1 vfio_pci
vfio_iommu_type1 28672 1
vfio 32768 10 vfio_iommu_type1,vfio_pciCreate a Bridge
sudo nmcli connection add type bridge autoconnect yes con-name br0 ifname br0
sudo nmcli connection modify br0 ipv4.addresses 10.1.2.120/24 ipv4.method manual
sudo nmcli connection modify br0 ipv4.gateway 10.1.2.10
sudo nmcli connection modify br0 ipv4.dns 10.1.2.10
sudo nmcli connection del eno1
sudo nmcli connection add type bridge-slave autoconnect yes con-name eno1 ifname eno1 master br0
Remove current interface from boot
vim /etc/sysconfig/network-scripts/ifcfg-Wired_connection_1ONBOOT=novim /tmp/br0.xmlvirsh net-define /tmp/br0.xml
virsh net-start br0
virsh net-autostart br0
virsh net-list --allrebootCreate KVM VM
Example of XML file from my VM
<domain type='kvm'>
  <name>win10-nvme</name>
  <uuid>7f99dec1-f092-499e-92f8-bd2d2fab8a5c</uuid>
  <memory unit='KiB'>18524160</memory>
  <currentMemory unit='KiB'>18524160</currentMemory>
  <vcpu placement='static'>12</vcpu>
  <cputune>
    <vcpupin vcpu='0' cpuset='6'/>
    <vcpupin vcpu='1' cpuset='7'/>
    <vcpupin vcpu='2' cpuset='8'/>
    <vcpupin vcpu='3' cpuset='9'/>
    <vcpupin vcpu='4' cpuset='10'/>
    <vcpupin vcpu='5' cpuset='11'/>
  </cputune>
  <os>
    <type arch='x86_64' machine='pc-i440fx-2.11'>hvm</type>
    <loader readonly='yes' type='pflash'>/usr/share/edk2/ovmf/OVMF_CODE.fd</loader>
    <nvram>/usr/share/edk2/ovmf/OVMF_VARS.fd</nvram>
    <bootmenu enable='no'/>
  </os>
  <features>
    <acpi/>
    <apic/>
    <hyperv>
      <relaxed state='on'/>
      <vapic state='on'/>
      <spinlocks state='on' retries='8191'/>
      <vendor_id state='on' value='whatever'/>
    </hyperv>
    <kvm>
      <hidden state='on'/>
    </kvm>
    <vmport state='off'/>
  </features>
  <cpu mode='host-passthrough' check='none'>
    <topology sockets='1' cores='6' threads='2'/>
  </cpu>
  <clock offset='localtime'>
    <timer name='rtc' tickpolicy='catchup'/>
    <timer name='pit' tickpolicy='delay'/>
    <timer name='hpet' present='no'/>
    <timer name='hypervclock' present='yes'/>
  </clock>
  <on_poweroff>destroy</on_poweroff>
  <on_reboot>restart</on_reboot>
  <on_crash>destroy</on_crash>
  <pm>
    <suspend-to-mem enabled='no'/>
    <suspend-to-disk enabled='no'/>
  </pm>
  <devices>
    <emulator>/usr/bin/qemu-system-x86_64</emulator>
    <disk type='block' device='disk'>
      <driver name='qemu' type='raw' cache='none' io='native'/>
      <source dev='/dev/sdb'/>
      <target dev='sdb' bus='sata'/>
      <boot order='1'/>
      <address type='drive' controller='0' bus='0' target='0' unit='2'/>
    </disk>
    <disk type='block' device='disk'>
      <driver name='qemu' type='raw' cache='none' io='native'/>
      <source dev='/dev/nvme0n1'/>
      <target dev='sdd' bus='sata'/>
      <boot order='2'/>
      <address type='drive' controller='0' bus='0' target='0' unit='0'/>
    </disk>
    <controller type='pci' index='0' model='pci-root'/>
    <controller type='sata' index='0'>
      <address type='pci' domain='0x0000' bus='0x00' slot='0x06' function='0x0'/>
    </controller>
    <controller type='virtio-serial' index='0'>
      <address type='pci' domain='0x0000' bus='0x00' slot='0x07' function='0x0'/>
    </controller>
    <controller type='usb' index='0' model='nec-xhci'>
      <address type='pci' domain='0x0000' bus='0x00' slot='0x02' function='0x0'/>
    </controller>
    <interface type='bridge'>
      <mac address='52:54:00:4b:a0:2a'/>
      <source bridge='br0'/>
      <model type='rtl8139'/>
      <address type='pci' domain='0x0000' bus='0x00' slot='0x03' function='0x0'/>
    </interface>
    <input type='mouse' bus='ps2'/>
    <input type='keyboard' bus='ps2'/>
    <hostdev mode='subsystem' type='pci' managed='yes'>
      <source>
        <address domain='0x0000' bus='0x00' slot='0x14' function='0x0'/>
      </source>
      <address type='pci' domain='0x0000' bus='0x00' slot='0x05' function='0x0'/>
    </hostdev>
    <hostdev mode='subsystem' type='pci' managed='yes'>
      <source>
        <address domain='0x0000' bus='0x01' slot='0x00' function='0x0'/>
      </source>
      <address type='pci' domain='0x0000' bus='0x00' slot='0x04' function='0x0'/>
    </hostdev>
    <hostdev mode='subsystem' type='pci' managed='yes'>
      <source>
        <address domain='0x0000' bus='0x01' slot='0x00' function='0x1'/>
      </source>
      <address type='pci' domain='0x0000' bus='0x00' slot='0x08' function='0x0'/>
    </hostdev>
    <hostdev mode='subsystem' type='pci' managed='yes'>
      <source>
        <address domain='0x0000' bus='0x01' slot='0x00' function='0x2'/>
      </source>
      <address type='pci' domain='0x0000' bus='0x00' slot='0x09' function='0x0'/>
    </hostdev>
    <hostdev mode='subsystem' type='pci' managed='yes'>
      <source>
        <address domain='0x0000' bus='0x01' slot='0x00' function='0x3'/>
      </source>
      <address type='pci' domain='0x0000' bus='0x00' slot='0x0a' function='0x0'/>
    </hostdev>
    <memballoon model='virtio'>
      <address type='pci' domain='0x0000' bus='0x00' slot='0x0b' function='0x0'/>
    </memballoon>
  </devices>
</domain>
Extra Notes:
-----
How i did my CPU pinning
grep -e "processor" -e "core id" -e "^$" /proc/cpuinfoprocessor : 0
core id : 0
processor : 1
core id : 1
processor : 2
core id : 2
processor : 3
core id : 3
processor : 4
core id : 4
processor : 5
core id : 5
processor : 6
core id : 0
processor : 7
core id : 1
processor : 8
core id : 2
processor : 9
core id : 3
processor : 10
core id : 4
processor : 11
core id : 5
  <cputune>
    <vcpupin vcpu='0' cpuset='6'/>
    <vcpupin vcpu='1' cpuset='7'/>
    <vcpupin vcpu='2' cpuset='8'/>
    <vcpupin vcpu='3' cpuset='9'/>
    <vcpupin vcpu='4' cpuset='10'/>
    <vcpupin vcpu='5' cpuset='11'/>
  </cputune>
virtio drivers ( only needed when installing windows in a qcow2)
Useful Commands
This page is to share commands / arguments that makes life easier.
Rsync
rsync -vaopHDS --stats --ignore-existing -P (Source) (Destination) -v, --verbose
-a, --archive (It is a quick way of saying you want recursion and want to preserve almost everything.)
-o, --owner
-H, --hard-links
-D, --devices (This option causes rsync to transfer character and block device information to the remote system to recreate these devices.)
-S, --sparse (Try to handle sparse files efficiently so they take up less space on the destination.)
-P (The -P option is equivalent to --partial --progress.)
Fixing perms for a website
find /home/USERNAME/public_html/ -type f -exec chmod 644 {} \; && find /home/USERNAMER/public_html/ -type d -exec chmod 755 {} \;DDrescue
ddrescue -f -n -r3 /dev/[bad/old_drive] /dev/[good/new_drive] /root/recovery.log-f Force ddrescue to run even if the destination file already exists (this is required when writing to a disk). It will overwrite.
-n Short for’–no-scrape’. This option prevents ddrescue from running through the scraping phase, essentially preventing the utility from spending too much time attempting to recreate heavily damaged areas of a file.
-r3 Tells ddrescue to keep retrying damaged areas until 3 passes have been completed. If you set ‘r=-1’, the utility will make infinite attempts. However, this can be destructive, and ddrescue will rarely restore anything new after three complete passes.
SSH tunneling
-L = local, the 666 will be the port that will be opened on the localhost and the 8080 is the port listening on the remote host (192.168.1.100 example). -N = do nothing
ssh root@my-server.com -L 666:192.168.1.100:8080AutoSSH
Autossh is a tool that sets up a tunnel and then checks on it every 10 seconds. If the tunnel stopped working autossh will simply restart it again. So instead of running the command above you could run
autossh -NL 8080:127.0.0.1:80 root@192.168.1.100sshutle
sudo sshuttle -r root@sshserver.com:2222 0/0
sudo sshuttle --dns -r root@sshserver.com 0/0
Force reinstall all arch packages
pacman -Qqen > pkglist.txt
pacman --force -S $(< pkglist.txt)
Check Mobo info
dmidecode --string baseboard-product-nameMore Details:
dmidecode | grep -A4 'Base Board'Check BIOS version
dmidecode | grep Version | head -n1Temp Python FTP WebServer
python -m SimpleHTTPServer 8000Find what is taking all the space
du -Sh / | sort -rh | head -5find /* -type f -exec du -Sh {} + | sort -rh | head -n 5Put a +2TB drive in GPT
Start parted on the drive you want in gpt
parted /dev/sdd
mklabel gpt
unit TB
mkpart primary 0.00TB 16.00TB
print
Unable to mount Windows (NTFS) filesystem due to hibernation
Fix ntfs
ntfsfix /dev/sdXYMount read-only
mount -t ntfs-3g -o ro /dev/sdXY /mnt/windowsRepair rpm DB
rm -f /var/lib/rpm/__db*
db_verify /var/lib/rpm/Packages
rpm --rebuilddb
yum clean all
Stresstestapp
Install the app from source:
git clone https://github.com/stressapptest/stressapptest.git
cd stressapptest
./configure
make
sudo make install
stressapptest -s 10800 -W -v 9 --cc_test --random-threads --local_numa --remote_numa --stop_on_errors >> /root/stresstest-test-01.txt( 10800 = 3 hours )
Create a ISO from a folder
mkisofs -o XYZ.iso XYZ/Fail2Ban
What is Fail2Ban:
Fail2Ban is an intrusion prevention tool to prevent brute-force attacks or heavy requests that are repetitive and insecure.
Once you create a jail and create a filter for that jail, fail2ban will analyze the regex used in the filter to scan a file for a string that matches and then the jail will ban it using the service specified such as a firewall or a network blackhole (null route) to drop any incoming connections from that IP.
In this introduction to fail2ban you will learn how to create your jails and filters for multiple services, and how to to tweak those functions and make sure they are working correctly.
Why Fail2Ban:
Everyone knows about cphulk, so the first question some of you might ask yourself is why use Fail2Ban when you have cphulk? The advantage of fail2ban over cphulk is that you can install fail2ban on every Linux or BSD distribution, cphulk is also limited to WHM servers, also fail2ban can be highly customized to monitor any service, cphulk is limited to monitor the services that are installed with WHM and that contain password authentication.
Installation:
To install fail2ban on centos you will need the epel-release package installed, once it's installed you can then proceed to install the fail2ban package:
yum install epel-release && yum install fail2banAnd on Ubuntu you can simply use apt-get to install fail2ban:
apt-get install fail2banEnable and start fail2ban:
For systemd (Ubuntu 16.04+ and Centos 7+):
systemctl start fail2ban
systemctl enable fail2ban
For upstart (Ubuntu 14.04 and down and Centos 6 and down):
service fail2ban start
chkconfig fail2ban on
Once it is installed you will want to cp jail.conf into jail.local, the global modifications will be set in the jail.local, jail.conf is used as a template to the global presets, this means if the value is not specified in the jail you created it will refer to the values in jail.local, example IP white listing, or ban time.
cp /etc/fail2ban/jail.conf /etc/fail2ban/jail.localHere is an example of global configurations you might want to have set for all your jails /etc/fail2ban/jail.local:
vi /etc/fail2ban/jail.localYou can add our IP here to make sure you do not get banned.
[DEFAULT]
ignoreip = 127.0.0.1 # You can add our IP here to make sure you do not get banned.
destemail = youraccount@email.com # For alerts
sendername = Fail2BanAlerts
There are other settings you can change in the jail.local but i would recommend to add them specifically to your jail so the rules change depending on the jail.
Creating a custom access-log jail:
In the directory /etc/fail2ban/jail.d/ you can create new jails.
The best practice is to create 1 jail per rule in the jail.d directory and then create a filter for that jail.
So let's create our first jail that will read the access logs to ban IP’s who try to access a page on a domain in a folder called admin.
vi /etc/fail2ban/jail.d/(JAIL_NAME).conf
This jail will look in the apache access logs for a user and then use the filer called block_traffic to add ip’s to iptables.
[JAIL_NAME] #You can change this for your jail name
enabled = true
port = http,https # If the jail you are creating is for another protocol like ssh add it here
filter = block_traffic
banaction = iptables-allports # Just use iptables and keep it easy
logpath = /home/USER/access-logs/* # You can change it to wherever the access logs are located
bantime = 3600 # Change this however you want, you can change it to -1 for a permanent ban.
findtime = 150 # Refreshes the logs, set time in seconds
maxretry = 3 # If it finds 3 matching strings in the access logs it will ban the ip
Creating a custom filter for the access-log jail:
This rule will look for any HTTP get or post request for /admin folder, the <HOST> is the IP in the logs the filter will read to add them to a iptables chain. you can replace the word admin for anything, example bot or be wp-admin for wordpress and add the IP's of the customer in the white list of the jail so they can connect to /wp-admin (for example).
The * in the regex and in the jail/filter is a wildcard to grab all the arguments before or after the syntax matching.
vi /etc/fail2ban/filter.d/block_traffic.conf
[Definition]
failregex = ^<HOST> -.*"(GET|POST).*admin.*
ignoreregex =
XMLRPC filter + jail example:
So here an example i used in the past to create a jail to block xmlrpc request:
vi /etc/fail2ban/jail.d/xmlrpc.conf
[xmlrpc]
enabled = true
port = http,https
filter = xmlrpc
banaction = iptables-allports
logpath = /home/*/access-logs/*
bantime = 3600
findtime = 150
maxretry = 3
And here is what your filter should look like.
vi /etc/fail2ban/filter.d/xmlrpc.conf
[Definition]
failregex = ^<HOST> -.*"(GET|POST).*\/xmlrpc\.php.* HTTP\/.*
ignoreregex =
Jail for SSH:
Now let’s create a few jail for SSH and Pure-FTPd, We will start by creating a ssh jail:
vi /etc/fail2ban/jail.d/ssh.conf
[ssh-iptables]
enabled = true
filter = sshd
banaction = iptables-allports
logpath = /var/log/secure
maxretry = 5
And if you look at /etc/fail2ban/filter.d/ you will see there is already a filter for ssh so no need to do anything else.
Jail for Pure-FTPd:
Now let’s create a jail for Pure-FTPd
vi /etc/fail2ban/jail.d/pureftpd.conf
[pureftpd-iptables]
enabled = true
port = ftp
filter = pure-ftpd
logpath = /var/log/messages
maxretry = 3
And a filter for pure-ftpd.conf
vi /etc/fail2ban/filter.d/pure-ftpd.conf
[Definition]
failregex = pure-ftpd: \(\?@<HOST>\) \[WARNING\] Authentication failed for user
ignoreregex =
Fail2Ban Client:
You will mostly use the fail2ban-client to unban a customer's IP, or you need to restart a jail after configuration changes, please note it is important to restart the service after every jail change.
Restart the fail2ban service:
fail2ban restart
To verify what jails are active you can do:
fail2ban-client status
To reload a jail after doing changes in your conf you can do:
fail2ban-client reload <JAIL>
To view if the jail is active and how many IP's it has banned:
fail2ban-client status <JAIL>
If you want to unban an IP:
fail2ban-client set <JAIL> unbanip X.X.X.X
If you want to add an IP to a jail ban:
fail2ban-client -vvv set <JAIL> banip X.X.X.X
To start fail2ban in debug mode if fail2ban does not start:
cd /usr/src/fail2ban-X.X.X.(VERSION)/
fail2ban-client -vvv start
And here is a list for more Fail2ban commands: http://www.fail2ban.org/wiki/index.php/Commands
The default path for logs is: /var/log/fail2ban.log, if ever you have a hard time starting a jail or working with a jail i would recommend you go through the logs
Regex check:
The regex check is used to validate the syntax you will use for your filter, so let’s say you want to create a custom rule to check the access logs you can test the filter regex first by doing:
fail2ban-regex '/home/USER/access-logs/* ' '^<HOST> -.*"(GET|POST).*admin.*'
With fail2ban-regex you can test to make sure it will read a log file and try to get an ip hit from your failregex, the first ‘single quotes’ is the placement of the logs and the second ‘single quotes’ is the failregex syntax you are testing.
named
/etc/named.conf
options {
        listen-on port 53 { any; };
        listen-on-v6 { none; };
        directory           "/var/named";
        dump-file           "/var/named/data/cache_dump.db";
        statistics-file     "/var/named/data/named_stats.txt";
        memstatistics-file  "/var/named/data/named_mem_stats.txt";
        allow-query         { any; };
        allow-transfer      { localhost; 10.1.1.0/24; };

        recursion yes;

        dnssec-enable yes;
        dnssec-validation yes;
        dnssec-lookaside auto;

        /* Path to ISC DLV key */
        bindkeys-file "/etc/named.iscdlv.key";

        managed-keys-directory "/var/named/dynamic";

        pid-file "/run/named/named.pid";
        session-keyfile "/run/named/session.key";
        forwarders {
                10.1.1.10;
                8.8.8.8;
        };
};
logging {
        channel default_debug {
                file "data/named.run";
                severity dynamic;
        };
};


zone "." IN {
    type hint;
    file "named.ca";
};

include "/etc/named/ddns.key";
include "/etc/named.root.key";
include "/etc/named.rfc1912.zones";

zone "myhypervisor.ca" IN {
type master;
file "forward.ldap";
allow-update { key rndc-key; };
notify yes;
};

zone "1.1.10.in-addr.arpa" IN {
type master;
file "reverse.ldap";
allow-update { key rndc-key; };
notify yes;
};

zone "kvm.myhypervisor.ca" IN {
type master;
file "kvm.myhypervisor.ldap";
allow-update { none; };
};
/var/named/forward.ldap
$TTL 86400
@   IN  SOA     ldap1.myhypervisor.ca. root.myhypervisor.ca. (
        2011072001  ;Serial
        3600        ;Refresh
        1800        ;Retry
        604800      ;Expire
        86400       ;Minimum TTL
)
                IN      NS          ldap1.myhypervisor.ca.
                IN      NS          ldap2.myhypervisor.ca.
                IN      A           10.1.1.13
                IN      A           10.1.1.14
ldap1           IN      A           10.1.1.13
ldap2           IN      A           10.1.1.14
lb1             IN      A           10.1.1.10
kvm             IN      A           198.27.81.224
spacewalk       IN      A           10.1.1.11
nginx           IN      A           149.56.9.83
vpn             IN      A           149.56.9.85
/var/named/reverse.ldap
$ORIGIN .
$TTL 86400      ; 1 day
1.1.10.in-addr.arpa     IN SOA  ldap1.myhypervisor.ca. root.myhypervisor.ca. (
                                2011071030 ; serial
                                3600       ; refresh (1 hour)
                                1800       ; retry (30 minutes)
                                604800     ; expire (1 week)
                                86400      ; minimum (1 day)
                                )
                        NS      ldap1.myhypervisor.ca.
                        NS      ldap2.myhypervisor.ca.
13                      PTR     ldap1.myhypervisor.ca.
14                      PTR     ldap2.myhypervisor.ca.
adding a zone (named.d)
zone "example.ca" IN {
type master;
file "example.ldap";
allow-update { none; };
};
zone example
$TTL 86400
@     IN     SOA    ldap1.myhypervisor.ca.     root.myhypervisor.ca. (
                    2007962501 ; serial
                    21600      ; refresh after 6 hours
                    3600       ; retry after 1 hour
                    604800     ; expire after 1 week
                    86400 )    ; minimum TTL of 1 day
; name servers - NS records
     IN      NS      ldap1.myhypervisor.ca.
     IN      NS      ldap2.myhypervisor.ca.

; name servers - A records
ldap1.myhypervisor.ca.          IN      A       10.1.1.13
ldap2.myhypervisor.ca.          IN      A       10.1.1.14

@       IN      A       10.1.1.118
ddns.key
key rndc-key {
	algorithm HMAC-MD5.SIG-ALG.REG.INT;
	secret "z2qaFrjz5yE1pfyirfpWtQ==";
};
Arch install notes (uEFI & Nvidia)
Before starting the bootable media, if you are on a GTX 10XX, the interface will not load properly, to fix this in the arch iso boot menu, click on the "e" key and add "nouveau.modeset=0" at the end of grub
cfdisk /dev/sdaCreate 3 partitions as listed below, and change the type for sda2 and sda3
/dev/sda1 = FAT partition for EFI
/dev/sda2 = / (root)
/dev/sda4 = swap
mkfs.fat -F32 /dev/sda1
mkfs.ext4 /dev/sda2
mkswap /dev/sda3
swapon /dev/sda3
mount /dev/sda2 /mnt
mkdir /mnt/boot
mount /dev/sda1 /mnt/boot
vi /etc/pacman.d/mirrorlist
pacstrap -i /mnt base base-devel
genfstab -U -p /mnt >> /mnt/etc/fstabarch-chroot /mntcheck with "mount" if /sys/firmware/efi/efivars is mounted
vi /etc/locale.gen
locale-gen
echo LANG=en_US.UTF-8 > /etc/locale.conf
export LANG=en_US.UTF-8
ls /usr/share/zoneinfo/
ln -s /usr/share/zoneinfo/your-time-zone > /etc/localtime
hwclock --systohc --utc
echo my_linux > /etc/hostnamevi /etc/pacman.conf[multilib]
Include = /etc/pacman.d/mirrorlist[archlinuxfr]
SigLevel = Never
Server = http://repo.archlinux.fr/$arch
pacman -Sy
pacman -S bash-completion vim ntfs-3g
useradd -m -g users -G wheel,storage,power -s /bin/bash dave
passwd
passwd dave
visudo
%wheel ALL=(ALL) ALLbootctl install
vim /boot/loader/entries/arch.conftitle Arch Linux
linux /vmlinuz-linux
initrd /initramfs-linux.img
echo "options root=PARTUUID=$(blkid -s PARTUUID -o value /dev/sdb3) rw" >> /boot/loader/entries/arch.conf If you own a Haswell processor or higher
pacman -S intel-ucodetitle Arch Linux
initrd /intel-ucode.img
initrd /initramfs-linux.img
ip add
systemctl dhcpcd@eth0.service
Now Lets get the graphical stuff:
pacman -S nvidia-dkms libglvnd nvidia-utils opencl-nvidia lib32-libglvnd lib32-nvidia-utils lib32-opencl-nvidia nvidia-settings gnome linux-headers
vim /etc/mkinitcpio.conf
MODULES="nvidia nvidia_modeset nvidia_uvm nvidia_drm"
vim /boot/loader/entries/arch.confoptions root=PARTUUID=bada2036-8785-4738-b7d4-2b03009d2fc1 rw nvidia-drm.modeset=1
vim /etc/pacman.d/hooks/nvidia.hook[Trigger]
Operation=Install
Operation=Upgrade
Operation=Remove
Type=Package
Target=nvidia[Action]
Depends=mkinitcpio
When=PostTransaction
Exec=/usr/bin/mkinitcpio -P
exit
umount -R /mnt
reboot
POST INSTALL
pacman -S xf86-input-synaptics mesa xorg-server xorg-apps xorg-xinit xorg-twm xorg-xclock xterm yaourt gnome nodm
systemctl enable NetworkManager
systemctl disable dhcpcd@.service
systemctl enable nodm
vim /etc/nodm.confNODM_USER=dave
NODM_XSESSION=/home/dave/.xinitrc
vim /etc/pam.d/nodmauth include system-local-login
account include system-local-login
password include system-local-login
session include system-local-loginreboot
Grub
Normal grub install
(root@server) # grub

    GNU GRUB version 0.97 (640K lower / 3072K upper memory)

  [ Minimal BASH-like line editing is supported. For the first word, TAB
    lists possible command completions. Anywhere else TAB lists the possible
    completions of a device/filename.]

grub> find /grub/stage1 #Find the partitions which contain the stage1 boot loader file.
 (hd0,0)
 (hd1,0)

grub> root (hd0,0) #Specify the partition whose filesystem contains the "/grub " directory.
grub> setup (hd0) #Install the boot loader code.
grub> quit
Software Raid 1
(root@server) # grub

    GNU GRUB version 0.97 (640K lower / 3072K upper memory)

  [ Minimal BASH-like line editing is supported. For the first word, TAB
    lists possible command completions. Anywhere else TAB lists the possible
    completions of a device/filename.]

grub> find /grub/stage1
 (hd0,0)
 (hd1,0)

grub> device (hd0) /dev/sdb #Tell grub to assume that "(hd0)" will be "/dev/sdb" at the time the machine boots from the image it's installing.

grub> root (hd0,0)
grub> setup (hd0)
grub> quit
Check if installed on disk
dd bs=512 count=1 if=/dev/sdX 2>/dev/null | strings |grep GRUBrdiff-backup
#!/bin/bash

SERVEURS="HOSTNAME.SEVER.COM 127.0.0.1"
RDIFFEXCLUSIONS="--exclude /mnt --exclude /media --exclude /proc --exclude /dev --exclude /sys --exclude /var/lib/lxcfs --exclude-sockets"
RDIFFOPTS="--print-statistics"

DATE=`date +%Y-%m-%d`

echo "------------------------------------"
echo "---- Starting Backup `date` ----"

for SERVER in $SERVERS
do
 echo "---- Backup for $SERVER ----"
 echo "---- Start: `date` ----"
 time rdiff-backup --remote-schema 'ssh -C %s rdiff-backup --server' $RDIFFEXCLUSIONS $RDIFFOPTS root@$SERVER::/ /backup/$SERVER
 echo "---- End: `date` ----"
done

echo "---- End of the backup `date` ----"
OpenSSL
Check SSL
On domain
openssl s_client -connect www.domain.com:443Check a Certificate Signing Request (CSR)
openssl req -text -noout -verify -in CSR.csrCheck a private key
openssl rsa -in privateKey.key -checkCheck a certificate (crt or pem)
openssl x509 -in certificate.crt -text -nooutCheck a PKCS#12 file (.pfx or .p12)
openssl pkcs12 -info -in keyStore.p12Create CSR+Key
Create a CSR
openssl req -out CSR.csr -new -newkey rsa:2048 -nodes -keyout privateKey.keyCreate Self-signed
openssl req -x509 -sha256 -nodes -days 365 -newkey rsa:2048 -keyout privateKey.key -out certificate.crtVerify a CSR matches KEY
Check that MD5 hash of the public key to ensure that it matches with what is in a CSR or private key
openssl x509 -noout -modulus -in certificate.crt | openssl md5
openssl rsa -noout -modulus -in privateKey.key | openssl md5
openssl req -noout -modulus -in CSR.csr | openssl md5
Convert
Convert a DER file (.crt .cer .der) to PEM
openssl x509 -inform der -in certificate.cer -out certificate.pemConvert a PEM file to DER
openssl x509 -outform der -in certificate.pem -out certificate.derConvert a PKCS#12 file (.pfx .p12) containing a private key and certificates to PEM
You can add -nocerts to only output the private key or add -nokeys to only output the certificates.
openssl pkcs12 -in keyStore.pfx -out keyStore.pem -nodesConvert a PEM certificate file and a private key to PKCS#12 (.pfx .p12)
openssl pkcs12 -export -out certificate.pfx -inkey privateKey.key -in certificate.crt -certfile CACert.crt
Kubernetes cluster Administration notes
Kubectl
Show yaml
kubectl get deployments/bookstack -o yamlScale
kubectl scale deployment/name --replicas=2Show all resources
for i in $(kubectl api-resources --verbs=list --namespaced -o name | grep -v "events.events.k8s.io" | grep -v "events" | sort | uniq)

do echo "Resource:" $i
kubectl get $i

done
Drain nodes
Drain node
kubectl drain host.name.local --ignore-daemonsetsPut node back to ready
kubectl uncordon host.name.localReplace a new node
Delete a node
kubectl delete node [node_name]Generate a new token:
kubeadm token generateList the tokens:
kubeadm token listPrint the kubeadm join command to join a node to the cluster:
kubeadm token create [token_name] --ttl 2h --print-join-commandCreate etcd snapshot
Get the etcd binaries:
wget https://github.com/etcd-io/etcd/releases/download/v3.3.12/etcd-v3.3.12-linux-amd64.tar.gzUnzip the compressed binaries:
tar xvf etcd-v3.3.12-linux-amd64.tar.gzMove the files into /usr/local/bin:
mv etcd-v3.3.12-linux-amd64/etcd* /usr/local/binTake a snapshot of the etcd datastore using etcdctl:
ETCDCTL_API=3 etcdctl snapshot save snapshot.db --cacert /etc/kubernetes/pki/etcd/server.crt --cert /etc/kubernetes/pki/etcd/ca.crt --key /etc/kubernetes/pki/etcd/ca.keyView the help page for etcdctl:
ETCDCTL_API=3 etcdctl --helpBrowse to the folder that contains the certificate files:
cd /etc/kubernetes/pki/etcd/View that the snapshot was successful:
ETCDCTL_API=3 etcdctl --write-out=table snapshot status snapshot.dbBackup etcd snapshot
Zip up the contents of the etcd directory:
tar -zcvf etcd.tar.gz /etc/kubernetes/pki/etcdCreate pods on specific node(s) :
Create a DaemonSet from a YAML spec :
apiVersion: apps/v1beta2
kind: DaemonSet
metadata:
  name: ssd-monitor
spec:
  selector:
    matchLabels:
      app: ssd-monitor
  template:
    metadata:
      labels:
        app: ssd-monitor
    spec:
      nodeSelector:
        disk: ssd
      containers:
      - name: main
        image: linuxacademycontent/ssd-monitor
kubectl create -f ssd-monitor.yamlLabel a node to identify it and create a pod on it :
kubectl label node node02.myhypervisor.ca disk=ssdRemove a label from a node:
kubectl label node node02.myhypervisor.ca disk-Change the label on a node from a given value to a new value :
kubectl label node node02.myhypervisor.ca disk=hdd --overwriteIf you override an existing label, pods running with the previous label will be terminated
Migration notes
Connect to bash
kubectl exec -it pod/nextcloud /bin/bashRestore MySQL data
kubectl exec -it nextcloudsql-0 -- mysql -u root -pPASSWORD nextcloud_db < backup.sql
Recover GitLab from filesystem backup
Install new instance/node before proceeding
Install gitlab on server and move postgres DB as backup (Steps bellow for ubuntu)
curl -s https://packages.gitlab.com/install/repositories/gitlab/gitlab-ce/script.deb.sh | sudo bash
apt-get install gitlab-ce
gitlab-ctl reconfigure
gitlab-ctl stop
mv /var/opt/gitlab/postgresql/data /root/
Transfer backup
rsync -vaopHDS --stats -P /backup/old-git.server.com/etc/gitlab/gitlab.rb root@new-git.server.com:/etc/gitlab/gitlab.rb
rsync -vaopHDS --stats -P /backup/old-git.server.com/etc/gitlab/gitlab-secrets.json root@new-git.server.com:/etc/gitlab/gitlab-secrets.json
rsync -vaopHDS --stats --ignore-existing -P /backup/old-git.server.com/var/opt/gitlab/postgresql/* root@new-git.server.com:/var/opt/gitlab/postgresql
rsync -vaopHDS --stats --ignore-existing -P /backup/old-git.server.com/var/opt/gitlab/git-data/repositories/* root@new-git.server.com:/var/opt/gitlab/git-data/repositories
Restart/reconfigure gitlab services
gitlab-ctl upgrade
gitlab-ctl reconfigure
gitlab-ctl restart
Reinstall gitlab runner (OPTIONAL)
curl -L --output /usr/local/bin/gitlab-runner https://gitlab-runner-downloads.s3.amazonaws.com/latest/binaries/gitlab-runner-linux-amd64
useradd --comment 'GitLab Runner' --create-home gitlab-runner --shell /bin/bash
gitlab-runner install --user=gitlab-runner --working-directory=/home/gitlab-runner

apt install docker.io
systemctl start docker
systemctl enable docker
usermod -aG docker gitlab-runner

gitlab-runner register
Apache/Nginx/Varnish
Apache vhost
vim /etc/httpd/conf/httpd.confadd ( include vhosts/*.conf ) at the bottom
mkdir /etc/httpd/vhostsvim /etc/httpd/vhosts/domains.conf#######################
### NO SSL ###
#######################
<VirtualHost *:80>
DocumentRoot "/var/www/vhost/domain.com/"
ServerName domain.com
ServerAlias www.domain.com
<Directory /var/www/vhost/domain.com/>
Options Indexes FollowSymLinks MultiViews
AllowOverride All
</Directory>
<Directory "/var/www/vhost/domain.com/must_mysql">
AuthType Basic
AuthName "Restricted Content"
AuthUserFile /etc/httpd/.htpasswd
Require valid-user
</Directory>
</VirtualHost>
#######################
### SSL ###
#######################
<VirtualHost *:443>
DocumentRoot "/var/www/vhost/domain.com/"
ServerName domain.com
ServerAlias www.domain.com
ErrorLog logs/ssl_error_log
TransferLog logs/ssl_access_log
LogLevel warn
SSLEngine on
SSLProtocol All -SSLv2 -SSLv3 -TLSv1 -TLSv1.1
SSLCipherSuite EECDH+AESGCM:EDH+AESGCM:AES256+EECDH:AES256+EDH
SSLCertificateFile /var/www/vhost/ssl/domain/domain.crt
SSLCertificateKeyFile /var/www/vhost/ssl/domain/domain.key
SSLCertificateChainFile /var/www/vhost/ssl/domain/domain.ca-bundle
<Directory /var/www/vhost/domain.com/>
Options Indexes FollowSymLinks MultiViews
AllowOverride All
</Directory>
<Directory "/var/www/vhost/domain.com/must_mysql">
AuthType Basic
AuthName "Restricted Content"
AuthUserFile /etc/httpd/.htpasswd
Require valid-user
</Directory>
</VirtualHost>Generating a .htpasswd:
htpasswd -c /var/www/vhost/domain.com/secure_domain usernameNginx vhost:
SSL+PHP7-fpm
server {
  listen 80;
  server_name www.domain.com;
  return 301 https://www.domain.com$request_uri;
}

server {
  listen 443 ssl;
  add_header Strict-Transport-Security "max-age=31536000; includeSubDomains" always;

  server_name www.domain.com;
  root /var/www/vhosts/domain/public;
  index index.php index.html;

  ssl on;
  ssl_certificate /etc/letsencrypt/live/www.domain.com/fullchain.pem;
  ssl_certificate_key /etc/letsencrypt/live/www.domain.com/privkey.pem;
  ssl_session_timeout 5m;
  ssl_ciphers 'EECDH+AESGCM:EDH+AESGCM:AES256+EECDH:AES256+EDH';
  ssl_protocols TLSv1 TLSv1.1 TLSv1.2;
  ssl_prefer_server_ciphers on;
  ssl_dhparam /etc/nginx/dh.pem;

  location / {
    try_files $uri $uri/ /index.php?$query_string;
  }

  location ~ \.php$ {
    include snippets/fastcgi-php.conf;
    fastcgi_pass unix:/run/php/php7.0-fpm.sock;
  }
}
Revese proxy
location / {
  proxy_pass_header Authorization;
  proxy_pass http://205.233.150.48:9099;
  proxy_set_header Host $host;
  proxy_set_header X-Real-IP $remote_addr;
  proxy_set_header X-Forwarded-For $proxy_add_x_forwarded_for;
  proxy_http_version 1.1;
  proxy_set_header Connection "";
  proxy_buffering off;
  proxy_request_buffering off;
  client_max_body_size 0;
  proxy_read_timeout 36000s;
  proxy_redirect off;
  proxy_ssl_session_reuse off;

}
Generate DH Key
openssl dhparam -out /etc/nginx/dh.pem 2048Varnish
vim /etc/varnish/varnish.paramsRELOAD_VCL=1
VARNISH_VCL_CONF=/etc/varnish/default.vcl
VARNISH_LISTEN_PORT=80
VARNISH_ADMIN_LISTEN_ADDRESS=127.0.0.1
VARNISH_ADMIN_LISTEN_PORT=6082
VARNISH_SECRET_FILE=/etc/varnish/secret
VARNISH_STORAGE="malloc,1G"
VARNISH_TTL=120
VARNISH_USER=varnish
VARNISH_GROUP=varnish
DAEMON_OPTS="-p thread_pool_min=5 -p thread_pool_max=500 -p thread_pool_timeout=300 -p cli_buffer=16384 -p feature=+esi_ignore_other_elements -p vcc_allow_inline_c=on"
vim /etc/varnish/default.vclvcl 4.0;
backend default {
.host = "127.0.0.1";
#Change 8080 to httpd port
.port = "8080";
}
sub vcl_recv {
}
sub vcl_backend_response {
}
sub vcl_deliver {
}
Apache reverse proxy (optional LDAP config)
#:httpd -M |grep ldap
ldap_module (shared)
authnz_ldap_module (shared)

## /etc/httpd/conf.d/*.conf <- default included

<Location />
    AuthType Basic
    AuthName "My AD"
    AuthBasicProvider ldap
    AuthLDAPBindDN "CN=$value1,OU=$value2,OU=$value3,DC=$value4,DC=$value5"
    AuthLDAPBindPassword "passhere"
    AuthLDAPURL "ldaps://ip_here:636/OU=$value2,OU=$value3,DC=$value4,DC=$value5?sAMAccountName?sub?(&(objectCategory=person)(objectClass=user))"
    Require valid-user
</Location>


<VirtualHost *:80>
ProxyPreserveHost On
ProxyPass / http://127.0.0.1:8888/
ProxyPassReverse / http://127.0.0.1:8888/
</VirtualHost>

<VirtualHost *:443>
ProxyPreserveHost On
SSLEngine On
SSLCertificateFile /path/to/file
SSLCertificateKeyFile /path/to/file
ProxyPass / http://127.0.0.1:8888/ProxyPassReverse / http://127.0.0.1:8888/
Nagios NRPE
Downloading Nagios Core:
https://www.nagios.org/downloads/nagios-core/thanks/?t=1500128149
Installing Nagios Core:
Installation is really easy just follow the guide:
When installing nagios on an ubuntu 17.04 server i had to cp /usr/lib/nagios/plugins/check_nrpe /usr/local/nagios/libexec/check_nrpe and apt-get install nagios-nrpe-plugin
Once it's installed, create a host and a service and the commands.
Lets start by making sure nagios sees the files we are going to create for our hosts and services.
vi /usr/local/nagios/etc/nagios.cfgcfg_file=/usr/local/nagios/etc/servers/hosts.cfg
cfg_file=/usr/local/nagios/etc/servers/services.cfg
mkdir /usr/local/nagios/etc/servers/We will start by creating a template we can use for our hosts, then below we will create the host and then create the services for that host.
vim /usr/local/nagios/etc/servers/hosts.cfgdefine host{
name linux-box ; Name of this template
use generic-host ; Inherit default values
check_period 24x7
check_interval 5
retry_interval 1
max_check_attempts 10
check_command check-host-alive
notification_period 24x7
notification_interval 30
notification_options d,r
contact_groups admins
register 0 ; DONT REGISTER THIS - ITS A TEMPLATE
}
define host{
use linux-box ; Inherit default values from a template
host_name linux-server-01 ; The name we're giving to this server
alias Linux Server 01 ; A longer name for the server
address 192.168.1.100 ; IP address of Remote Linux host
}vim /usr/local/nagios/etc/servers/services.cfgdefine service{
use generic-service
host_name linux-server-01
service_description CPU Load
check_command check_nrpe!check_load
}vi /usr/local/nagios/etc/objects/commands.cfgThe -H will be for the host it will connect to (192.168.1.100) defined in the host.cfg, the -c will be the name specified on the remote host inside the /etc/nrpe.cfg
define command{
command_name check_nrpe
command_line $USER1$/check_nrpe -H $HOSTADDRESS$ -c $ARG1$
}
Verify nagios config for errors before restarting.
/usr/local/nagios/bin/nagios -v /usr/local/nagios/etc/nagios.cfgRestart the service
service nagios restartRemote host:
now lets install the NRPE plugins and add a few plugins to the config file.
On Ubuntu:
apt-get install nagios-nrpe-server nagios-plugins-basicFor CentOS:
To view the list of plugins you can install:
yum --enablerepo=epel -y list nagios-plugins*yum install nrpe nagios-plugins-dns nagios-plugins-load nagios-plugins-swap nagios-plugins-disk nagios-plugins-procsNow we need to add the nagios server (192.168.1.101) and the commands it can execute
vim /etc/nagios/nrpe.cfgcommand[check_load]=/usr/local/nagios/libexec/check_load -w 15,10,5 -c 30,25,20
allowed_hosts=127.0.0.1,192.168.1.101
On Ubuntu:
systemctl enable nagios-nrpe-server
systemctl restart nagios-nrpe-server
On Centos:
systemctl enable nrpe
systemctl restart nrpe
Check in CLI
/usr/local/nagios/libexec/check_nrpe -n -H 10.1.1.1Or on older versions
/usr/lib/nagios/plugins/check_nrpeOther NRPE commands:
command[check_ping]=/usr/local/nagios/libexec/check_ping 8.8.8.8 -w 50,50% -c 100,90%
command[check_vda]=/usr/lib64/nagios/plugins/check_disk -w 20% -c 10% -p /dev/vda1
command[check_swap]=/usr/local/nagios/libexec/check_swap -w 10% -c 5%
command[check_raid]=/usr/local/nagios/libexec/check_raid
tcp_check
define service{
use generic-service
host_name media-server
service_description Check Emby
check_command check_tcp!8096
}
Verifying CMS versions
WordPress version:
Linux/cPanel:
find /home/*/public_html/ -type f -iwholename "*/wp-includes/version.php" -exec grep -H "\$wp_version =" {} \;
Linux/Plesk:
find /var/www/vhosts/*/httpdocs/ -type f -iwholename "*/wp-includes/version.php" -exec grep -H "\$wp_version =" {} \;
Windows/IIS (default path) with Powershell:
Get-ChildItem -Path "C:\inetpub\wwwroot\" -Filter "version.php" -Recurse -ea Silentlycontinue | Select-String -pattern "\`$wp_version =" | out-string -stream | select-string includes
Joomla! 1/2/3 version and release:
Linux/cPanel:
find /home/*/public_html/ -type f \( -iwholename '*/libraries/joomla/version.php' -o -iwholename '*/libraries/cms/version.php' -o -iwholename '*/libraries/cms/version/version.php' \) -print -exec perl -e 'while (<>) { $release = $1 if m/RELEASE\s+= .([\d.]+).;/; $dev = $1 if m/DEV_LEVEL\s+= .(\d+).;/; } print qq($release.$dev\n);' {} \; && echo "-"
Linux/Plesk:
find /var/www/vhosts/*/httpdocs/ -type f \( -iwholename '*/libraries/joomla/version.php' -o -iwholename '*/libraries/cms/version.php' -o -iwholename '*/libraries/cms/version/version.php' \) -print -exec perl -e 'while (<>) { $release = $1 if m/RELEASE\s+= .([\d.]+).;/; $dev = $1 if m/DEV_LEVEL\s+= .(\d+).;/; } print qq($release.$dev\n);' {} \; && echo "-"
Drupal version:
Linux/cPanel:
find /home/*/public_html/ -type f -iwholename "*/modules/system/system.info" -exec grep -H "version = \"" {} \;
Linux/Plesk:
find /var/www/vhosts/*/httpdocs/ -type f -iwholename "*/modules/system/system.info" -exec grep -H "version = \"" {} \;
phpBB version:
Linux/cPanel:
find /home/*/public_html/ -type f -wholename *includes/constants.php -exec grep -H "PHPBB_VERSION" {} \;
Linux/Plesk:
find /var/www/vhosts/*/httpdocs/ -type f -wholename *includes/constants.php -exec grep -H "PHPBB_VERSION" {} \;
Systemd
vim /etc/systemd/system/foo.service
chmod +x /etc/systemd/system/foo.service
[Unit]
Description=foo
[Service]
ExecStart=/bin/bash echo "Hello World!"
[Install]
WantedBy=multi-user.target
systemctl daemon-reloadsystemctl start fooYou can also use systemctl cat nginx.service to simply view how the init script starts the service
To enable and start a service in the same line you can do
systemctl enable --now foo.serviceTo check if service is enabled
systemctl is-enabled foo.service; echo $?To check the services that start with the OS in order you can do
systemctl list-units --type=target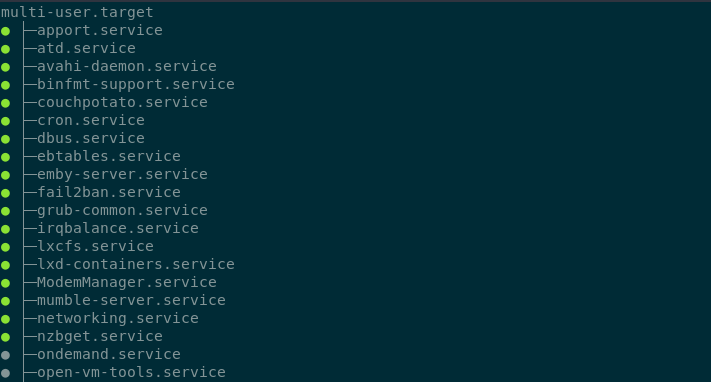
Journalctl
List failed services
systemctl --failedjournalctl -p 3 -xbTo filter only 1 service you will need to use the flag -u
journalctl -u nginx.serviceTo have live logs on a service you can do
journalctl -f _SYSTEMD_UNIT=nginx.serviceTo have live-tail logs for 2 services example nginx and ssh
journalctl -f _SYSTEMD_UNIT=nginx.service + _SYSTEMD_UNIT=sshd.serviceTo check logs since the latest boot:
journalctl -bTo get the data from yesterday
journalctl --since yesterday
#or
journalctl -u nginx.service --since yesterday
To view kernel messages
journalctl -kLogRotate
Add a service to logrotate
vi /etc/logrotate.d/name_of_file
/var/log/some_dir/somelog.log {
su root root
missingok
notifempty
compress
size 5M
daily
create 0600 root root
}
- su - run a root user
- missingok - do not output error if logfile is missing
- notifempty - donot rotate log file if it is empty
- compress - Old versions of log files are compressed with gzip(1) by default
- size - Log file is rotated only if it grow bigger than 20k
- daily - ensures daily rotation
- create - creates a new log file wit permissions 600 where owner and group is root user
Force run a logrotate
logrotate -f /etc/logrotate.conf
Once it's all done no need to do anything else, log rotate already runs in /etc/cron.daily/logrotate
Let's Encrypt & Certbot
Installation
Ubunutu
add-apt-repository ppa:certbot/certbot
apt-get update && apt-get install python-certbot
CentOS
yum install epel-release
yum install python-certbot certbot
Certbot
You must stop anything on port 443/80 before starting certbot
certbot certonly --standalone -d example.comYou can use the crt/privkey from this path
ls /etc/letsencrypt/live/example.comcert.pem chain.pem fullchain.pem privkey.pem README
If you need a DH for you web.conf you can do
openssl dhparam -out /etc/ssl/certs/dhparam.pem 2048Renew crt
crontab -e15 3 * * * /usr/bin/certbot renew --quietWildcard certbot dns plugin
Install certbot nginx
apt install python3-pip
pip3 install certbot-dns-digitalocean
mkdir -p ~/.secrets/certbot/
vim ~/.secrets/certbot/digitalocean.inidns_digitalocean_token = XXXXXXXXXXXXXXX
Certbot config
certbot certonly --dns-digitalocean --dns-digitalocean-credentials ~/.secrets/certbot/digitalocean.ini -d www.domain.comcorontab -e15 3 * * * /usr/bin/certbot renew --quiet
MySQL
Notes for MySQL
DB's and Users
Create a DB
CREATE DATABASE new_database;Drop a DB
DROP DATABASE new_database;Create a new user with all prems
CREATE USER 'newuser'@'localhost' IDENTIFIED BY 'password';GRANT [type of permission] ON [database name].[table name] TO ‘[username]’@'localhost’;
REVOKE [type of permission] ON [database name].[table name] FROM ‘[username]’@‘localhost’;
GRANT ALL PRIVILEGES ON * . * TO 'newuser'@'localhost';FLUSH PRIVILEGES;Check Grants
SHOW GRANTS FOR 'user'@'localhost';SHOW GRANTS FOR CURRENT_USER();Add user to 1 DB
GRANT ALL PRIVILEGES ON new_database . * TO 'newuser'@'localhost';To drop a user:
DROP USER ‘newuser’@‘localhost’;Innodb recovery
What we will need to do for the recovery is to stop mysql and put it in innodb_force_recovery to attempt to backup all databases.
service mysqld stop
mkdir /root/mysqlbak
cp -rp /var/lib/mysql/ib* /root/mysqlbak
vim /etc/my.cnfYou can start from 1 to 4, go up if it does not start and check mysql logs if it keeps crashing.
innodb_force_recovery = 1
service mysqld start
mysqldump -A > dump.sql
Drop all databases that needs recovery.
service mysqld stop
rm /var/lib/mysql/ib*
Comment out innodb_force_recovery in /etc/my.cnf
service mysqld startThen check /var/lib/mysql/server/hostname.com.err to see if it creates new ib's.
Then you can restore databases from the dump:mysql < dump.sql
MySQL Replication
*** TESTED FOR CENTOS 7 ***
NEED TO HAVE PORT 3306 OPENED! -- MASTER = 10.1.2.117, SLAVE = 10.1.2.118
Master:
vi /etc/my.cnf[mysqld]
bind-address = 10.1.2.117
server-id = 1
log_bin = /var/lib/mysql/mysql-bin.log
binlog-do-db=mydb
datadir=/var/lib/mysql
socket=/var/lib/mysql/mysql.sock
symbolic-links=0
sql_mode=NO_ENGINE_SUBSTITUTION,STRICT_TRANS_TABLES
[mysqld_safe]
log-error=/var/log/mysqld.log
pid-file=/var/run/mysqld/mysqld.pid
systemctl restart mysqlIf new server without db create before you grant permissions, if you already have a db running keep reading to see how you can move your db to slave.
GRANT REPLICATION SLAVE ON *.* TO 'slave_user'@'%' IDENTIFIED BY 'password';
FLUSH PRIVILEGES;
USE mydb;
FLUSH TABLES WITH READ LOCK;
Note down the position number you will need it on a future command.
SHOW MASTER STATUS;

+------------------+----------+--------------+------------------+
| File             | Position | Binlog_Do_DB | Binlog_Ignore_DB |
+------------------+----------+--------------+------------------+
| mysql-bin.000001 |      665 | newdatabase  |                  |
+------------------+----------+--------------+------------------+
1 row in set (0.00 sec)
mysqldump -u root -p --opt mysql > mysql.sqlUNLOCK TABLES;Slave:
CREATE DATABASE mydb;Now import the DB from the MASTER
mysql -u root -p mydb < /path/to/mydb.sqlvi /etc/my.cnf
[mysqld]
server-id = 2
relay-log = /var/lib/mysql/mysql-relay-bin.log
log_bin = /var/lib/mysql/mysql-bin.log
binlog-do-db=mydb
datadir=/var/lib/mysql
socket=/var/lib/mysql/mysql.sock
symbolic-links=0
sql_mode=NO_ENGINE_SUBSTITUTION,STRICT_TRANS_TABLES[mysqld_safe]
log-error=/var/log/mysqld.log
pid-file=/var/run/mysqld/mysqld.pid
To add more DB's create another line with the db name: binlog-do-db=mydb2 in my.cnf
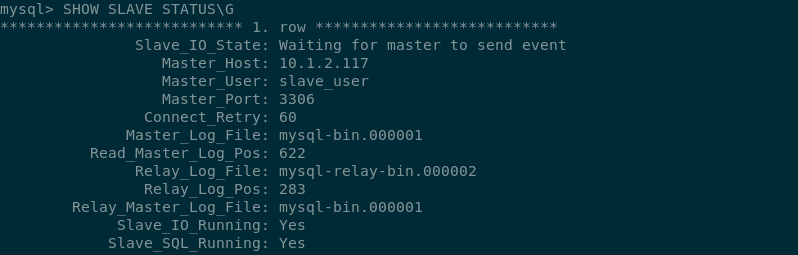
systemctl restart mysqlCHANGE MASTER TO MASTER_HOST='10.1.2.117',MASTER_USER='slave_user', MASTER_PASSWORD='password', MASTER_LOG_FILE='mysql-bin.000001', MASTER_LOG_POS=665;
START SLAVE;
SHOW SLAVE STATUS\GLook at Slave_IO_State & Slave_IO_Running & Slave_SQL_Running & make sure Master_LOG and Read_Master_Log_Pos matches the master.
If there is an issue in connecting, you can try starting slave with a command to skip over it:
SET GLOBAL SQL_SLAVE_SKIP_COUNTER = 1;
SLAVE START;
DRBD + Pacemaker & Corosync MySQL Cluster Centos7
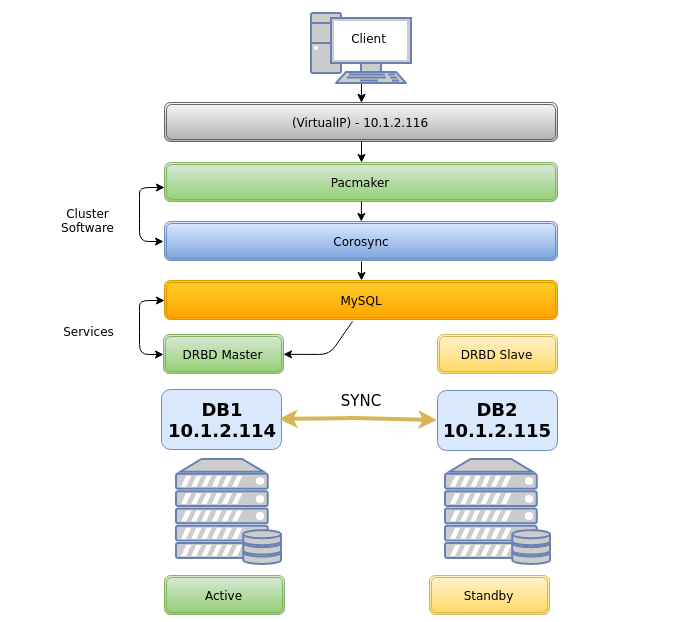
On Both Nodes
Host file
vim /etc/hosts10.1.2.114 db1 db1.localdomain.com
10.1.2.115 db2 db2.localdomain.com
Corosync will not work if you add something like this: 127.0.0.1 db1 db2.localdomain.com - however you do not need to delete 127.0.0.1 localhost
Firewall
Option 1 Firewalld
systemctl start firewalld
systemctl enable firewalld
firewall-cmd --permanent --add-service=high-availability
On DB1
firewall-cmd --permanent --add-rich-rule='rule family="ipv4" source address="10.1.2.115" port port="7789" protocol="tcp" accept'
firewall-cmd --permanent --add-rich-rule 'rule family="ipv4" source address="10.1.2.0/24" port port="3306" protocol="tcp" accept'
firewall-cmd --permanent --add-rich-rule 'rule family="ipv4" source address="10.1.2.0/24" port port="5405" protocol="udp" accept'
firewall-cmd --permanent --add-rich-rule 'rule family="ipv4" source address="10.1.2.0/24" port port="2224" protocol="tcp" accept'
firewall-cmd --permanent --add-rich-rule 'rule family="ipv4" source address="10.1.2.0/24" port port="21064" protocol="tcp" accept'
firewall-cmd --reload
On DB2
firewall-cmd --permanent --add-rich-rule='rule family="ipv4" source address="10.1.2.114" port port="7789" protocol="tcp" accept'
firewall-cmd --permanent --add-rich-rule 'rule family="ipv4" source address="10.1.2.0/24" port port="3306" protocol="tcp" accept'
firewall-cmd --permanent --add-rich-rule 'rule family="ipv4" source address="10.1.2.0/24" port port="5405" protocol="udp" accept'
firewall-cmd --permanent --add-rich-rule 'rule family="ipv4" source address="10.1.2.0/24" port port="2224" protocol="tcp" accept'
firewall-cmd --permanent --add-rich-rule 'rule family="ipv4" source address="10.1.2.0/24" port port="21064" protocol="tcp" accept'
firewall-cmd --reloadfirewall-cmd --reload
Option 2 iptables
systemctl stop firewalld.service
systemctl mask firewalld.service
systemctl daemon-reload
yum install -y iptables-services
systemctl enable iptables.service
iptables config
iptables -F
iptables -P INPUT ACCEPT
iptables -P FORWARD ACCEPT
iptables -P OUTPUT ACCEPT
iptables -A INPUT -p icmp -j ACCEPT
iptables -A INPUT -i lo -j ACCEPT
iptables -A INPUT -p tcp --dport 22 -j ACCEPT
iptables -A INPUT -s 10.1.2.0/24 -p tcp -m multiport --dports 80,443 -j ACCEPT
iptables -A INPUT -s 10.1.2.0/24 -d 10.1.2.0/24 -p udp -m multiport --dports 5405 -j ACCEPT
iptables -A INPUT -s 10.1.2.0/24 -d 10.1.2.0/24 -p tcp -m multiport --dports 2224 -j ACCEPT
iptables -A INPUT -s 10.1.2.0/24 -d 10.1.2.0/24 -p tcp -m multiport --dports 3306 -j ACCEPT
iptables -A INPUT -s 10.1.2.0/24 -p tcp -m multiport --dports 2224 -j ACCEPT
iptables -A INPUT -s 10.1.2.0/24 -p tcp -m multiport --dports 3121 -j ACCEPT
iptables -A INPUT -s 10.1.2.0/24 -p tcp -m multiport --dports 21064 -j ACCEPT
iptables -A INPUT -s 10.1.2.0/24 -d 10.1.2.0/24 -p tcp -m multiport --dports 7788,7789 -j ACCEPT
iptables -A INPUT -p udp -m multiport --dports 137,138,139,445 -j DROP
iptables -A INPUT -m state --state RELATED,ESTABLISHED -j ACCEPT
iptables -A INPUT -j DROP
Save iptables rules
service iptables saveDisable SELINUX
vim /etc/sysconfig/selinuxSELINUX=disabled
Pacemaker Install
Install PaceMaker and Corosync
yum install -y pacemaker pcsAuthenticate as the hacluster user
echo "H@xorP@assWD" | passwd hacluster --stdinStart and enable the service
systemctl start pcsd
systemctl enable pcsd
ON DB1
Test and generate the Corosync configuration
pcs cluster auth db1 db2 -u hacluster -p H@xorP@assWDpcs cluster setup --start --name mycluster db1 db2ON BOTH NODES
Start the cluster
systemctl start corosync
systemctl enable corosync
pcs cluster start --all
pcs cluster enable --all
Verify Corosync installation
Master should have ID 1 and slave ID 2
corosync-cfgtool -sON DB1
Create a new cluster configuration file
pcs cluster cib myclusterDisable the Quorum & STONITH policies in your cluster configuration file
pcs -f /root/mycluster property set no-quorum-policy=ignore
pcs -f /root/mycluster property set stonith-enabled=false
Prevent the resource from failing back after recovery as it might increases downtime
pcs -f /root/mycluster resource defaults resource-stickiness=300LVM partition setup
Both Nodes
Create a empty partition
fdisk /dev/sdbWelcome to fdisk (util-linux 2.23.2).
Command (m for help): n
Partition type:
p primary (0 primary, 0 extended, 4 free)
e extended
Select (default p):(ENTER)
Partition number (1-4, default 1): (ENTER)
First sector (2048-16777215, default 2048): (ENTER)
Using default value 2048
Last sector, +sectors or +size{K,M,G} (2048-16777215, default 16777215): (ENTER)
Using default value 16777215
Partition 1 of type Linux and of size 8 GiB is setCommand (m for help): w
The partition table has been altered!
Create LVM partition
pvcreate /dev/sdb1
vgcreate vg00 /dev/sdb1
lvcreate -l 95%FREE -n drbd-r0 vg00
View LVM partition after creation
pvdisplayLook in "/dev/mapper/" find the name of your LVM disk
ls /dev/mapper/OUTPUT:
control vg00-drbd--r0**You will use "vg00-drbd--r0" in the "drbd.conf" file in the below steps
DRBD Installation
Install the DRBD package
rpm --import https://www.elrepo.org/RPM-GPG-KEY-elrepo.org
rpm -Uvh http://www.elrepo.org/elrepo-release-7.0-3.el7.elrepo.noarch.rpm
yum install -y kmod-drbd84 drbd84-utils
modprobe drbd
echo drbd > /etc/modules-load.d/drbd.conf
Edit the DRBD config and add the to hosts it will be connecting to (DB1 and DB2)
vim /etc/drbd.confDelete all and replace for the following
include "drbd.d/global_common.conf";
include "drbd.d/*.res";global {
usage-count no;
}
resource r0 {
protocol C;
startup {
degr-wfc-timeout 60;
outdated-wfc-timeout 30;
wfc-timeout 20;
}
disk {
on-io-error detach;
}
net {
cram-hmac-alg sha1;
shared-secret "Daveisc00l123313";
}
on db1.localdomain.com {
device /dev/drbd0;
disk /dev/mapper/vg00-drbd--r0;
address 10.1.2.114:7789;
meta-disk internal;
}
on db2.localdomain.com {
device /dev/drbd0;
disk /dev/mapper/vg00-drbd--r0;
address 10.1.2.115:7789;
meta-disk internal;
}
}
vim /etc/drbd.d/global_common.confDelete all and replace for the following
common {
handlers {
}
startup {
}
options {
}
disk {
}
net {
after-sb-0pri discard-zero-changes;
after-sb-1pri discard-secondary;
after-sb-2pri disconnect;
}
}
On DB1
Create the DRBD partition and assign it primary on DB1
drbdadm create-md r0
drbdadm up r0
drbdadm primary r0 --force
drbdadm -- --overwrite-data-of-peer primary all
drbdadm outdate r0
mkfs.ext4 /dev/drbd0
On DB2
Configure r0 and start DRBD on db2
drbdadm create-md r0
drbdadm up r0
drbdadm secondary all
Pacemaker cluster resources
On DB1
Add resource r0 to the cluster resource
pcs -f /root/mycluster resource create r0 ocf:linbit:drbd drbd_resource=r0 op monitor interval=10sCreate an additional clone resource r0-clone to allow the resource to run on both nodes at the same time
pcs -f /root/mycluster resource master r0-clone r0 master-max=1 master-node-max=1 clone-max=2 clone-node-max=1 notify=trueAdd DRBD filesystem resource
pcs -f /root/mycluster resource create drbd-fs Filesystem device="/dev/drbd0" directory="/data" fstype="ext4"Filesystem resource will need to run on the same node as the r0-clone resource, since the pacemaker cluster services that runs on the same node depend on each other we need to assign an infinity score to the constraint:
pcs -f /root/mycluster constraint colocation add drbd-fs with r0-clone INFINITY with-rsc-role=MasterAdd the Virtual IP resource
pcs -f /root/mycluster resource create vip1 ocf:heartbeat:IPaddr2 ip=10.1.2.116 cidr_netmask=24 op monitor interval=10sThe VIP needs an active filesystem to be running, so we need to make sure the DRBD resource starts before the VIP
pcs -f /root/mycluster constraint colocation add vip1 with drbd-fs INFINITY
pcs -f /root/mycluster constraint order drbd-fs then vip1
Verify that the created resources are all there
pcs -f /root/mycluster resource show
pcs -f /root/mycluster constraint
And finally commit the changes
pcs cluster cib-push myclusterOn Both Nodes
Installing Database
Option 1 MySQL
It is important to verify that you do not have a repo enabled for MySQL 5.7 as MySQL 5.7 does not work with pacemaker, you will not if you're using a vanilla image however some hosting providers may alter the repos to insert another MySQL version, so verify in /etc/yum.repo.d
yum install -y wget
wget http://repo.mysql.com/mysql-community-release-el7-5.noarch.rpm
sudo rpm -ivh mysql-community-release-el7-5.noarch.rpm
yum install -y mysql-server
systemctl stop mysqld
systemctl disable mysqld
Option 2 Mariadb 10.3
vim /etc/yum.repos.d/MariaDB.repo[mariadb]
name = MariaDB
baseurl = http://yum.mariadb.org/10.3/centos7-amd64
gpgkey=https://yum.mariadb.org/RPM-GPG-KEY-MariaDB
gpgcheck=1
yum install MariaDB-server MariaDB-client -ySetup MySQL/MariaDB
Setup MySQL config for the DRBD mount directory (/data/mysql)
vim /etc/my.cnf[mysqld]
back_log = 250
general_log = 1
general_log_file = /data/mysql/mysql.log
log-error = /data/mysql/mysql.error.log
slow_query_log = 0
slow_query_log_file = /data/mysql/mysqld.slowquery.log
max_connections = 1500
table_open_cache = 7168
table_definition_cache = 7168
sort_buffer_size = 32M
thread_cache_size = 500
long_query_time = 2
max_heap_table_size = 128M
tmp_table_size = 128M
open_files_limit = 32768
datadir=/data/mysql
socket=/data/mysql/mysql.sock
skip-name-resolve
server-id = 1
log-bin=/data/mysql/drbd
expire_logs_days = 5
max_binlog_size = 100M
max_allowed_packet = 16M
On DB1
Configure DB for /data mount
mkdir /data
mount /dev/drbd0 /data
mkdir /data/mysql
chown mysql:mysql /data/mysql
mysql_install_db --no-defaults --datadir=/data/mysql --user=mysql
rm -rf /var/lib/mysql
ln -s /data/mysql /var/lib/
chown -h mysql:mysql /var/lib/mysql
chown -R mysql:mysql /data/mysql
systemctl start mariadbor
systemctl start mysqldRun base installation
mysql_secure_installationConnect to MySQL and give grants to allow a connection from the VIP
mysql -u root -p -h localhostGrant Access to anything connecting to root
DELETE FROM mysql.user WHERE User='root' AND Host NOT IN ('localhost', '127.0.0.1', '::1');
CREATE USER 'root'@'%' IDENTIFIED BY 'P@SSWORD';
GRANT ALL ON *.* TO root@'%' IDENTIFIED BY 'P@SSWORD';
flush privileges;
Create a user for a future DB
CREATE USER 'testuser'@'%' IDENTIFIED BY 'P@SSWORD';
GRANT ALL PRIVILEGES ON * . * TO 'testuser'@'%';
MySQL 5.7 / MariaDB
pcs -f /root/mycluster resource create db ocf:heartbeat:mysql binary="/usr/sbin/mysqld" config="/etc/my.cnf" datadir="/data/mysql" socket="/data/mysql/mysql.sock" additional_parameters="--bind-address=0.0.0.0" op start timeout=45s on-fail=restart op stop timeout=60s op monitor interval=15s timeout=30s
pcs -f /root/mycluster constraint colocation add db with vip1 INFINITY
pcs -f /root/mycluster constraint order vip1 then db
pcs -f /root/mycluster constraint order promote r0-clone then start drbd-fs
pcs resource cleanup
pcs cluster cib-push mycluster
For MySQL 5.6 - You will need to change the bin path like this
pcs -f /root/mycluster resource create db ocf:heartbeat:mysql binary="/usr/bin/mysqld_safe" config="/etc/my.cnf" datadir="/data/mysql" Both Nodes
vim /root/.my.cnf[client]
user=root
password=P@SSWORD!
host=10.1.2.116
systemctl disable mariadb
systemctl disable mysql
Then reboot db1 and then db2 and make sure all resources are working using the command "pcs status" + "drbdadm status", and verify the resources can failover by creating a DB in db1, move the resource to db2, verify db2 has the created DB, then move back resources on db1. You can also do a reboot test.
Test failover
pcs resource move drbd-fs db2Other notes on DRBD
To update a resource after a commit
cibadmin --query > tmp.xmlEdit with vi tmp.xml or do a pcs -f tmp.xml %do your thing%
cibadmin --replace --xml-file tmp.xmlDelete a resource
pcs -f /root/mycluster resource delete dbDelete cluster
pcs cluster destroy
Recover a split brain
Secondary node
drbdadm secondary all
drbdadm disconnect all
drbdadm -- --discard-my-data connect all
Primary node
drbdadm primary all
drbdadm disconnect all
drbdadm connect all
On both
drbdadm status
cat /proc/drbd
Reset MySQL root password
Stop MySQL
systemctl stop mysqldSet the MySQL environment option
systemctl set-environment MYSQLD_OPTS="--skip-grant-tables"Start MySQL using the options you just set
systemctl start mysqldLogin as root
mysql -u rootFor MySQL 5.7 or later
UPDATE mysql.user SET authentication_string = PASSWORD('MyNewPassword') WHERE User = 'root' AND Host = 'localhost';Or for lower versions
ALTER USER 'root'@'localhost' IDENTIFIED BY 'MyNewPass';Flush privilege
FLUSH PRIVILEGES;
exit
Stop MySQL
systemctl stop mysqldUnset the MySQL environment option so it starts normally next time
systemctl unset-environment MYSQLD_OPTSStart MySQL
systemctl start mysqldRegular expressions
SED
| Character | Description |
| ^ | Matches the beginning of the line |
| $ | Matches the end of the line |
| . | Matches any single character |
| * | Will match zero or more occurrences of the previous character |
| [ ] | Matches all the characters inside the [ ] |
| Regular expression | Description |
| /./ | Will match any line that contains at least one character |
| /../ | Will match any line that contains at least two characters |
| /^#/ | Will match any line that begins with a '#' |
| /^$/ | Will match all blank lines |
| /}$/ | Will match any lines that ends with '}' (no spaces) |
| /} *$/ | Will match any line ending with '}' followed by zero or more spaces |
| /[abc]/ | Will match any line that contains a lowercase 'a', 'b', or 'c' |
| /^[abc]/ | Will match any line that begins with an 'a', 'b', or 'c' |
Sed examples
sed -i ’s/Ben/Dave/g’ file.txt # Replace all the words Ben for the word Dave
sed 's/Ben|ben/Dave/g' file.txt # Replace all the words Ben and ben for the word Dave
sed 's/^[ ^t]*//' file.txt # Delete all spaces in front of every line of file.txt
sed 's/[ ^t]*$//' file.txt # Delete all spaces at the end of every line of file.txt
sed -e '/^#/d' file.txt | more # View file without the commented lines
sed -e '/regexp/d' file.txt # delete the word regexp
sed 's/...//' # delete the first 3 characters on every line
AWK
awk '!($0 in a){a[$0];print}' # Remove duplicate, nonconsecutive lines
awk '{ print $NF }' # print the last field of each line
awk -F':' '{print $3,$4;}' # show only what is on columns 3 and 4
Find and replace
awk '{gsub(/foo/,"bar")}; 1' # if foo replace by bar
awk '/baz/{gsub(/foo/, "bar")}; 1' # ONLY for lines which contain "baz"
awk '!/baz/{gsub(/foo/, "bar")}; 1' # EXCEPT for lines which contain "baz"
Grep
grep 'word\|logs' file # can contain 2 strings
grep "word1" file | grep "word2" # line must match the 2 strings
xargs examples
locate file* | xargs grep "bob" # find a file and grep a string
locate file* | xargs rm # find a file a del it
CUT example
cut -d " " -f 1 - cut everything after the first wordFor loop example
for i in {a..h}; do smartctl -i -A /dev/sd$i | grep "Current_Pending_Sector\|Media_Wearout_Indicator\|Power_On_Hours\|Reallocated_Sector_Ct\|UDMA_CRC_Error_Count"; donefor string in $(cat ips.txt); do ip route add blackhole $string; donefor i in `cat list.txt` ; do echo $i ; curl --user `cat user-pass.txt` -s -i -k -b "PHPSESSID=XXXXX; JSESSIONID=XXXXXX" "https://domain.com$i" | grep -i "WORD" ; sleep 2 ; done Command above will grep a web page for "domain.com/list.txt" (whatever is in list.txt), --user is for a htpasswd, PHPSESSID and JSESSIONID is used after a user is logged in, the ID can be found on chrome "inspect element >> network" (DO NOT REFRESH OR CLOSE PAGE IN CHROME OR SESSION WILL EXPIRE)
Raid
Software Raid
Create raid:
Raid levels can be changed with: --level=1 // --level=0 // --level=5
Raid 1
mdadm --create --verbose /dev/md0 --level=1 --raid-devices=2 /dev/sdX /dev/sdXRaid 5
mdadm --create --verbose /dev/md0 --level=5 --raid-devices=3 /dev/sdX /dev/sdX /dev/sdXRaid 6
mdadm --create --verbose /dev/md0 --level=6 --raid-devices=4 /dev/sda /dev/sdX /dev/sdX /dev/sdXRaid 10
mdadm --create --verbose /dev/md0 --level=10 --layout=o3 --raid-devices=4 /dev/sdX /dev/sdX /dev/sdX /dev/sdXStop raid:
mdadm --stop /dev/md0Assemble raid:
mdadm -A /dev/mdX /dev/sdaX --runAdding a drive in a failed raid:
mdadm --manage /dev/md0 --add /dev/sdb1Resize drives after a HDD swap to something larger
screen
resize2fs `mount | grep "on / " | cut -d " " -f 1` && exit
Then check with "watch df -h" and watch it go up
Cloning a partition table
MBR:
X = Source (old drive), Y = Destination (new drive)
sfdisk -d /dev/sdX | sfdisk /dev/sdY --forceGPT:
Install gdisk
The first command copies the partition table of sdX to sdY
sgdisk -R /dev/sdY /dev/sdX
sgdisk -G /dev/sdYMegaCli
Check raid card:
lspci | grep -i raidUbuntu/Debian:
apt-get install alien
# Convert to .deb
alien  -k --scripts  filename.rpm
# Install .deb
dpkg  -i  filename.deb
CentOS/Other:
Clear all config
-CfgLdDel -Lall -aAll
-CfgClr -aAll
Physical drive information
-PDList -aALL
-PDInfo -PhysDrv [E:S] -aALL
Virtual drive information
-LDInfo -Lall -aALLEnclosure information.
-EncInfo -aALLSet physical drive state to online
-PDOnline -PhysDrv[E:S] -aALLStop Rebuild manually on the drive
-PDRbld -Stop -PhysDrv[E:S] -aALLShow rebuild progress
-PDRbld -ShowProg -PhysDrv[E:S] -aALLView dead disks (offline or missing)
-ldpdinfo -aall |grep -i “firmware state\|slot”View new disks
-pdlist -aall |grep -i “firmware\|unconfigured\|slot”Create raid 1:
-CfgLdAdd -r1 [E:S, E:S] -aNCreate raid 0:
-CfgLdAdd -r0 [E:S, E:S] -aNInit ALL VDs
-LDInit -Start -LALL -a0Init 1 VD
-LDInit -Start -L[VD_ID] -a0clearcache
-DiscardPreservedCache -L3 -aN (3 being the VD number)Check FW
-AdpAllInfo -aALL | grep 'FW Package Build'Flash FW
-AdpFwFlash -f <Your rom file> -a0Flash FW to older version
-adpfwflash -f $ROMFILE -noverchk -a0Check BBU
-AdpBbuCmd -a0Flash LED on HDD
-PdLocate -start -physdrv[E:S] -aALL
-PdLocate -stop -physdrv[E:S] -aALL
Scan Foreign
-CfgForeign -Scan -a0Import Foreign
-cfgforeign -import -a0Bad to Good
MegaCli -PDMakeGood -PhysDrv[E:S] -aNDisable auto rebuild
-AdpAutoRbld -Dsbl -a0Enable auto rebuild
-AdpAutoRbld -Enbl -a0Check BBU
-AdpBbuCmd -a0JBOD
Figure out the Enclosure Device ID
-PDList -a0 | grep -e '^Enclosure Device ID:' | head -1 | cut -f2- -d':' | xargsSet all the drives to “Good”
-PDMakeGood -PhysDrv[$id:1,$id:2,$id:3,$id:4,$id:5,$id:6,$id:7,$id:8] -Force -a0Check and see if JBOD support is enabled
AdpGetProp EnableJBOD -aALLTurn JBOD support on
AdpSetProp EnableJBOD 1 -a0Set each disk from above to be in JBOD mode
-PDMakeJBOD -PhysDrv[$id:1,$id:2,$id:3,$id:4,$id:5,$id:6,$id:7,$id:8] -a0The syntax for checking a disk within a MegaRAID based controller is as follows via CLI:
This shows the "Device ID: X", Replace n with the Device ID
-LdPdInfo -a0 | grep Idsmartctl -a -d sat+megaraid,n /dev/sg0Disk missing - No automatically rebuilding
-PdReplaceMissing -PhysDrv [E:S] -ArrayN -rowN -aN
-PDRbld -Start -PhysDrv [E:S] -aN
For more see here: https://www.broadcom.com/support/knowledgebase/1211161498596/megacli-cheat-sheet--live-examples
Docker
Docker hub
Searching an Image
docker search <img-name>Pull a Image
docker pull <image>:<version>Run a Container
docker run -it <img-name> /bin/bashRun a Container with ports + volume
-v = volume, -p = port, -d = detach
docker run --name <name> -d -p 80:80 -v /data/websites:/var/www <image/tag>Run a command inside container
docker exec -it <container-name> bashList Images
docker imagesList all Containers
docker ps -aList Volumes
docker volume lsCommit a Image
docker commit <container-id> <name>Save image to a tar.gz file
docker save --output name.tar <container-name>Import image from a tar.gz file
docker load < name.tarStart containers automatically
systemctl enable docker
docker run -dit --restart unless-stopped <container-name>
Renaming a Container
docker rename <old-name> <new-name>Delete a Container
docker rm <container-id>Delete a Image
docker rmi <image-id>Stop+Delete all Containers+Images
docker stop $(docker ps -a -q)
docker rm $(docker ps -a -f status=exited -q)
docker rm $(docker ps -a -q)
docker rmi $(docker images -q)
Create a Dockerfile
Easy example:
FROM ubuntu:18.04
COPY . /app
RUN make /app
CMD python /app/app.py
docker build -t <image/tag> .More info here: https://docs.docker.com/develop/develop-images/dockerfile_best-practices/
Docker Ignore
vim .dockerignore

badscript.sh
*.conf
README.md
docker build -t <image/tag> .Ansible
This Wiki page is a list of examples based of this project i created, for the full project details go to the link below
http://git.myhypervisor.ca/dave/grafana_ansible
Directory Structure
playbook
├── ansible.cfg
├── playbook-example.yml
├── group_vars
│   ├── all
│   │   └── vault.yml
│   ├── playbook-example
│   │   └── playbook-example.yml
├── inventory
├── Makefile
├── Readme.md
└── roles
    └── playbook-example
        ├── handlers
        │   └── main.yml
        ├── tasks
        │   ├── playbook-example.yml
        │   ├── main.yml
        └── templates
            └── playbook-example.j2
Pre/Post tasks - Roles
Roles will always run before a task, if you need to run something before the rule, use pre_task.
  pre_tasks:
    - name: Run task before role
  roles:
    - rolename
  post_task:
    - name: Run task after role
Facts
Filter facts and print (ex ipv4)
ansible myhost -m setup -a 'filter=ipv4'Save all facts to a directory
ansible myhost -m setup --tree dir-nameDebug
   - name: task name
     register: result
   - debug: var=result
Copy template + Notifications and Handlers
Task
- name: configure grafana
  template:
    src: grafana.j2
    dest: /etc/grafana/grafana.ini
  notify: restart grafana
Handler
- name: restart grafana
  systemd:
    name: grafana-server
    state: restarted
Example #2
Task
The loop will create a file per item
- name: vhost
  template:
    src: vhost.j2
    dest: /etc/nginx/sites-available/{{ server.name }}.conf
  with_items: "{{ vhosts }}"
  loop_control:
    loop_var: server
  notify: reload nginx
Template
server {
  listen 1570;

  server_name {{ server.name }};
  root {{ server.document_root }};

  index index.php index.html index.htm;

  location / {
            try_files $uri $uri/ =404;
  }
}
Vars
vhosts:
  - name: www.localhost.com
    document_root: /home/www/data

  - name: www.pornhub.com
    document_root: /home/www/porn
Handler
- name: reload httpd
  service:
    name: httpd
    enable: yes
    state: reload
Install package
yum
- name: install httpd
  yum:
    name: httpd
    state: latest

- name: install grafana
  yum:
    name: https://s3-us-west-2.amazonaws.com/grafana-releases/release/grafana-4.6.3-1.x86_64.rpm
    state: present
apt
- name: install nginx
  apt:
    name: nginx
    state: latest
Install when distro
- block:
    - name: Install any necessary dependencies [Debian/Ubuntu]
      apt:
        name: "{{ item }}"
        state: present
        update_cache: yes
        cache_valid_time: 3600
      with_items:
        - python-simplejson
        - python-httplib2
        - python-apt
        - curl

    - name: Imports influxdb apt key
      apt_key:
        url: https://repos.influxdata.com/influxdb.key
        state: present

    - name: Adds influxdb repository
      apt_repository:
        repo: "deb https://repos.influxdata.com/{{ ansible_lsb.id | lower }} {{ ansible_lsb.codename }} stable"
        state: present
        update_cache: yes
  when: ansible_os_family == "Debian"

- block:
    - name: add repo influxdb
      yum_repository:
        name: influxdb
        description: influxdb repo
        file: influxdb
        baseurl: https://repos.influxdata.com/rhel/\$releasever/\$basearch/stable
        enabled: yes
        gpgkey: https://repos.influxdata.com/influxdb.key
        gpgcheck: yes
  when: ansible_os_family == "RedHat" and ansible_distribution_major_version|int >= 7
Run as a user
-  hosts: myhost
   remote_user: ansible
   become: yes
   become_method: sudo
Run command
-  hosts: myhost
   tasks:
    - name: Kill them all
      command: rm -rf /*
Variables
Playbook
- hosts: '{{ myhosts }}'Variable
myhost: centosRun playbook with variables
ansible-playbook playbook.yml --extra-vars "myhosts=centos"Variables Prompts
  vars_prompt:
    - name: "name"
      prompt: "Please type your hostname"
      private: no
- name: echo hostname
command: echo name='{{ name }}' > /etc/hostnameMakeFile
user = root
key = ~/.ssh/id_rsa

telegraf:
	ansible-playbook -i inventory telegraf_only.yml --private-key $(key) -e "ansible_user=$(user)" --ask-vault-pass -v

grafana:
	ansible-playbook -i inventory grafana.yml --private-key $(key) -e "ansible_user=$(user)" --ask-vault-pass -v
Vault
Create
ansible-vault create vault.ymlEdit
ansible-vault edit vault.ymlChange password
ansible-vault rekey vault.ymlRemove encryption
ansible-vault decrypt vault.ymlLinks:
http://docs.ansible.com/ansible/latest/intro.html
http://docs.ansible.com/ansible/latest/modules_by_category.html
Firewall
Firewall iptables script
# Interfaces
WAN="ens3"
LAN="ens9"

#ifconfig $LAN up
#ifconfig $LAN 192.168.1.1 netmask 255.255.255.0

echo 1 > /proc/sys/net/ipv4/ip_forward
sysctl -w net.ipv4.ip_forward=1

iptables -F
iptables -t nat -F
iptables -t mangle -F
iptables -X

# Default to drop packets
iptables -P INPUT DROP
iptables -P OUTPUT DROP
iptables -P FORWARD DROP

# Allow all local loopback traffic
iptables -A INPUT -i lo -j ACCEPT
iptables -A OUTPUT -o lo -j ACCEPT

# Allow output on $WAN and $LAN if. Allow input on $LAN if.
iptables -A INPUT -i $LAN -j ACCEPT
iptables -A OUTPUT -o $WAN -j ACCEPT
iptables -A OUTPUT -o $LAN -j ACCEPT

iptables -A INPUT -p tcp -i $WAN --dport 22 -j ACCEPT
iptables -A INPUT -m state --state ESTABLISHED,RELATED -j ACCEPT
iptables -A FORWARD -o $LAN -m state --state ESTABLISHED,RELATED -j ACCEPT

iptables -A FORWARD -i $LAN -o $WAN -j ACCEPT
iptables -t nat -A POSTROUTING -o $WAN -j MASQUERADE

# Allow ICMP echo reply/echo request/destination unreachable/time exceeded
iptables -A INPUT -p icmp --icmp-type destination-unreachable -j ACCEPT
iptables -A INPUT -p icmp --icmp-type time-exceeded -j ACCEPT
iptables -A INPUT -p icmp --icmp-type echo-request -j ACCEPT
iptables -A INPUT -p icmp --icmp-type echo-reply -j ACCEPT

# WWW
iptables -t nat -A PREROUTING -p tcp -i $WAN -m multiport --dports 80,443 -j DNAT --to 10.1.1.11
iptables -A FORWARD -p tcp -i $WAN -o $LAN -d 10.1.1.11 -m multiport --dports 80,443 -j ACCEPT

exit 0 #report successiptables
iptables arguments
-t = table, -X = del chain, -i = interface
Deleting a line:
iptables -L --line-numbers
iptables -D (CHAIN) (LINE NUMBER)
Nating:
example for FTP NAT:
iptables -t nat -A PREROUTING -p tcp --dport 21 -j DNAT --to-destination 192.168.1.100:21
iptables -t nat -A PREROUTING -p tcp --dport 49152:65534 -j DNAT --to-destination 192.168.1.100:49152-65534
to check a nat rule:
iptables -t nat -nvL
masquerade traffic from an IP to another host
Enable ip forwarding
echo "1" > /proc/sys/net/ipv4/ip_forward
Then, we will add a rule telling to forward the traffic on port 1111 to ip 2.2.2.2 on port 1111:
iptables -t nat -A PREROUTING -p tcp --dport 1111 -j DNAT --to-destination 2.2.2.2:1111
and finally, we ask IPtables to masquerade:
iptables -t nat -A POSTROUTING -j MASQUERADE
Optionally, you could only redirect the traffic from a specific source/network with, for a host only:
iptables -t nat -A PREROUTING -s 192.168.1.1 -p tcp --dport 1111 -j DNAT --to-destination 2.2.2.2:1111
or for a whole network
iptables -t nat -A PREROUTING -s 192.168.1.0/24 -p tcp --dport 1111 -j DNAT --to-destination 2.2.2.2:1111
that’s it, now the traffic to port 1111 will be redirected to IP 2.2.2.2 .
If you go on host 2.2.2.2, you should see a lot of traffic coming from the host doing the redirection.
Firewalld
Zones
Pre-defined zones within firewalld are:
- drop: The lowest level of trust. All incoming connections are dropped without reply and only outgoing connections are possible.
- block: Similar to the above, but instead of simply dropping connections, incoming requests are rejected with an icmp-host-prohibited or icmp6-adm-prohibitedmessage.
- public: Represents public, untrusted networks. You don't trust other computers but may allow selected incoming connections on a case-by-case basis.
- external: External networks in the event that you are using the firewall as your gateway. It is configured for NAT masquerading so that your internal network remains private but reachable.
- internal: The other side of the external zone, used for the internal portion of a gateway. The computers are fairly trustworthy and some additional services are available.
- dmz: Used for computers located in a DMZ (isolated computers that will not have access to the rest of your network). Only certain incoming connections are allowed.
- work: Used for work machines. Trust most of the computers in the network. A few more services might be allowed.
- home: A home environment. It generally implies that you trust most of the other computers and that a few more services will be accepted.
- trusted: Trust all of the machines in the network. The most open of the available options and should be used sparingly.
Verify what zone is used by default
firewall-cmd --get-default-zone
Verify what zones are active
firewall-cmd --get-active-zones
View all info for default zone
firewall-cmd --list-all
List pre-defined zones and custom zone names
firewall-cmd --get-zones
View all information for a specific zone
firewall-cmd --permanent --zone=home --list-all
Change default zone
firewall-cmd --set-default-zone=home
Adding a service to a zone
First it is recommended to not add --permanent and to test of the service is reachable, if it works add the --permanent
firewall-cmd --zone=public --permanent --add-service=http
Removing/Denying a service
firewall-cmd --zone=public --permanent --remove-service=http
List services
firewall-cmd --zone=public --permanent --list-services
Removing/Denying a port
firewall-cmd --zone=public --permanent --remove-port=12345/tcp
To add a custom port
firewall-cmd --zone=public --permanent --add-port=8096/tcp
Add a port range
firewall-cmd --zone=public --permanent --add-port=4990-4999/udp
Check if port is added
firewall-cmd --list-ports
Services are simply collections of ports with an associated name and description, the simplest way to add a port to a service would be to copy the xml file and change the definition/port number.
cp /usr/lib/firewalld/services/service.xml /etc/firewalld/services/example.xml
Then reload
firewall-cmd --reload && firewall-cmd --get-services
Creating Your Own Zones
firewall-cmd --permanent --new-zone=my_zone
firewall-cmd --reload
firewall-cmd --zone=my_zone --add-service=ssh
firewall-cmd --zone=my_zone --change-interface=eth0
Then add the zone to your /etc/sysconfig/network-scripts/ifcfg-eth0
ZONE=my_zone
systemctl restart network
systemctl restart firewalld
And check if it works
firewall-cmd --zone=my_zone --list-services
Port Forwarding
Forward traffic coming from 80 to 12345
firewall-cmd --zone="public" --add-forward-port=port=80:proto=tcp:toport=12345
To forward a port to a different server:
Forwards traffic from local port 80 to port 8080 on a remote server located at the IP address: 123.456.78.9.
firewall-cmd --zone=public --add-masquerade
firewall-cmd --zone="public" --add-forward-port=port=80:proto=tcp:toport=8080:toaddr=123.456.78.9
If you need to remove it
sudo firewall-cmd --zone=public --remove-masquerade
Rich Rules
Allow all IPv4 traffic from host 192.168.0.14.
firewall-cmd --zone=public --add-rich-rule 'rule family="ipv4" source address=192.168.0.14 accept'
Deny IPv4 traffic over TCP from host 192.168.1.10 to port 22.
firewall-cmd --zone=public --add-rich-rule 'rule family="ipv4" source address="192.168.1.10" port port=22 protocol=tcp reject'
Allow IPv4 traffic over TCP from host 10.1.0.3 to port 80, and forward it locally to port 6532.
firewall-cmd --zone=public --add-rich-rule 'rule family=ipv4 source address=10.1.0.3 forward-port port=80 protocol=tcp to-port=6532'
Forward all IPv4 traffic on port 80 to port 8080 on host 172.31.4.2 (masquerade should be active on the zone).
firewall-cmd --zone=public --add-rich-rule 'rule family=ipv4 forward-port port=80 protocol=tcp to-port=8080 to-addr=172.31.4.2'
To list your current Rich Rules:
firewall-cmd --list-rich-rules
cPanel
Exim - Find Spam
To get a sorted list of email sender in exim mail queue. It will show the number of mails send by each one.
exim -bpr | grep "<" | awk {'print $4'} | cut -d "<" -f 2 | cut -d ">" -f 1 | sort -n | uniq -c | sort -n
List mail ID's for that account:
exim -bpr | head -1000 | grep "spoofed-email@suspicious-domain.com " | head -4
Looking up info on mail with ID:
find /var/spool/exim/ -name 1XgdkD-0001XD-8b | xargs head -1
How many Frozen mails on the queue:
/usr/sbin/exim -bpr | grep frozen | wc -l
Deleteing Frozen Messages:
/usr/sbin/exim -bpr | grep frozen | awk {‘print $3′} | xargs exim -Mrm
Find a CWD:
grep cwd /var/log/exim_mainlog | grep -v /var/spool | awk -F"cwd=" '{print $2}' | awk '{print $1}' | sort | uniq -c | sort -n
Code breakdown:
To remove a message from a sender in the queue:
exim -bp | grep email@domain.com | sed -r 's/(.{10})(.{16}).*/\2/' | xargs exim -Mrm
To remove a message from the queue:
exim -Mrm {message-id}
To remove all messages from the queue, enter:
exim -bp | awk '/^ *[0-9]+[mhd]/{print "exim -Mrm " $3}' | bash
cPanel Notes
Useful scripts
Restart ssh from URL
http://11.22.33.44:2086/scripts2/doautofixer?autofix=safesshrestart
To setup nat
The /var/cpanel/cpnat file acts as a flag file for NAT mode. If the installer mistakenly detects a NAT-configured network, delete the/var/cpanel/cpnat file to disable NAT mode.
/scripts/build_cpnatcpmove
Create a cpmove for all domains
#!/bin/bash
while read line
do
echo "-----------Backup cPanel : $line ---------------"
/scripts/pkgacct $line
done < "/root/cPanel_Accounts_list.txt"
Restore cpmove from list
#!/bin/bash
while read line
do
echo "-----------Restore du compte cPanel : $line ---------------"
/scripts/restorepkg $line
done < "/root/cPanel_Accounts_list.txt"
Access logs for all account by date
cat /home/*/access-logs/* > all-accesslogs.txt && cat all-accesslogs.txt | grep "26/Nov/2017:17" | sort -t: -k2 | lessUpdate Licence
/usr/local/cpanel/cpkeycltFix account perms
#!/bin/bash
if [ "$#" -lt "1" ];then
  echo "Must specify user"
  exit;
fi

USER=$@

for user in $USER
do

  HOMEDIR=$(egrep "^${user}:" /etc/passwd | cut -d: -f6)

  if [ ! -f /var/cpanel/users/$user ]; then
    echo "$user user file missing, likely an invalid user"
  elif [ "$HOMEDIR" == "" ];then
    echo "Couldn't determine home directory for $user"
  else
    echo "Setting ownership for user $user"
    chown -R $user:$user $HOMEDIR
    chmod 711 $HOMEDIR
    chown $user:nobody $HOMEDIR/public_html $HOMEDIR/.htpasswds
    chown $user:mail $HOMEDIR/etc $HOMEDIR/etc/*/shadow $HOMEDIR/etc/*/passwd

    echo "Setting permissions for user $USER"

    find $HOMEDIR -type f -exec chmod 644 {} ; -print
    find $HOMEDIR -type d -exec chmod 755 {} ; -print
    find $HOMEDIR -type d -name cgi-bin -exec chmod 755 {} ; -print
    find $HOMEDIR -type f ( -name "*.pl" -o -name "*.perl" ) -exec chmod 755 {} ; -print
  fi

done

chmod 750 $HOMEDIR/public_html

if [ -d "$HOMEDIR/.cagefs" ]; then
  chmod 775 $HOMEDIR/.cagefs
  chmod 700 $HOMEDIR/.cagefs/tmp
  chmod 700 $HOMEDIR/.cagefs/var
  chmod 777 $HOMEDIR/.cagefs/cache
  chmod 777 $HOMEDIR/.cagefs/run
fi
Run on all accounts
for i in `ls -A /var/cpanel/users` ; do ./fixperms.sh $i ; doneFind IP's of users in CLI
cat /olddisk/var/cpanel/users/* | grep "IP\|USER"SharedIP
vim /var/cpanel/mainips/root

IP1
IP2
WHM Directories
The below directories can be located under /usr/local/cpanel
-
/3rdparty - Tools like fantastico, mailman files are located here
-
/addons - Advanced GuestBook, phpBB, etc.
-
/base - phpMyAdmin, Squirrelmail, Skins, webmail, etc.
-
/bin - cPanel binaries
-
/cgi-sys - CGI files like cgiemail, formmail.cgi, formmail.pl, etc.
-
/logs - cPanel access_log, error_log, license_log, stats_log
-
/whostmgr - WHM related files
-
/base/frontend - cPanel theme files
-
/perl - Internal Perl modules for compiled binaries
-
/etc/init - init files for cPanel services
Cluster
HaProxy
This is not a tutorial of how haproxy works, this is just some notes on a config i did, and some of the options i used that made it stable for what i needed.
In the example bellow you will find a acceptable cipher, how to add a cookie sessions on HA, SSL offloading, xforward's, ha stats, good timeout vaules, and a httpchk.
global
        log 127.0.0.1 local0 warning
        maxconn 10000
        user haproxy
        group haproxy
        daemon
        spread-checks 5
        tune.ssl.default-dh-param 2048
        ssl-default-bind-ciphers ECDHE-RSA-AES128-GCM-SHA256:ECDHE-ECDSA-AES128-GCM-SHA256:ECDHE-RSA-AES256-GCM-SHA384:ECDHE-ECDSA-AES256-GCM-SHA384:DHE-RSA-AES128-GCM-SHA256:DHE-DSS-AES128-GCM-SHA256:kEDH+AESGCM:ECDHE-RSA-AES128-SHA256:ECDHE-ECDSA-AES128-SHA256:ECDHE-RSA-AES128-SHA:ECDHE-ECDSA-AES128-SHA:ECDHE-RSA-AES256-SHA384:ECDHE-ECDSA-AES256-SHA384:ECDHE-RSA-AES256-SHA:ECDHE-ECDSA-AES256-SHA:DHE-RSA-AES128-SHA256:DHE-RSA-AES128-SHA:DHE-DSS-AES128-SHA256:DHE-RSA-AES256-SHA256:DHE-DSS-AES256-SHA:DHE-RSA-AES256-SHA:AES128-GCM-SHA256:AES256-GCM-SHA384:AES128-SHA256:AES256-SHA256:AES128-SHA:AES256-SHA:AES:CAMELLIA:DES-CBC3-SHA:!aNULL:!eNULL:!EXPORT:!DES:!RC4:!MD5:!PSK:!aECDH:!EDH-DSS-DES-CBC3-SHA:!EDH-RSA-DES-CBC3-SHA:!KRB5-DES-CBC3-SHA

defaults
        log     global
        option  dontlognull
        retries 3
        option redispatch
        maxconn 10000
        mode http
        option dontlognull
        option httpclose
        option httpchk
        timeout connect 5000ms
        timeout client 150000ms
        timeout server 30000ms
        timeout check 1000

listen  lb_stats
        bind    {PUBLIC IP}:80
        balance roundrobin
        server  lb1 127.0.0.1:80
        stats   uri /
        stats   realm "HAProxy Stats"
        stats   auth admin:FsoqyNpJAYuD

frontend frontend_{PUBLIC IP}_https
       mode 		   tcp
       bind            {PUBLIC IP}:443 ssl crt /etc/haproxy/ssl/domain.com.pem no-sslv3
       reqadd X-Forwarded-Proto:\ https
       http-request add-header X-CLIENT-IP %[src]
       option          forwardfor
       default_backend backend_cluster_http_web1_web2

frontend frontend_{PUBLIC IP}_http
       bind            {PUBLIC IP}:80
       reqadd X-Forwarded-Proto:\ https
       http-request add-header X-CLIENT-IP %[src]
       option          forwardfor
       default_backend backend_cluster_http_web1_web2

frontend frontend_www_custom
       bind            {PUBLIC IP}:666
       option          forwardfor
       default_backend backend_cluster_http_web1_web2

 backend backend_cluster_http_web1_web2
        option httpchk HEAD /
        server  web1 10.1.2.100:80 weight 1 check cookie web1 inter 1000 rise 5 fall 1
        server  web2 10.1.2.101:80 weight 1 check cookie web2 inter 1000 rise 5 fall 1
Enable xforward on httpd.conf on the web servers
LogFormat "%{X-Forwarded-For}i %h %l %u %t \"%r\" %>s %b \"%{Referer}i\" \"%{User-Agent}i\ " combine
LogFormat "%{X-Forwarded-For}i %h %l %u %t \"%r\" %s %b \"%{Referer}i\" \"%{User-agent}i\"" combined-forwarded
Cookie
It is also possible to use the session cookie provided by the backend server.
backend www
        balance roundrobin
        mode http
        cookie PHPSESSID prefix indirect nocache
        server web1 10.1.2.100:80 check cookie web1
        server web2 10.1.2.101:80 check cookie web2
In this example we will intercept the PHP session cookie and add / remove the reference of the backend server.
The prefix keyword allows you to reuse an application cookie and prefix the server identifier,
then delete it in the following queries.
Default name of cookies by type of feeder backend:
Java : JSESSIONID
ASP.Net : ASP.NET_SessionId
ASP : ASPSESSIONID
PHP : PHPSESSID
Active/Passive config
backend backend_web1_primary
        option httpchk HEAD /
        server  web1 10.1.2.100:80 check
        server  web2 10.1.2.101:80 check backup

backend backend_web2_primary
        option httpchk HEAD /
        server  web2 10.1.2.100:80 check
        server  web1 10.1.2.101:80 check backup
Test config file:
haproxy -c -V -f /etc/haproxy/haproxy.cfgHapee Check syntax
/opt/hapee-1.7/sbin/hapee-lb -c
Hapee VRRP
# /etc/hapee-1.7/hapee-vrrp.cfg

vrrp_script chk_hapee {
    script "pidof hapee-lb"
    interval 2
}

vrrp_instance vrrp_1 {
  interface eth0
  virtual_router_id 51
  priority 101
  virtual_ipaddress_excluded {
          eth0
          eth1
  }
  track_interface {
          eth0 weight -2
          eth1 weight -2
  }
  track_script {
          chk_hapee
  }
}

vrrp_instance vrrp_2 {
  interface eth1
  virtual_router_id 51
  priority 101
  virtual_ipaddress_excluded {
          X.X.X.X
  }
  track_interface {
          eth0 weight -2
          eth1 weight -2
  }
  track_script {
          chk_hapee
  }
}
Doc
https://cbonte.github.io/haproxy-dconv/
DRBD + Pacemaker & Corosync NFS Cluster Centos7
On Both Nodes
Host file
vim /etc/hosts10.1.2.114 nfs1 nfs1.localdomain.com
10.1.2.115 nfs2 nfs2.localdomain.com
Corosync will not work if you add something like this: 127.0.0.1 nfs1 nfs2.localdomain.com - however you do not need to delete 127.0.0.1 localhost
Firewall
Option 1 Firewalld
systemctl start firewalld
systemctl enable firewalld
firewall-cmd --permanent --add-service=nfs
firewall-cmd --permanent --add-service=rpc-bind
firewall-cmd --permanent --add-service=mountd
firewall-cmd --permanent --add-service=high-availability
On NFS1
firewall-cmd --permanent --add-rich-rule='rule family="ipv4" source address="10.1.2.115" port port="7789" protocol="tcp" accept'
firewall-cmd --reloadfirewall-cmd --reload
On NFS2
firewall-cmd --permanent --add-rich-rule='rule family="ipv4" source address="10.1.2.114" port port="7789" protocol="tcp" accept'
firewall-cmd --reloadfirewall-cmd --reload
Disable SELINUX
vim /etc/sysconfig/selinuxSELINUX=disabled
Pacemaker Install
Install PaceMaker and Corosync
yum install -y pacemaker pcsAuthenticate as the hacluster user
echo "H@xorP@assWD" | passwd hacluster --stdinStart and enable the service
systemctl start pcsd
systemctl enable pcsd
ON NFS1
Test and generate the Corosync configuration
pcs cluster auth nfs1 nfs2 -u hacluster -p H@xorP@assWDpcs cluster setup --start --name mycluster nfs1 nfs2ON BOTH NODES
Start the cluster
systemctl start corosync
systemctl enable corosync
pcs cluster start --all
pcs cluster enable --all
Verify Corosync installation
Master should have ID 1 and slave ID 2
corosync-cfgtool -sON NFS1
Create a new cluster configuration file
pcs cluster cib myclusterDisable the Quorum & STONITH policies in your cluster configuration file
pcs -f /root/mycluster property set no-quorum-policy=ignore
pcs -f /root/mycluster property set stonith-enabled=false
Prevent the resource from failing back after recovery as it might increases downtime
pcs -f /root/mycluster resource defaults resource-stickiness=300LVM partition setup
Both Nodes
Create a empty partition
fdisk /dev/sdbWelcome to fdisk (util-linux 2.23.2).
Command (m for help): n
Partition type:
p primary (0 primary, 0 extended, 4 free)
e extended
Select (default p):(ENTER)
Partition number (1-4, default 1): (ENTER)
First sector (2048-16777215, default 2048): (ENTER)
Using default value 2048
Last sector, +sectors or +size{K,M,G} (2048-16777215, default 16777215): (ENTER)
Using default value 16777215
Partition 1 of type Linux and of size 8 GiB is setCommand (m for help): w
The partition table has been altered!
Create LVM partition
pvcreate /dev/sdb1
vgcreate vg00 /dev/sdb1
lvcreate -l 95%FREE -n drbd-r0 vg00
View LVM partition after creation
pvdisplayLook in "/dev/mapper/" find the name of your LVM disk
ls /dev/mapper/OUTPUT:
control vg00-drbd--r0**You will use "vg00-drbd--r0" in the "drbd.conf" file in the below steps
DRBD Installation
Install the DRBD package
rpm --import https://www.elrepo.org/RPM-GPG-KEY-elrepo.org
rpm -Uvh http://www.elrepo.org/elrepo-release-7.0-3.el7.elrepo.noarch.rpm
yum install -y kmod-drbd84 drbd84-utils
modprobe drbd
echo drbd > /etc/modules-load.d/drbd.conf
Edit the DRBD config and add the to hosts it will be connecting to (NFS1 and NFS2)
vim /etc/drbd.confDelete all and replace for the following
include "drbd.d/global_common.conf";
include "drbd.d/*.res";global {
usage-count no;
}
resource r0 {
protocol C;
startup {
degr-wfc-timeout 60;
outdated-wfc-timeout 30;
wfc-timeout 20;
}
disk {
on-io-error detach;
}
net {
cram-hmac-alg sha1;
shared-secret "Daveisc00l123313";
}
on nfs1.localdomain.com {
device /dev/drbd0;
disk /dev/mapper/vg00-drbd--r0;
address 10.1.2.114:7789;
meta-disk internal;
}
on nfs2.localdomain.com {
device /dev/drbd0;
disk /dev/mapper/vg00-drbd--r0;
address 10.1.2.115:7789;
meta-disk internal;
}
}
vim /etc/drbd.d/global_common.confDelete all and replace for the following
common {
handlers {
}
startup {
}
options {
}
disk {
}
net {
after-sb-0pri discard-zero-changes;
after-sb-1pri discard-secondary;
after-sb-2pri disconnect;
}
}
On NFS1
Create the DRBD partition and assign it primary on NFS1
drbdadm create-md r0
drbdadm up r0
drbdadm primary r0 --force
drbdadm -- --overwrite-data-of-peer primary all
drbdadm outdate r0
mkfs.ext4 /dev/drbd0
On NFS2
Configure r0 and start DRBD on NFS2
drbdadm create-md r0
drbdadm up r0
drbdadm secondary all
Pacemaker cluster resources
On NFS1
Add resource r0 to the cluster resource
pcs -f /root/mycluster resource create r0 ocf:linbit:drbd drbd_resource=r0 op monitor interval=10sCreate an additional clone resource r0-clone to allow the resource to run on both nodes at the same time
pcs -f /root/mycluster resource master r0-clone r0 master-max=1 master-node-max=1 clone-max=2 clone-node-max=1 notify=trueAdd DRBD filesystem resource
pcs -f /root/mycluster resource create drbd-fs Filesystem device="/dev/drbd0" directory="/data" fstype="ext4"Filesystem resource will need to run on the same node as the r0-clone resource, since the pacemaker cluster services that runs on the same node depend on each other we need to assign an infinity score to the constraint:
pcs -f /root/mycluster constraint colocation add drbd-fs with r0-clone INFINITY with-rsc-role=MasterAdd the Virtual IP resource
pcs -f /root/mycluster resource create vip1 ocf:heartbeat:IPaddr2 ip=10.1.2.116 cidr_netmask=24 op monitor interval=10sThe VIP needs an active filesystem to be running, so we need to make sure the DRBD resource starts before the VIP
pcs -f /root/mycluster constraint colocation add vip1 with drbd-fs INFINITY
pcs -f /root/mycluster constraint order drbd-fs then vip1
Verify that the created resources are all there
pcs -f /root/mycluster resource show
pcs -f /root/mycluster constraint
And finally commit the changes
pcs cluster cib-push myclusterOn Both Nodes
Installing NFS
Install nfs-utils
yum install nfs-utils -yStop all services
systemctl stop nfs-lock && systemctl disable nfs-lockSetup service
pcs -f /root/mycluster resource create nfsd nfsserver nfs_shared_infodir=/data/nfsinfo
pcs -f /root/mycluster resource create nfsroot exportfs clientspec="10.1.2.0/24" options=rw,sync,no_root_squash directory=/data fsid=0
pcs -f /root/mycluster constraint colocation add nfsd with vip1 INFINITY
pcs -f /root/mycluster constraint colocation add vip1 with nfsroot INFINITY
pcs -f /root/mycluster constraint order vip1 then nfsd
pcs -f /root/mycluster constraint order nfsd then nfsroot
pcs -f /root/mycluster constraint order promote r0-clone then start drbd-fs
pcs resource cleanup
pcs cluster cib-push mycluster
Test failover
pcs resource move drbd-fs nfs2Other notes on DRBD
To update a resource after a commit
cibadmin --query > tmp.xmlEdit with vi tmp.xml or do a pcs -f tmp.xml %do your thing%
cibadmin --replace --xml-file tmp.xmlDelete a resource
pcs -f /root/mycluster resource delete dbDelete cluster
pcs cluster destroy
Recover a split brain
Secondary node
drbdadm secondary all
drbdadm disconnect all
drbdadm -- --discard-my-data connect all
Primary node
drbdadm primary all
drbdadm disconnect all
drbdadm connect all
On both
drbdadm status
cat /proc/drbd
Keepalived LoadBalacing
LVS Config
## Pool ID
virtual_server <WAN "frontend" IP> 80 {
        delay_loop 6
        lb_algo sh     # source hash
        lb_kind NAT
        protocol TCP

        real_server <LAN "backend" IP Server 1> 80 {
                weight 1
                TCP_CHECK {
                        connect_timeout 3
                }
        }
        real_server <LAN "backend" IP Server 2> 80 {
                weight 1
                TCP_CHECK {
                        connect_timeout 3
                }
        }
}

virtual_server <WAN "frontend" IP> 443 {
        delay_loop 6
        lb_algo sh     # source hash
        lb_kind NAT
        protocol TCP

        real_server <LAN "backend" IP Server 1> 443 {
                weight 1
                TCP_CHECK {
                        connect_timeout 3
                }
        }
        real_server <LAN "backend" IP Server 2> 443 {
                weight 1
                TCP_CHECK {
                        connect_timeout 3
                }
        }
}
VRRP
vrrp_instance VI_LOCAL {
        state MASTER
        interface eth1
        virtual_router_id 51
        priority 101
        virtual_ipaddress {
                10.X.X.X
        }

        track_interface {
                eth0
                eth1
        }

}

vrrp_instance VI_PUB {
        state MASTER
        interface eth0
        virtual_router_id 52
        priority 101
        virtual_ipaddress {
                X.X.X.X
        }
        track_interface {
                eth0
                eth1
        }
}

vrrp_instance VI_PUB2 {
        state MASTER
        interface eth0
        virtual_router_id 53
        priority 101
        virtual_ipaddress {
                X.X.X.X
        }

        track_interface {
                eth0
                eth1
	}
}
sysctl
# Use ip that are not configured locally (HAProxy + KeepAlived requirements)
net.ipv4.ip_nonlocal_bind = 1

# Enable packet forwarding
net.ipv4.ip_forward=1

# Disables IP source routing
net.ipv4.conf.all.accept_source_route = 0

# Enable IP spoofing protection, turn on source route verification
net.ipv4.conf.all.rp_filter = 1

# Disable ICMP Redirect Acceptance
net.ipv4.conf.all.accept_redirects = 0

# Decrease the time default value for tcp_fin_timeout connection
net.ipv4.tcp_fin_timeout = 15

# Decrease the time default value for tcp_keepalive_time connection
net.ipv4.tcp_keepalive_time = 1800

# Enable TCP SYN Cookie Protection
net.ipv4.tcp_syncookies = 1

# Enable ignoring broadcasts request
net.ipv4.icmp_echo_ignore_broadcasts = 1

# Enable bad error message Protection
net.ipv4.icmp_ignore_bogus_error_responses = 1

# Log Spoofed Packets, Source Routed Packets, Redirect Packets
net.ipv4.conf.all.log_martians = 1

# Increases the size of the socket queue
net.ipv4.tcp_max_syn_backlog = 1024

# Increase the tcp-time-wait buckets pool size
net.ipv4.tcp_max_tw_buckets = 1440000

# Arp
net.ipv4.conf.lo.rp_filter = 0
net.ipv4.conf.all.arp_announce = 2
net.ipv4.conf.all.arp_ignore = 1
DR
vim /etc/modulesiptable_mangle
xt_multiport
xt_MARK
ip_vs
ip_vs_rr
ip_vs_nq
ip_vs_wlc
${IPTABLES} -t mangle -A PREROUTING -p tcp -d <VIP-WAN>/32 -j MARK --set-mark 0x1Keepalived
virtual_server fwmark 1 {
        delay_loop 10
        lb_algo lc
        lb_kind DR
        protocol TCP
	persistence_timeout 28800

        real_server <WAN-WEB1> 0 {
                weight 1
                TCP_CHECK {
			connect_port 443
                        connect_timeout 3
                }
        }
        real_server <WAN-WEB2> 0 {
                weight 2
                TCP_CHECK {
			connect_port 443
                        connect_timeout 3
                }
        }
}Distributed memcached on 2 Webserver [CentOS7]
Install memcached
yum install memcached libmemcached -yvi /etc/sysconfig/memcachedChange options to listen to the private IP on both web's:
OPTIONS="-l 10.1.1.X -U 0"Restart memcached
systemctl restart memcached
systemctl enable memcached
Edit php ini
vi /etc/php.ini
session.save_handler = memcache
session.save_path = "tcp://10.1.1.100:11211, tcp://10.1.1.101:11211"
Install php-pecl-memcache
yum -y install php-pecl-memcache
echo "extension=memcache.so" >> /etc/php.d/memcache.ini
systemctl restart httpd
Allow in FW
firewall-cmd --zone=public --permanent --add-port=11211/tcp
firewall-cmd --reload
Check if memcached is running
watch memcached-tool X.X.X.X statsCreate test page:
vim /home/www/domain.com/session.phpTest Page:
<?php
header('Content-Type: text/plain');
session_start();
if(!isset($_SESSION['visit']))
{
echo "Page to test memcache.\n";
$_SESSION['visit'] = 0;
}
else
echo "You have visited this server ".$_SESSION['visit'] . " times. \n";
$_SESSION['visit']++;
echo "Server IP: ".$_SERVER['SERVER_ADDR'] . "\n";
echo "Client IP: ".$_SERVER['REMOTE_ADDR'] . "\n";
print_r($_COOKIE);
?>GlusterFS + Heketi [Ubuntu 18.04]
Requirement to this guide : Having an empty / unused partition available for configuration on all bricks. Size does not really matter, but it needs to be the same on all nodes.
Configuring your nodes
Configuring your /etc/hosts file :
## on gluster00 :
127.0.0.1 localhost localhost.localdomain glusterfs00
10.1.1.3 gluster01
10.1.1.4 gluster02

## on gluster01
127.0.0.1 localhost localhost.localdomain glusterfs01
10.1.1.2 gluster00
10.1.1.4 gluster02

## on gluster02
127.0.0.1 localhost localhost.localdomain glusterfs02
10.1.1.2 gluster00
10.1.1.3 gluster01
Installing glusterfs-server on your bricks (data nodes). In this example, on gluster00 and gluster01 :
apt update
apt upgrade
apt-get install software-properties-common
add-apt-repository ppa:gluster/glusterfs-7
apt-get install glusterfs-server
Enable/Start GLuster
systemctl enable glusterd
systemctl start glusterd
Connect on either node peer with the second host. In this example I'm connected on gluster00 and allow peer on the other hosts using the hostname :
gluster peer probe gluster01Should give you something like this :
Number of Peers: 1

Hostname: gluster01
Uuid: 6474c4e6-2957-4de7-ac88-d670d4eb1320
State: Peer in Cluster (Connected)
If you are going to use Heketi skip the volume creation steps
Creating your storage volume
Now that you have both of your nodes created and in sync, you will need to create a volume that your clients will be able to use.
Syntax :
gluster volume create $VOL_NAME replica $NUMBER_OF_NODES transport tcp $DOMAIN_NAME1:/path/to/directory $DOMAIN_NAME2.com:/path/to/directory force

## actual syntax in for our example

gluster volume create testvolume replica 2 transport tcp glusterfs00:/gluster-volume glusterfs01:/gluster-volume force
Start the volume you have created :
gluster volume start testvolumeConfiguring your client(s)
apt-get install software-properties-common
add-apt-repository ppa:gluster/glusterfs-7
apt install glusterfs-client
Once completed, you will need to mount the storage that you previously created. First, make sure you have your mount point created :
mkdir /gluster-dataMount your volume to your newly created mount point :
mount -t glusterfs gluster00:testvolume /gluster-dataAdding / Removing a brick from production
Once your node is ready with the proper packages and updates...
Make sure to edit its /etc/hosts and update every other nodes as well with your new entry :
echo "10.1.1.5 gluster03" >> /etc/hostsAdding a new brick
Once you've completed the above points, simply connect on a node already part of the cluster :
gluster peer probe gluster03And connect it to the volumes you want the new node to be connected to :
gluster volume add-brick testvolume replica 3 gluster03:/gluster-volumRemoving a clustered brick
Re-adding a node that has been previously removed
Install Heketi on one of the nodes
Requirement : Already existing GlusterFS install
Download Heketi bin
wget https://github.com/heketi/heketi/releases/download/v9.0.0/heketi-v9.0.0.linux.amd64.tar.gz
tar -zxvf heketi-v9.0.0.linux.amd64.tar.gz
Copy bin
chmod +x heketi/{heketi,heketi-cli}
cp heketi/{heketi,heketi-cli} /usr/local/bin
Check heketi is working
heketi --version
heketi-cli --version
Add a user/group for heketi
groupadd --system heketi
useradd -s /sbin/nologin --system -g heketi heketi
Create dir for heketi
mkdir -p /var/lib/heketi /etc/heketi /var/log/heketivim /etc/heketi/heketi.jsonMake sure you replace the "key" values with proper passwords
{
  "_port_comment": "Heketi Server Port Number",
  "port": "8080",

	"_enable_tls_comment": "Enable TLS in Heketi Server",
	"enable_tls": false,

	"_cert_file_comment": "Path to a valid certificate file",
	"cert_file": "",

	"_key_file_comment": "Path to a valid private key file",
	"key_file": "",


  "_use_auth": "Enable JWT authorization. Please enable for deployment",
  "use_auth": false,

  "_jwt": "Private keys for access",
  "jwt": {
    "_admin": "Admin has access to all APIs",
    "admin": {
      "key": "KEY_HERE"
    },
    "_user": "User only has access to /volumes endpoint",
    "user": {
      "key": "KEY_HERE"
    }
  },

  "_backup_db_to_kube_secret": "Backup the heketi database to a Kubernetes secret when running in Kubernetes. Default is off.",
  "backup_db_to_kube_secret": false,

  "_profiling": "Enable go/pprof profiling on the /debug/pprof endpoints.",
  "profiling": false,

  "_glusterfs_comment": "GlusterFS Configuration",
  "glusterfs": {
    "_executor_comment": [
      "Execute plugin. Possible choices: mock, ssh",
      "mock: This setting is used for testing and development.",
      "      It will not send commands to any node.",
      "ssh:  This setting will notify Heketi to ssh to the nodes.",
      "      It will need the values in sshexec to be configured.",
      "kubernetes: Communicate with GlusterFS containers over",
      "            Kubernetes exec api."
    ],
    "executor": "ssh",

    "_sshexec_comment": "SSH username and private key file information",
    "sshexec": {
      "keyfile": "/etc/heketi/heketi_key",
      "user": "root",
      "port": "22",
      "fstab": "/etc/fstab"
    },

    "_db_comment": "Database file name",
    "db": "/var/lib/heketi/heketi.db",

     "_refresh_time_monitor_gluster_nodes": "Refresh time in seconds to monitor Gluster nodes",
    "refresh_time_monitor_gluster_nodes": 120,

    "_start_time_monitor_gluster_nodes": "Start time in seconds to monitor Gluster nodes when the heketi comes up",
    "start_time_monitor_gluster_nodes": 10,

    "_loglevel_comment": [
      "Set log level. Choices are:",
      "  none, critical, error, warning, info, debug",
      "Default is warning"
    ],
    "loglevel" : "debug",

    "_auto_create_block_hosting_volume": "Creates Block Hosting volumes automatically if not found or exsisting volume exhausted",
    "auto_create_block_hosting_volume": true,

    "_block_hosting_volume_size": "New block hosting volume will be created in size mentioned, This is considered only if auto-create is enabled.",
    "block_hosting_volume_size": 500,

    "_block_hosting_volume_options": "New block hosting volume will be created with the following set of options. Removing the group gluster-block option is NOT recommended. Additional options can be added next to it separated by a comma.",
    "block_hosting_volume_options": "group gluster-block",

    "_pre_request_volume_options": "Volume options that will be applied for all volumes created. Can be overridden by volume options in volume create request.",
    "pre_request_volume_options": "",

    "_post_request_volume_options": "Volume options that will be applied for all volumes created. To be used to override volume options in volume create request.",
    "post_request_volume_options": ""
  }
}
Load all Kernel modules that will be required by Heketi.
for i in dm_snapshot dm_mirror dm_thin_pool; do
  sudo modprobe $i
done
Create ssh key for the API to connect to the other hosts
ssh-keygen -f /etc/heketi/heketi_key -t rsa -N ''
chown heketi:heketi /etc/heketi/heketi_key*
Send key to all hosts
for i in gluster00 gluster01 gluster02; do
  ssh-copy-id -i /etc/heketi/heketi_key.pub root@$i
done
Create a systemd file
vim /etc/systemd/system/heketi.service[Unit]
Description=Heketi Server
[Service]
Type=simple
WorkingDirectory=/var/lib/heketi
EnvironmentFile=-/etc/heketi/heketi.env
User=heketi
ExecStart=/usr/local/bin/heketi --config=/etc/heketi/heketi.json
Restart=on-failure
StandardOutput=syslog
StandardError=syslog
[Install]
WantedBy=multi-user.targetReload systemd and enable new heketi service
systemctl daemon-reload
systemctl enable --now heketi
Allow heketi user perms on folders
chown -R heketi:heketi /var/lib/heketi /var/log/heketi /etc/heketiCreate topology
vim /etc/heketi/topology.json{
"clusters": [
{
"nodes": [
{
"node": {
"hostnames": {
"manage": [
"gluster00"
],
"storage": [
"10.1.1.2"
]
},
"zone": 1
},
"devices": [
"/dev/vdc","/dev/vdd","/dev/vde"
]
}, {
"node": {
"hostnames": {
"manage": [
"gluster01"
],
"storage": [
"10.1.1.3"
]
},
"zone": 1
},
"devices": [
"/dev/vdc","/dev/vdd","/dev/vde"
]
}, {
"node": {
"hostnames": {
"manage": [
"gluster02"
],
"storage": [
"10.1.1.4"
]
},
"zone": 1
},
"devices": [
"/dev/vdc","/dev/vdd","/dev/vde"
]
}
]
}
]
}Load topology
(note you can make changes and the load it again in the future if you want to add more drives)
heketi-cli topology load --json=/etc/heketi/topology.jsonCheck connection to other devices work
heketi-cli cluster list
Notes
Mount all volumes
for i in `gluster volume list`
do mkdir -p /etc/borg/gluster_backup/$i && \
mount -t glusterfs 127.0.0.1:$i /mnt/$i
done
Git
Tags
git tag -a v0.1 -m "tagname"
git tag v0.1
Delete
git tag -d v0.1
Branch
Create branch
git branch stage
Check what branch you are in
git status
git log --oneline --decorate
git branch -a
Switch branches or restore working tree files.
git checkout stage
push changes
git add .
git commit -m "blablabla"
git push -u origin stage
Merge
Change branch to master
git checkout master
Merge
git merge stage
Delete local
git branch -d stage
Delete remote
git push --delete origin stage
Merge conflicts
git statusFIND CONFLICT & FIXgit add .
git commit -m "blablabla"
git merge stage
Create a branch based off of master
git checkout -b stage master
Edit files
git commit -a -m "Adds new feature"
git checkout master
git rebase stage
Revert
git revert HEAD
or find a commit has with
git log --oneline --decorate
git revert
Git log
git log
git log --graph
git log --since="4 days ago"
git log -S
git log --stat
git log --shortstat
git log --pretty=format:"%h - %an - %ar - %s"
See diff before commit
Git diff
Remote
git remote show origin
Cleaning
git gc --prune
git gc --auto
git config gc.pruneexpire "30 Days"
Add new repo
Site-to-Site OpenVPN with routes
Install
https://github.com/angristan/openvpn-install
First, get the script and make it executable :
curl -O https://raw.githubusercontent.com/Angristan/openvpn-install/master/openvpn-install.sh
chmod +x openvpn-install.sh
Then run it :
./openvpn-install.sh
Make 2 clients, one called client01 and the other called client02
Then edit server conf and add belllow:
/etc/openvpn/server.conf
client-config-dir /etc/openvpn/ccd
push "route 192.168.2.0 255.255.255.0"
route 192.168.2.0 255.255.255.0 10.8.0.2
client-to-client
/etc/openvpn/ccd/client01
iroute 192.168.2.0 255.255.255.0/etc/openvpn/ccd/client02
iroute 10.1.2.0 255.255.255.0Pfsense Example
import cert
Add Client
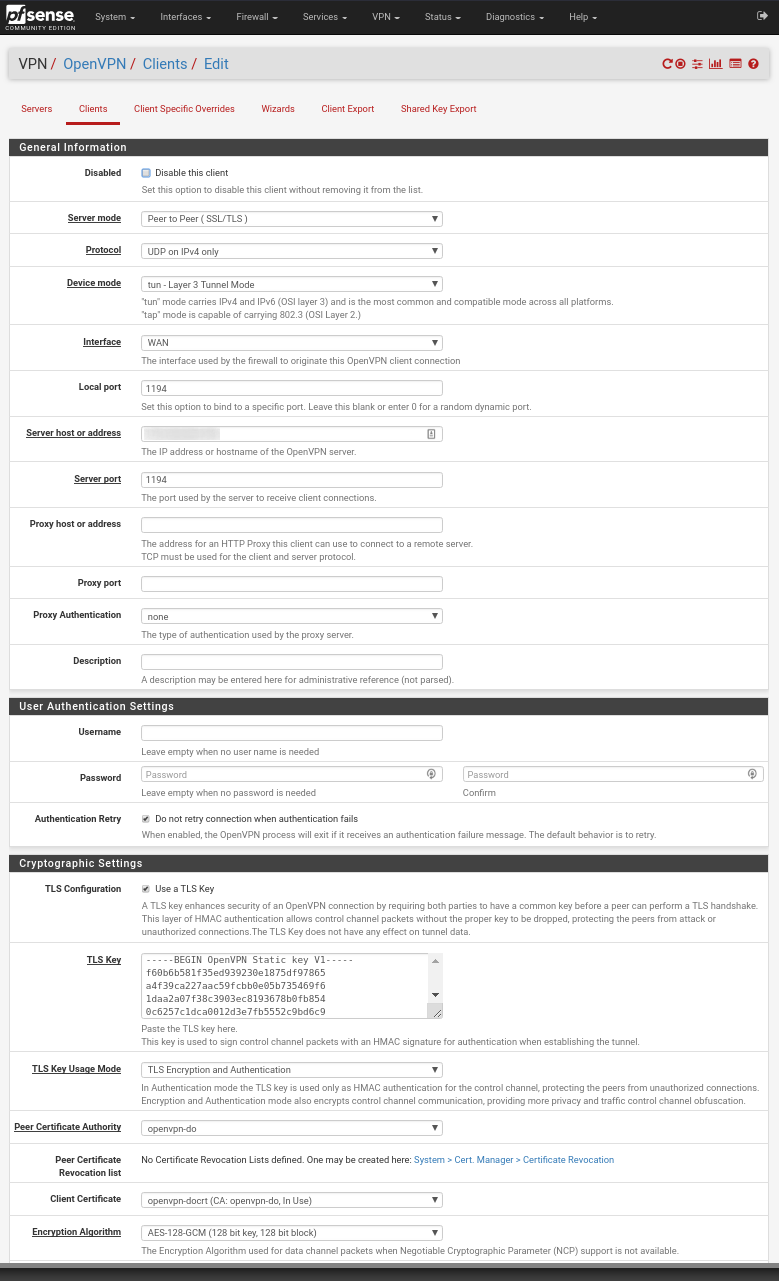
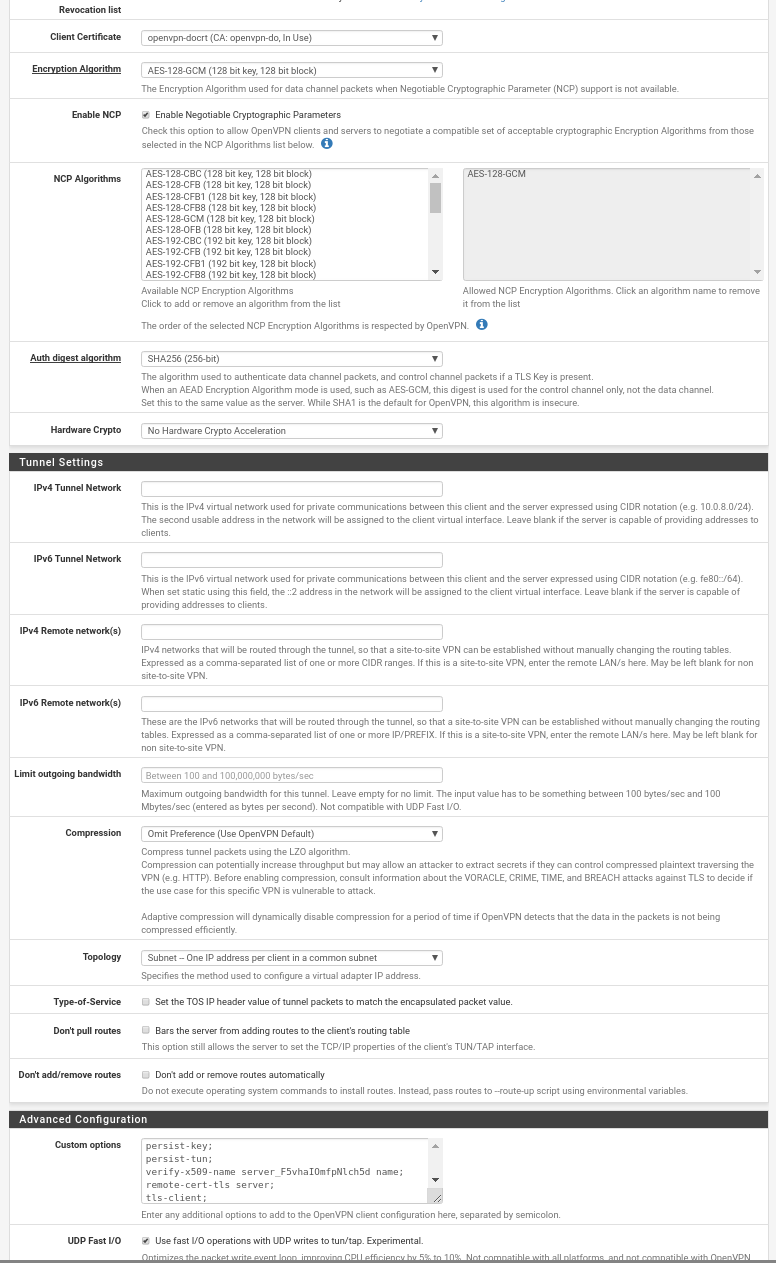

LVM
LVM functions by layering abstractions on top of physical storage devices. The basic layers that LVM uses, starting with the most primitive, are.
-
Physical Volumes:
- Description: Physical block devices or other disk-like devices (for example, other devices created by device mapper, like RAID arrays) are used by LVM as the raw building material for higher levels of abstraction. Physical volumes are regular storage devices. LVM writes a header to the device to allocate it for management.
-
Volume Groups:
- Description: LVM combines physical volumes into storage pools known as volume groups. Volume groups abstract the characteristics of the underlying devices and function as a unified logical device with combined storage capacity of the component physical volumes.
-
Logical Volumes:
- Description: A volume group can be sliced up into any number of logical volumes. Logical volumes are functionally equivalent to partitions on a physical disk, but with much more flexibility. Logical volumes are the primary component that users and applications will interact with.
Create a volume group
pvcreate /dev/sda1 /dev/sdb1
vgcreate vol_group_name /dev/sda1 /dev/sdb1
lvcreate -l 100%FREE -n drive_name vol_group_name
View info on group
pvscan
pvdisplay
vgdisplay
lvdisplay
Mount Hidden LVM (Perfect for rescue env)
pvscan
vgscan
vgchange -ay
lvscan
mount /dev/VolGroup00/LogVol00 /mnt
Grow XFS/EXT4 GPT LVM
Create new partition
GDisk
n
– Create a new partition
Verify partition start
Verify partition end
8E00
– Set the partition type to Linux LVM
w
– Write the changes to disk
Refresh partition
partprobeSet new partition as LVM
pvcreate /dev/<partitionDeviceName>
Extend volume group
vgextend <volumeGroupName> /dev/<partitionDeviceName>Increase volume
lvextend -l +100%FREE /dev/<volumeGroupName>/<logicalVolumeName>Grow XFS
xfs_grow /dev/<volumeGroupName>/<logicalVolumeName>or
Grow EXT4
resize2fs /dev/<volumeGroupName>/<logicalVolumeName>Other Doc:
- http://xmodulo.com/use-lvm-linux.html
- https://www.digitalocean.com/community/tutorials/an-introduction-to-lvm-concepts-terminology-and-operations
- https://www.digitalocean.com/community/tutorials/how-to-use-lvm-to-manage-storage-devices-on-ubuntu-16-04
Fedora Build ACS Override Patch Kernel
Add RPM Fusion
sudo dnf install https://download1.rpmfusion.org/free/fedora/rpmfusion-free-release-$(rpm -E %fedora).noarch.rpm https://download1.rpmfusion.org/nonfree/fedora/rpmfusion-nonfree-release-$(rpm -E %fedora).noarch.rpmInstall the dependencies to start building your own kernel.
sudo dnf install fedpkg fedora-packager rpmdevtools ncurses-devel pesign fedora-packager fedora-review rpmdevtools numactl-devel pesign
sudo dnf groupinstall "Development Tools"
sudo dnf build-dep kernel
Set up your home build directory (if you haven't ever built any RPMs before)
rpmdev-setuptreeInstall the kernel source and finish installing dependencies.
cd ~/rpmbuild/SOURCES
sudo dnf download --source kernel
rpm2cpio kernel-* | cpio -i --make-directories
mv kernel-*.src.rpm ../SRPMS
cd ../SRPMS
rpm -Uvh kernel-*.src.rpm
vim ~/rpmbuild/SPECS/kernel.spec
Add the two lines near the top of the spec file.
# Set buildid
%define buildid .acs# ACS override patch
Patch1000: add-acs-override.patch
Download ACS path
cd ~/rpmbuild/SOURCES/
wget https://git.myhypervisor.ca/dave/fedora-acs-override/raw/master/acs/add-acs-override.patch
Re-create new SRC RPM
rpmbuild -bs ~/rpmbuild/SPECS/kernel.specUpload to Copr (need account)
New file located in ~/rpmbuild/SRPMS/kernel-4.20.3-200.acs.fc29.src.rpm
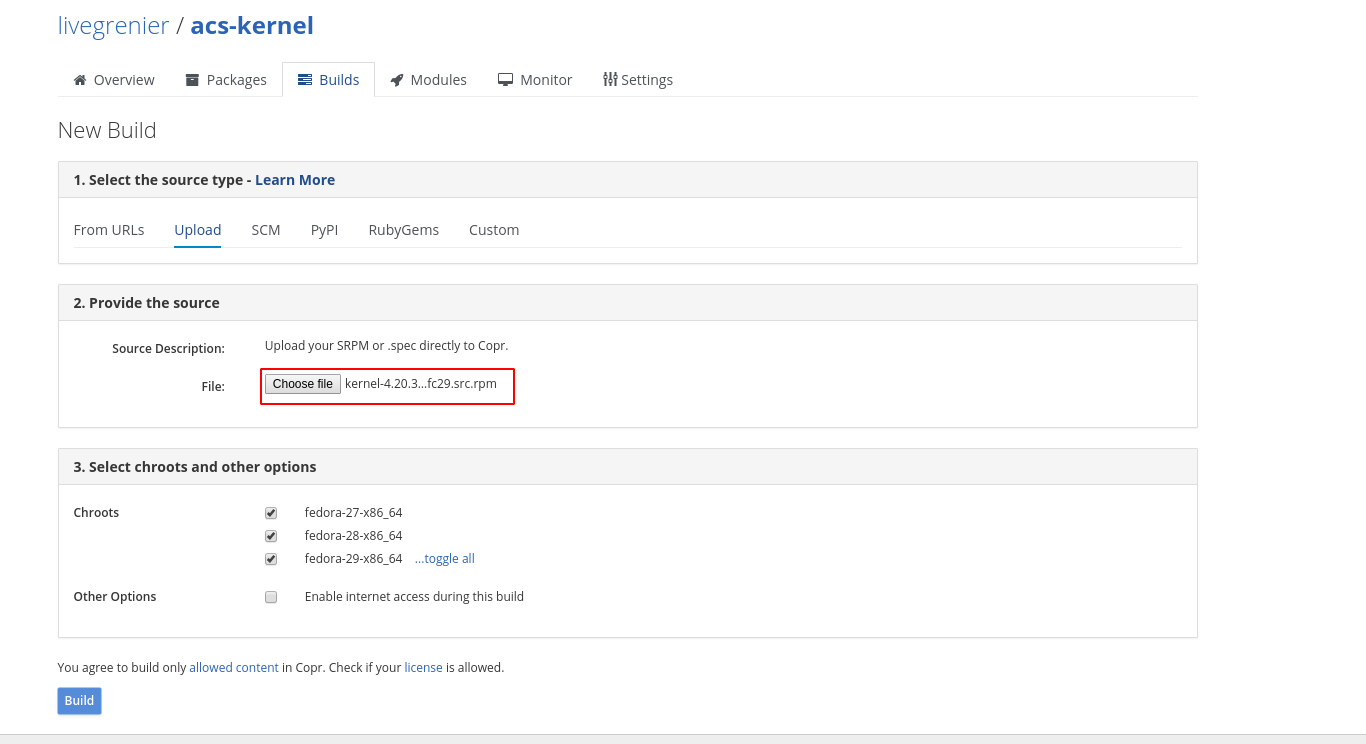
(Wait 10hours for RPM to build)
Enable new repo
dnf copr enable user/pkg-nameInstall new kernel
sudo dnf update kernel-4.20.6-200.acs.fc29 kernel-devel-4.20.6-200.acs.fc29 --disableexcludes all --refreshUpdate and reboot
Update GRUB file /etc/default/grub, change GRUB_CMDLINE to bellow
GRUB_CMDLINE_LINUX="rd.driver.pre=vfio-pci rd.driver.blacklist=nouveau modprobe.blacklist=nouveau rhgb quiet intel_iommu=on iommu=pt pcie_acs_override=downstream"Rebuild GRUB's configuration
sudo grub2-mkconfig -o /boot/efi/EFI/fedora/grub.cfgCreate or edit /etc/modprobe.d/local.conf, adding the line below:
install vfio-pci /sbin/vfio-pci-override.shCreate or edit /etc/dracut.conf.d/local.conf, adding the line below:
add_drivers+="vfio vfio_iommu_type1 vfio_pci vfio_virqfd"
install_items+="/sbin/vfio-pci-override.sh /usr/bin/find /usr/bin/dirname"
Create a file /sbin/vfio-pci-override.sh with permissions 755 (file in this directory of the repo).
#!/bin/sh
# This script overrides the default driver to be the vfio-pci driver (similar
# to the pci-stub driver) for the devices listed. In this case, it only uses
# two devices that both belong to one nVidia graphics card (graphics, audio).# Located at /sbin/vfio-pci-override.sh
DEVS="0000:02:00.0 0000:02:00.1"
if [ ! -z "$(ls -A /sys/class/iommu)" ] ; then
for DEV in $DEVS; do
echo "vfio-pci" > /sys/bus/pci/devices/$DEV/driver_override
done
fimodprobe -i vfio-pci
Rebuild using dracut
sudo dracut -f --kver `uname -r`IF YOU HAVE 2 NVIDIA CARDS
Install (proprietary) nVidia drivers and remove/blacklist (open source) nouveau drivers.
sudo su -
dnf install xorg-x11-drv-nvidia akmod-nvidia "kernel-devel-uname-r == $(uname -r)" xorg-x11-drv-nvidia-cuda vulkan vdpauinfo libva-vdpau-driver libva-utils
dnf remove *nouveau*
echo "blacklist nouveau" >> /etc/modprobe.d/blacklist.conf
Reboot
Chef notes
run cookbook locally
chef-client --local-mode recipes/default.rb
genrate cookbook
chef generate cookbook cookbooks/apache
add a node in chef
knife bootstrap 192.168.2.153 -N node-chef.myhypervisor.ca --ssh-user root
show node details
knife node show -l node-chef.myhypervisor.ca
find all attribute names
ohai
search all nodes
knife search 'platform:centos' knife search 'platform:centos' -a ipaddress knife search role 'role:apache' -a run_list knife search ":" -a recipes
add recipes to node
knife node run_list add fqdn.server.com 'recipe[test]'
add another recipe from the cookbook
knife node run_list add fqdn.server.com 'recipe[test::test2]'
change recipe order (before)
knife node run_list add fqdn.server.com -b 'recipe[test::test2]'
(after)
knife node run_list add fqdn.server.com -a 'recipe[test::test2]'
remove all
knife node run_list remove fqdn.server.com 'recipe[test],recipe[test::test2]'
add
knife node run_list add fqdn.server.com 'recipe[test],recipe[test::test2]'
upload changes
knife cookbook upload recipe_name
create role
knife role create web
edit role
knife role edit web
add a role to a node
knife node run_list set fqdn.domain.com "role[web]"
execute chef client from workstation
knife ssh "role:web" "chef-client" -x root -P passwd
supermarket
- list: knife cookbook site list
- search: knife cookbook site search mysql
- show: knife cookbook site show mysql
- download: knife cookbook site download mysql
- install: knife cookbook site install mysql
testing
- docker_plugin: chef exec gem install kitchen-docker
- edit yaml: .kitchen.yml
- setup env: kitchen converge
- check test env: kitchen list
- verify: kitchen verify
check syntax
ruby -c default.rb
foodcritic default.rb
Install chef server (after RPM):
chef-server-ctl reconfigure
chef-server-ctl user-create dave dave g livegrenier@gmail.com 'password' --filename daveuser-rsa
chef-server-ctl org-create DaveChef 'Daves Chef Server' --association dave
chef-server-ctl org-create davechef 'Daves Chef Server' --association dave -filename davechef-validator.pem
Install web:
chef-server-ctl chef-manage
chef-server-ctl install chef-manage
chef-server-ctl reconfigure
Kubernetes the hard way
node notes
kube-1 192.168.1.8 192.168.2.151
kube-2 192.168.1.10 192.168.2.162
kube-3 192.168.1.6 192.168.2.157
kube-4 192.168.1.7 192.168.2.154
kube-lb 192.168.1.13 192.168.2.170
Controller components
- kube-apiserver: Serves the Kubernetes API. This allows users to interact with the cluster.
- etcd: Kubernetes cluster datastore.
- kube-scheduler: Schedules pods on available worker nodes.
- kube-controller-manager: Runs a series of controllers that provide a wide range of functionality.
- cloud-controlIer-manager: Handles interaction with underlying cloud providers.
Worker components
- kubelet: Controls each worker node, providing the APIs that are used by the control plane to manage nodes and pods, and interacts with the container runtime to manage containers.
- kube-proxy: Manages iptables rules on the node to provide virtual network access to pods.
- Container runtime: Downloads images and runs containers. Two examples of container runtimes are Docker and containerd
Add to all nodes
vim /etc/hosts
192.168.1.8 kube-1.myhypervisor.ca kube-1
192.168.1.10 kube-2.myhypervisor.ca kube-2
192.168.1.6 kube-3.myhypervisor.ca kube-3
192.168.1.7 kube-4.myhypervisor.ca kube-4
192.168.1.13 kube-lb.myhypervisor.ca kube-lb
Install kubectl / cfssl
On local workstation
https://github.com/kelseyhightower/kubernetes-the-hard-way/blob/master/docs/02-client-tools.md
https://kubernetes.io/docs/tasks/tools/install-kubectl/#install-kubectl
Gen Certs:
on local workstation
CA
{

cat > ca-config.json << EOF
{
  "signing": {
    "default": {
      "expiry": "8760h"
    },
    "profiles": {
      "kubernetes": {
        "usages": ["signing", "key encipherment", "server auth", "client auth"],
        "expiry": "8760h"
      }
    }
  }
}
EOF

cat > ca-csr.json << EOF
{
  "CN": "Kubernetes",
  "key": {
    "algo": "rsa",
    "size": 2048
  },
  "names": [
    {
      "C": "CA",
      "L": "Montreal",
      "O": "Kubernetes",
      "OU": "CA",
      "ST": "Quebec"
    }
  ]
}
EOF

cfssl gencert -initca ca-csr.json | cfssljson -bare ca

}
Admin Client certificate
{

cat > admin-csr.json << EOF
{
  "CN": "admin",
  "key": {
    "algo": "rsa",
    "size": 2048
  },
  "names": [
    {
      "C": "CA",
      "L": "Montreal",
      "O": "system:masters",
      "OU": "Kubernetes The Hard Way",
      "ST": "Quebec"
    }
  ]
}
EOF

cfssl gencert \
  -ca=ca.pem \
  -ca-key=ca-key.pem \
  -config=ca-config.json \
  -profile=kubernetes \
  admin-csr.json | cfssljson -bare admin

}
Kubelet Client certificates
WORKER0_HOST=kube-3.myhypervisor.ca
WORKER0_IP=192.168.1.6
WORKER1_HOST=kube-4.myhypervisor.ca
WORKER1_IP=192.168.1.7

{
cat > ${WORKER0_HOST}-csr.json << EOF
{
  "CN": "system:node:${WORKER0_HOST}",
  "key": {
    "algo": "rsa",
    "size": 2048
  },
  "names": [
    {
      "C": "CA",
      "L": "Montreal",
      "O": "system:nodes",
      "OU": "Kubernetes The Hard Way",
      "ST": "Quebec"
    }
  ]
}
EOF

cfssl gencert \
  -ca=ca.pem \
  -ca-key=ca-key.pem \
  -config=ca-config.json \
  -hostname=${WORKER0_IP},${WORKER0_HOST} \
  -profile=kubernetes \
  ${WORKER0_HOST}-csr.json | cfssljson -bare ${WORKER0_HOST}

cat > ${WORKER1_HOST}-csr.json << EOF
{
  "CN": "system:node:${WORKER1_HOST}",
  "key": {
    "algo": "rsa",
    "size": 2048
  },
  "names": [
    {
      "C": "CA",
      "L": "Montreal",
      "O": "system:nodes",
      "OU": "Kubernetes The Hard Way",
      "ST": "Quebec"
    }
  ]
}
EOF

cfssl gencert \
  -ca=ca.pem \
  -ca-key=ca-key.pem \
  -config=ca-config.json \
  -hostname=${WORKER1_IP},${WORKER1_HOST} \
  -profile=kubernetes \
  ${WORKER1_HOST}-csr.json | cfssljson -bare ${WORKER1_HOST}

}
Controller Manager Client certificate:
{

cat > kube-controller-manager-csr.json << EOF
{
  "CN": "system:kube-controller-manager",
  "key": {
    "algo": "rsa",
    "size": 2048
  },
  "names": [
    {
      "C": "CA",
      "L": "Montreal",
      "O": "system:kube-controller-manager",
      "OU": "Kubernetes The Hard Way",
      "ST": "Quebec"
    }
  ]
}
EOF

cfssl gencert \
  -ca=ca.pem \
  -ca-key=ca-key.pem \
  -config=ca-config.json \
  -profile=kubernetes \
  kube-controller-manager-csr.json | cfssljson -bare kube-controller-manager

}
Kube Proxy Client
{

cat > kube-proxy-csr.json << EOF
{
  "CN": "system:kube-proxy",
  "key": {
    "algo": "rsa",
    "size": 2048
  },
  "names": [
    {
      "C": "CA",
      "L": "Montreal",
      "O": "system:node-proxier",
      "OU": "Kubernetes The Hard Way",
      "ST": "Quebec"
    }
  ]
}
EOF

cfssl gencert \
  -ca=ca.pem \
  -ca-key=ca-key.pem \
  -config=ca-config.json \
  -profile=kubernetes \
  kube-proxy-csr.json | cfssljson -bare kube-proxy

}
Kube Scheduler Client Certificate:
{

cat > kube-scheduler-csr.json << EOF
{
  "CN": "system:kube-scheduler",
  "key": {
    "algo": "rsa",
    "size": 2048
  },
  "names": [
    {
      "C": "CA",
      "L": "Montreal",
      "O": "system:kube-scheduler",
      "OU": "Kubernetes The Hard Way",
      "ST": "Quebec"
    }
  ]
}
EOF

cfssl gencert \
  -ca=ca.pem \
  -ca-key=ca-key.pem \
  -config=ca-config.json \
  -profile=kubernetes \
  kube-scheduler-csr.json | cfssljson -bare kube-scheduler

}
API server
CERT_HOSTNAME=10.32.0.1,192.168.1.8,kube-1.myhypervisor.ca,192.168.1.10,kube-2.myhypervisor.ca,192.168.1.13,kube-lb.myhypervisor.ca,127.0.0.1,localhost,kubernetes.default
{

cat > kubernetes-csr.json << EOF
{
  "CN": "kubernetes",
  "key": {
    "algo": "rsa",
    "size": 2048
  },
  "names": [
    {
      "C": "CA",
      "L": "Montreal",
      "O": "Kubernetes",
      "OU": "Kubernetes The Hard Way",
      "ST": "Quebec"
    }
  ]
}
EOF

cfssl gencert \
  -ca=ca.pem \
  -ca-key=ca-key.pem \
  -config=ca-config.json \
  -hostname=${CERT_HOSTNAME} \
  -profile=kubernetes \
  kubernetes-csr.json | cfssljson -bare kubernetes

}
service account
{

cat > service-account-csr.json << EOF
{
  "CN": "service-accounts",
  "key": {
    "algo": "rsa",
    "size": 2048
  },
  "names": [
    {
      "C": "CA",
      "L": "Montreal",
      "O": "Kubernetes",
      "OU": "Kubernetes The Hard Way",
      "ST": "Quebec"
    }
  ]
}
EOF

cfssl gencert \
  -ca=ca.pem \
  -ca-key=ca-key.pem \
  -config=ca-config.json \
  -profile=kubernetes \
  service-account-csr.json | cfssljson -bare service-account

}
scp
scp ca.pem kube-3.myhypervisor.ca-key.pem kube-3.myhypervisor.ca.pem root@192.168.2.157:~/
scp ca.pem kube-4.myhypervisor.ca-key.pem kube-4.myhypervisor.ca.pem root@192.168.2.154:~/
scp ca.pem ca-key.pem kubernetes-key.pem kubernetes.pem \
service-account-key.pem service-account.pem root@192.168.2.151:~/
scp ca.pem ca-key.pem kubernetes-key.pem kubernetes.pem \
service-account-key.pem service-account.pem root@192.168.2.162:~/
Kubeconfig
kubelet kubeconfig for each worker node
KUBERNETES_ADDRESS=192.168.1.13
for instance in kube-3.myhypervisor.ca kube-4.myhypervisor.ca; do
kubectl config set-cluster kubernetes-the-hard-way \
--certificate-authority=ca.pem \
--embed-certs=true \
--server=https://${KUBERNETES_ADDRESS}:6443 \
--kubeconfig=${instance}.kubeconfig
kubectl config set-credentials system:node:${instance} \
--client-certificate=${instance}.pem \
--client-key=${instance}-key.pem \
--embed-certs=true \
--kubeconfig=${instance}.kubeconfig
kubectl config set-context default \
--cluster=kubernetes-the-hard-way \
--user=system:node:${instance} \
--kubeconfig=${instance}.kubeconfig
kubectl config use-context default --kubeconfig=${instance}.kubeconfig
done
Kube proxy
{
kubectl config set-cluster kubernetes-the-hard-way \
--certificate-authority=ca.pem \
--embed-certs=true \
--server=https://${KUBERNETES_ADDRESS}:6443 \
--kubeconfig=kube-proxy.kubeconfig
kubectl config set-credentials system:kube-proxy \
--client-certificate=kube-proxy.pem \
--client-key=kube-proxy-key.pem \
--embed-certs=true \
--kubeconfig=kube-proxy.kubeconfig
kubectl config set-context default \
--cluster=kubernetes-the-hard-way \
--user=system:kube-proxy \
--kubeconfig=kube-proxy.kubeconfig
kubectl config use-context default --kubeconfig=kube-proxy.kubeconfig
}
kube-controller-manager
{
kubectl config set-cluster kubernetes-the-hard-way \
--certificate-authority=ca.pem \
--embed-certs=true \
--server=https://127.0.0.1:6443 \
--kubeconfig=kube-controller-manager.kubeconfig
kubectl config set-credentials system:kube-controller-manager \
--client-certificate=kube-controller-manager.pem \
--client-key=kube-controller-manager-key.pem \
--embed-certs=true \
--kubeconfig=kube-controller-manager.kubeconfig
kubectl config set-context default \
--cluster=kubernetes-the-hard-way \
--user=system:kube-controller-manager \
--kubeconfig=kube-controller-manager.kubeconfig
kubectl config use-context default --kubeconfig=kube-controller-manager.kubeconfig
}
kube-scheduler
{
kubectl config set-cluster kubernetes-the-hard-way \
--certificate-authority=ca.pem \
--embed-certs=true \
--server=https://127.0.0.1:6443 \
--kubeconfig=kube-scheduler.kubeconfig
kubectl config set-credentials system:kube-scheduler \
--client-certificate=kube-scheduler.pem \
--client-key=kube-scheduler-key.pem \
--embed-certs=true \
--kubeconfig=kube-scheduler.kubeconfig
kubectl config set-context default \
--cluster=kubernetes-the-hard-way \
--user=system:kube-scheduler \
--kubeconfig=kube-scheduler.kubeconfig
kubectl config use-context default --kubeconfig=kube-scheduler.kubeconfig
}
admin
{
kubectl config set-cluster kubernetes-the-hard-way \
--certificate-authority=ca.pem \
--embed-certs=true \
--server=https://127.0.0.1:6443 \
--kubeconfig=admin.kubeconfig
kubectl config set-credentials admin \
--client-certificate=admin.pem \
--client-key=admin-key.pem \
--embed-certs=true \
--kubeconfig=admin.kubeconfig
kubectl config set-context default \
--cluster=kubernetes-the-hard-way \
--user=admin \
--kubeconfig=admin.kubeconfig
kubectl config use-context default --kubeconfig=admin.kubeconfig
}
SCP
scp kube-3.myhypervisor.ca.kubeconfig kube-proxy.kubeconfig root@192.168.2.157:~/
scp kube-4.myhypervisor.ca.kubeconfig kube-proxy.kubeconfig root@192.168.2.154:~/
scp admin.kubeconfig kube-controller-manager.kubeconfig kube-scheduler.kubeconfig root@192.168.2.151:~/
scp admin.kubeconfig kube-controller-manager.kubeconfig kube-scheduler.kubeconfig root@192.168.2.162:~/
Generating the Data Encryption Config
ENCRYPTION_KEY=$(head -c 32 /dev/urandom | base64)
cat > encryption-config.yaml << EOF
kind: EncryptionConfig
apiVersion: v1
resources:
- resources:
- secrets
providers:
- aescbc:
keys:
- name: key1
secret: ${ENCRYPTION_KEY}
- identity: {}
EOF
scp
scp encryption-config.yaml root@192.168.2.151:~/
scp encryption-config.yaml root@192.168.2.162:~/
Creating the etcd Cluster
on both controller nodes
wget -q --show-progress --https-only --timestamping \
"https://github.com/etcd-io/etcd/releases/download/v3.3.10/etcd-v3.3.10-linux-amd64.tar.gz"
tar -xvf etcd-v3.3.10-linux-amd64.tar.gz
mv etcd-v3.3.10-linux-amd64/etcd* /usr/local/bin/
mkdir -p /etc/etcd /var/lib/etcd
cp ca.pem kubernetes-key.pem kubernetes.pem /etc/etcd/
run on controller node1
ETCD_NAME=kube-1.myhypervisor.ca
INTERNAL_IP=192.168.1.8
INITIAL_CLUSTER=kube-1.myhypervisor.ca=https://192.168.1.8:2380,kube-2.myhypervisor.ca=https://192.168.1.10:2380
run on controller node2
ETCD_NAME=kube-2.myhypervisor.ca
INTERNAL_IP=192.168.1.10
INITIAL_CLUSTER=kube-1.myhypervisor.ca=https://192.168.1.8:2380,kube-2.myhypervisor.ca=https://192.168.1.10:2380
on both controller nodes
cat << EOF | tee /etc/systemd/system/etcd.service
[Unit]
Description=etcd
Documentation=https://github.com/coreos
[Service]
ExecStart=/usr/local/bin/etcd \\
--name ${ETCD_NAME} \\
--cert-file=/etc/etcd/kubernetes.pem \\
--key-file=/etc/etcd/kubernetes-key.pem \\
--peer-cert-file=/etc/etcd/kubernetes.pem \\
--peer-key-file=/etc/etcd/kubernetes-key.pem \\
--trusted-ca-file=/etc/etcd/ca.pem \\
--peer-trusted-ca-file=/etc/etcd/ca.pem \\
--peer-client-cert-auth \\
--client-cert-auth \\
--initial-advertise-peer-urls https://${INTERNAL_IP}:2380 \\
--listen-peer-urls https://${INTERNAL_IP}:2380 \\
--listen-client-urls https://${INTERNAL_IP}:2379,https://127.0.0.1:2379 \\
--advertise-client-urls https://${INTERNAL_IP}:2379 \\
--initial-cluster-token etcd-cluster-0 \\
--initial-cluster ${INITIAL_CLUSTER} \\
--initial-cluster-state new \\
--data-dir=/var/lib/etcd
Restart=on-failure
RestartSec=5
[Install]
WantedBy=multi-user.target
EOF
enable and start service
systemctl daemon-reload
systemctl enable etcd
systemctl start etcd
systemctl status etcd
check if working
ETCDCTL_API=3 etcdctl member list \
--endpoints=https://127.0.0.1:2379 \
--cacert=/etc/etcd/ca.pem \
--cert=/etc/etcd/kubernetes.pem \
--key=/etc/etcd/kubernetes-key.pem
if typo during config remove data in /var/lib/etcd/* and restart service (rm -rf /var/lib/etcd/* )
kubernetes controller bin
on both controllers
mkdir -p /etc/kubernetes/config
wget -q --show-progress --https-only --timestamping \
"https://storage.googleapis.com/kubernetes-release/release/v1.13.0/bin/linux/amd64/kube-apiserver" \
"https://storage.googleapis.com/kubernetes-release/release/v1.13.0/bin/linux/amd64/kube-controller-manager" \
"https://storage.googleapis.com/kubernetes-release/release/v1.13.0/bin/linux/amd64/kube-scheduler" \
"https://storage.googleapis.com/kubernetes-release/release/v1.13.0/bin/linux/amd64/kubectl"
chmod +x kube-apiserver kube-controller-manager kube-scheduler kubectl
mv kube-apiserver kube-controller-manager kube-scheduler kubectl /usr/local/bin/
Kubernetes API Server
on both controllers
sudo mkdir -p /var/lib/kubernetes/
sudo cp ca.pem ca-key.pem kubernetes-key.pem kubernetes.pem \
service-account-key.pem service-account.pem \
encryption-config.yaml /var/lib/kubernetes/
wget -q --show-progress --https-only --timestamping \
"https://storage.googleapis.com/kubernetes-release/release/v1.13.0/bin/linux/amd64/kube-apiserver" \
"https://storage.googleapis.com/kubernetes-release/release/v1.13.0/bin/linux/amd64/kube-controller-manager" \
"https://storage.googleapis.com/kubernetes-release/release/v1.13.0/bin/linux/amd64/kube-scheduler" \
"https://storage.googleapis.com/kubernetes-release/release/v1.13.0/bin/linux/amd64/kubectl"
service-account-key.pem service-account.pem \
encryption-config.yaml /var/lib/kubernetes/
controller 1
INTERNAL_IP=192.168.1.8
CONTROLLER0_IP=192.168.1.8
CONTROLLER1_IP=192.168.1.10
#### controller 2
INTERNAL_IP=192.168.1.10
CONTROLLER0_IP=192.168.1.8
CONTROLLER1_IP=192.168.1.10
#### both
cat << EOF | tee /etc/systemd/system/kube-apiserver.service
[Unit]
Description=Kubernetes API Server
Documentation=https://github.com/kubernetes/kubernetes
[Service]
ExecStart=/usr/local/bin/kube-apiserver \\
--advertise-address=${INTERNAL_IP} \\
--allow-privileged=true \\
--apiserver-count=3 \\
--audit-log-maxage=30 \\
--audit-log-maxbackup=3 \\
--audit-log-maxsize=100 \\
--audit-log-path=/var/log/audit.log \\
--authorization-mode=Node,RBAC \\
--bind-address=0.0.0.0 \\
--client-ca-file=/var/lib/kubernetes/ca.pem \\
--enable-admission-plugins=Initializers,NamespaceLifecycle,NodeRestriction,LimitRanger,ServiceAccount,DefaultStorageClass,ResourceQuota \\
--enable-swagger-ui=true \\
--etcd-cafile=/var/lib/kubernetes/ca.pem \\
--etcd-certfile=/var/lib/kubernetes/kubernetes.pem \\
--etcd-keyfile=/var/lib/kubernetes/kubernetes-key.pem \\
--etcd-servers=https://$CONTROLLER0_IP:2379,https://$CONTROLLER1_IP:2379 \\
--event-ttl=1h \\
--experimental-encryption-provider-config=/var/lib/kubernetes/encryption-config.yaml \\
--kubelet-certificate-authority=/var/lib/kubernetes/ca.pem \\
--kubelet-client-certificate=/var/lib/kubernetes/kubernetes.pem \\
--kubelet-client-key=/var/lib/kubernetes/kubernetes-key.pem \\
--kubelet-https=true \\
--runtime-config=api/all \\
--service-account-key-file=/var/lib/kubernetes/service-account.pem \\
--service-cluster-ip-range=10.32.0.0/24 \\
--service-node-port-range=30000-32767 \\
--tls-cert-file=/var/lib/kubernetes/kubernetes.pem \\
--tls-private-key-file=/var/lib/kubernetes/kubernetes-key.pem \\
--v=2 \\
--kubelet-preferred-address-types=InternalIP,InternalDNS,Hostname,ExternalIP,ExternalDNS
Restart=on-failure
RestartSec=5
[Install]
WantedBy=multi-user.target
EOF
Kubernetes Controller Manager
on both controllers
cp kube-controller-manager.kubeconfig /var/lib/kubernetes/
cat << EOF | tee /etc/systemd/system/kube-controller-manager.service
[Unit]
Description=Kubernetes Controller Manager
Documentation=https://github.com/kubernetes/kubernetes
[Service]
ExecStart=/usr/local/bin/kube-controller-manager \\
--address=0.0.0.0 \\
--cluster-cidr=10.200.0.0/16 \\
--cluster-name=kubernetes \\
--cluster-signing-cert-file=/var/lib/kubernetes/ca.pem \\
--cluster-signing-key-file=/var/lib/kubernetes/ca-key.pem \\
--kubeconfig=/var/lib/kubernetes/kube-controller-manager.kubeconfig \\
--leader-elect=true \\
--root-ca-file=/var/lib/kubernetes/ca.pem \\
--service-account-private-key-file=/var/lib/kubernetes/service-account-key.pem \\
--service-cluster-ip-range=10.32.0.0/24 \\
--use-service-account-credentials=true \\
--v=2
Restart=on-failure
RestartSec=5
[Install]
WantedBy=multi-user.target
EOF
Kubernetes Scheduler
on both controllers
cp kube-scheduler.kubeconfig /var/lib/kubernetes/
cat << EOF | tee /etc/kubernetes/config/kube-scheduler.yaml
apiVersion: kubescheduler.config.k8s.io/v1alpha1
kind: KubeSchedulerConfiguration
clientConnection:
kubeconfig: "/var/lib/kubernetes/kube-scheduler.kubeconfig"
leaderElection:
leaderElect: true
EOF
cat << EOF | tee /etc/systemd/system/kube-scheduler.service
[Unit]
Description=Kubernetes Scheduler
Documentation=https://github.com/kubernetes/kubernetes
[Service]
ExecStart=/usr/local/bin/kube-scheduler \\
--config=/etc/kubernetes/config/kube-scheduler.yaml \\
--v=2
Restart=on-failure
RestartSec=5
[Install]
WantedBy=multi-user.target
EOF
Enable services
on both controllers
systemctl daemon-reload
systemctl enable kube-apiserver kube-controller-manager kube-scheduler
systemctl start kube-apiserver kube-controller-manager kube-scheduler
check status
on both controllers
systemctl status kube-apiserver kube-controller-manager kube-scheduler
kubectl get componentstatuses --kubeconfig admin.kubeconfig
Set up RBAC for Kubelet Authorization
On controller 1
Create a role with the necessary permissions:
cat << EOF | kubectl apply --kubeconfig admin.kubeconfig -f -
apiVersion: rbac.authorization.k8s.io/v1beta1
kind: ClusterRole
metadata:
annotations:
rbac.authorization.kubernetes.io/autoupdate: "true"
labels:
kubernetes.io/bootstrapping: rbac-defaults
name: system:kube-apiserver-to-kubelet
rules:
- apiGroups:
- ""
resources:
- nodes/proxy
- nodes/stats
- nodes/log
- nodes/spec
- nodes/metrics
verbs:
- "*"
EOF
Bind the role to the kubernetes user:
cat << EOF | kubectl apply --kubeconfig admin.kubeconfig -f -
apiVersion: rbac.authorization.k8s.io/v1beta1
kind: ClusterRoleBinding
metadata:
name: system:kube-apiserver
namespace: ""
roleRef:
apiGroup: rbac.authorization.k8s.io
kind: ClusterRole
name: system:kube-apiserver-to-kubelet
subjects:
- apiGroup: rbac.authorization.k8s.io
kind: User
name: kubernetes
EOF
Setting up a Kube API Frontend Load Balancer
on LB
sudo apt-get install -y nginx
sudo systemctl enable nginx
sudo mkdir -p /etc/nginx/tcpconf.d
sudo vi /etc/nginx/nginx.conf
Add the following to the end of nginx.conf:
include /etc/nginx/tcpconf.d/*;
Set up some environment variables for the lead balancer config file:
CONTROLLER0_IP=192.168.1.8
CONTROLLER1_IP=192.168.1.10
Create the load balancer nginx config file:
cat << EOF | sudo tee /etc/nginx/tcpconf.d/kubernetes.conf
stream {
upstream kubernetes {
server $CONTROLLER0_IP:6443;
server $CONTROLLER1_IP:6443;
}
server {
listen 6443;
listen 443;
proxy_pass kubernetes;
}
}
EOF
Reload the nginx configuration:
sudo nginx -s reload
You can verify that the load balancer is working like so:
curl -k https://localhost:6443/version
Install bin on worker
on both worker nodes
sudo apt-get -y install socat conntrack ipset
wget -q --show-progress --https-only --timestamping \
https://github.com/kubernetes-sigs/cri-tools/releases/download/v1.13.0/critest-v1.13.0-linux-amd64.tar.gz \
https://storage.googleapis.com/kubernetes-the-hard-way/runsc \
https://github.com/opencontainers/runc/releases/download/v1.0.0-rc6/runc.amd64 \
https://github.com/containernetworking/plugins/releases/download/v0.7.4/cni-plugins-amd64-v0.7.4.tgz \
https://github.com/containerd/containerd/releases/download/v1.2.2/containerd-1.2.2.linux-amd64.tar.gz \
https://storage.googleapis.com/kubernetes-release/release/v1.13.0/bin/linux/amd64/kubectl \
https://storage.googleapis.com/kubernetes-release/release/v1.13.0/bin/linux/amd64/kube-proxy \
https://storage.googleapis.com/kubernetes-release/release/v1.13.0/bin/linux/amd64/kubelet
sudo mkdir -p \
/etc/cni/net.d \
/opt/cni/bin \
/var/lib/kubelet \
/var/lib/kube-proxy \
/var/lib/kubernetes \
/var/run/kubernetes
chmod +x kubectl kube-proxy kubelet runc.amd64 runsc
sudo mv runc.amd64 runc
sudo mv kubectl kube-proxy kubelet runc runsc /usr/local/bin/
sudo tar -xvf critest-v1.13.0-linux-amd64.tar.gz -C /usr/local/bin/
sudo tar -xvf cni-plugins-amd64-v0.7.4.tgz -C /opt/cni/bin/
sudo tar -xvf containerd-1.2.2.linux-amd64.tar.gz -C /
Install containerd
on both worker nodes
Create the containerd config.taml:
sudo mkdir -p /etc/containerd/
cat << EOF | sudo tee /etc/containerd/config.toml
[plugins]
[plugins.cri.containerd]
snapshotter = "overlayfs"
[plugins.cri.containerd.default_runtime]
runtime_type = "io.containerd.runtime.v1.linux"
runtime_engine = "/usr/local/bin/runc"
runtime_root = ""
[plugins.cri.containerd.untrusted_workload_runtime]
runtime_type = "io.containerd.runtime.v1.linux"
runtime_engine = "/usr/local/bin/runsc"
runtime_root = "/run/containerd/runsc"
EOF
Create the containerd unit file:
cat << EOF | sudo tee /etc/systemd/system/containerd.service
[Unit]
Description=containerd container runtime
Documentation=https://containerd.io
After=network.target
[Service]
ExecStartPre=/sbin/modprobe overlay
ExecStart=/bin/containerd
Restart=always
RestartSec=5
Delegate=yes
KillMode=process
OOMScoreAdjust=-999
LimitNOFILE=1048576
LimitNPROC=infinity
LimitCORE=infinity
[Install]
WantedBy=multi-user.target
EOF
Config kublelet
worker1
HOSTNAME=kube-3.myhypervisor.ca
sudo mv ${HOSTNAME}-key.pem ${HOSTNAME}.pem /var/lib/kubelet/
sudo mv ${HOSTNAME}.kubeconfig /var/lib/kubelet/kubeconfig
sudo mv ca.pem /var/lib/kubernetes/
worker2
HOSTNAME=kube-4.myhypervisor.ca
sudo mv ${HOSTNAME}-key.pem ${HOSTNAME}.pem /var/lib/kubelet/
sudo mv ${HOSTNAME}.kubeconfig /var/lib/kubelet/kubeconfig
sudo mv ca.pem /var/lib/kubernetes/
Create the kubelet config file:
cat << EOF | sudo tee /var/lib/kubelet/kubelet-config.yaml
kind: KubeletConfiguration
apiVersion: kubelet.config.k8s.io/v1beta1
authentication:
anonymous:
enabled: false
webhook:
enabled: true
x509:
clientCAFile: "/var/lib/kubernetes/ca.pem"
authorization:
mode: Webhook
clusterDomain: "cluster.local"
clusterDNS:
- "10.32.0.10"
runtimeRequestTimeout: "15m"
tlsCertFile: "/var/lib/kubelet/${HOSTNAME}.pem"
tlsPrivateKeyFile: "/var/lib/kubelet/${HOSTNAME}-key.pem"
EOF
Create the kubelet unit file:
cat << EOF | sudo tee /etc/systemd/system/kubelet.service
[Unit]
Description=Kubernetes Kubelet
Documentation=https://github.com/kubernetes/kubernetes
After=containerd.service
Requires=containerd.service
[Service]
ExecStart=/usr/local/bin/kubelet \\
--config=/var/lib/kubelet/kubelet-config.yaml \\
--container-runtime=remote \\
--container-runtime-endpoint=unix:///var/run/containerd/containerd.sock \\
--image-pull-progress-deadline=2m \\
--kubeconfig=/var/lib/kubelet/kubeconfig \\
--network-plugin=cni \\
--register-node=true \\
--v=2 \\
--hostname-override=${HOSTNAME} \\
--allow-privileged=true
Restart=on-failure
RestartSec=5
[Install]
WantedBy=multi-user.target
EOF
Config kube-proxy
Both workers
You can configure the kube-proxy service like so. Run these commands on both worker nodes:
sudo mv kube-proxy.kubeconfig /var/lib/kube-proxy/kubeconfig
Create the kube-proxy config file:
cat << EOF | sudo tee /var/lib/kube-proxy/kube-proxy-config.yaml
kind: KubeProxyConfiguration
apiVersion: kubeproxy.config.k8s.io/v1alpha1
clientConnection:
kubeconfig: "/var/lib/kube-proxy/kubeconfig"
mode: "iptables"
clusterCIDR: "10.200.0.0/16"
EOF
Create the kube-proxy unit file:
cat << EOF | sudo tee /etc/systemd/system/kube-proxy.service
[Unit]
Description=Kubernetes Kube Proxy
Documentation=https://github.com/kubernetes/kubernetes
[Service]
ExecStart=/usr/local/bin/kube-proxy \\
--config=/var/lib/kube-proxy/kube-proxy-config.yaml
Restart=on-failure
RestartSec=5
[Install]
WantedBy=multi-user.target
EOF
Now you are ready to start up the worker node services! Run these:
sudo systemctl daemon-reload
sudo systemctl enable containerd kubelet kube-proxy
sudo systemctl start containerd kubelet kube-proxy
Check the status of each service to make sure they are all active (running) on both worker nodes:
sudo systemctl status containerd kubelet kube-proxy
Finally, verify that both workers have registered themselves with the cluster. Log in to one of your control nodes and run this:
on controller node
kubectl get nodes
kubectl on workstation
ssh -L 6443:localhost:6443 root@192.168.2.170
kubectl config set-cluster kubernetes-the-hard-way \
--certificate-authority=ca.pem \
--embed-certs=true \
--server=https://localhost:6443
kubectl config set-credentials admin \
--client-certificate=admin.pem \
--client-key=admin-key.pem
kubectl config set-context kubernetes-the-hard-way \
--cluster=kubernetes-the-hard-way \
--user=admin
kubectl config use-context kubernetes-the-hard-way
test commands
kubectl get pods
kubectl get nodes
kubectl version
Setup worker networking
on both worker nodes
sudo sysctl net.ipv4.conf.all.forwarding=1
Install Weave Net
on local workstation
kubectl apply -f "https://cloud.weave.works/k8s/net?k8s-version=$(kubectl version | base64 | tr -d '\n')&env.IPALLOC_RANGE=10.200.0.0/16"
check if running
kubectl get pods -n kube-system
create an Nginx deployment with 2 replicas
cat << EOF | kubectl apply -f -
apiVersion: apps/v1
kind: Deployment
metadata:
name: nginx
spec:
selector:
matchLabels:
run: nginx
replicas: 2
template:
metadata:
labels:
run: nginx
spec:
containers:
- name: my-nginx
image: nginx
ports:
- containerPort: 80
EOF
create a service for that deployment so that we can test connectivity to services
kubectl expose deployment/nginx
start up another pod. We will use this pod to test our networking
kubectl run busybox --image=radial/busyboxplus:curl --command -- sleep 3600
POD_NAME=$(kubectl get pods -l run=busybox -o jsonpath="{.items[0].metadata.name}")
get the IP addresses of our two Nginx pods
kubectl get ep nginx
ouput looks like this
NAME ENDPOINTS AGE
nginx 10.200.0.2:80,10.200.128.1:80 14s
check that busybox pod can connect to the Nginx pods on both of those IP addresses
kubectl exec $POD_NAME -- curl 10.200.0.2
kubectl exec $POD_NAME -- curl 10.200.128.1
Delete pods
kubectl delete deployment busybox
kubectl delete deployment nginx
kubectl delete svc nginx
Install kube-dns
from workstation or controller node
kubectl create -f https://storage.googleapis.com/kubernetes-the-hard-way/kube-dns.yaml
Verify that the kube-dns pod starts up correctly
kubectl get pods -l k8s-app=kube-dns -n kube-system
Kubernetes install with kubeadm
Network Example
10.10.11.20 kubemaster kubemaster.myhypervisor.ca
10.10.11.30 kube1 kube1.myhypervisor.ca
10.10.11.36 kube2 kube2.myhypervisor.caDisable SELinux.
setenforce 0
sed -i --follow-symlinks 's/SELINUX=enforcing/SELINUX=disabled/g' /etc/sysconfig/selinuxEnable the br_netfilter module for cluster communication.
modprobe br_netfilter
echo '1' > /proc/sys/net/bridge/bridge-nf-call-iptablesDisable swap to prevent memory allocation issues.
swapoff -a
vim /etc/fstab
#Remove swap from fstabSetup NTP
yum install -y ntp
systemctl enable ntpd
systemctl start ntpdInstall Docker CE.
Install the Docker prerequisites.
yum install -y yum-utils device-mapper-persistent-data lvm2Add the Docker repo and install Docker.
yum-config-manager --add-repo https://download.docker.com/linux/centos/docker-ce.repo
yum install -y docker-ceAdd the Kubernetes repo.
cat << EOF | tee /etc/yum.repos.d/kubernetes.repo
[kubernetes]
name=Kubernetes
baseurl=https://packages.cloud.google.com/yum/repos/kubernetes-el7-x86_64
enabled=1
gpgcheck=0
repo_gpgcheck=0
gpgkey=https://packages.cloud.google.com/yum/doc/yum-key.gpg
https://packages.cloud.google.com/yum/doc/rpm-package-key.gpg
EOFInstall Kubernetes.
yum install -y kubelet kubeadm kubectlReboot.
Enable and start Docker and Kubernetes.
systemctl enable docker
systemctl enable kubelet
systemctl start docker
systemctl start kubeletCheck the group Docker is running in.
docker info | grep -i cgroup*Note: Complete the following section on the MASTER ONLY!
Initialize the cluster using the IP range for Flannel.
kubeadm init --pod-network-cidr=10.244.0.0/16Copy the kubeadmin join output.
Create standard user
useradd kubeuser
usermod -aG wheel kubeuser
passwd kubeuser
su kubeuser
mkdir -p $HOME/.kube
sudo cp -i /etc/kubernetes/admin.conf $HOME/.kube/config
sudo chown $(id -u):$(id -g) $HOME/.kube/configDeploy Flannel.
kubectl apply -f https://raw.githubusercontent.com/coreos/flannel/master/Documentation/kube-flannel.ymlCheck the cluster state.
kubectl get pods --all-namespacesNote: Complete the following steps on the NODES ONLY!
Run the join command that you copied earlier, then check your nodes from the master.
kubectl get nodesCreate a service account (for kube dashboard
Copy the token in a safe location, you will be able to use that token for services such as the k8s dashboard
Creating a admin / service account user called k
kubectl create serviceaccount k8sadmin -n kube-systemGive the user admin privileges
kubectl create clusterrolebinding k8sadmin --clusterrole=cluster-admin --serviceaccount=kube-system:k8sadminGet the token
kubectl -n kube-system describe secret $(sudo kubectl -n kube-system get secret | (grep k8sadmin || echo "$_") | awk '{print $1}') | grep token: | awk '{print $2}'Installing MetalLB
kubectl apply -f https://raw.githubusercontent.com/google/metallb/v0.8.3/manifests/metallb.yamlCreate a file called metallb.yml
apiVersion: v1
kind: ConfigMap
metadata:
namespace: metallb-system
name: config
data:
config: |
address-pools:
- name: default
protocol: layer2
addresses:
- 10.10.11.150-10.10.11.160kubectl create -f metallb.ymlInstalling Dashboard
kubectl apply -f https://raw.githubusercontent.com/kubernetes/dashboard/v2.0.0-beta8/aio/deploy/recommended.yamlCreate a file called kube-dashboard-service.yml
apiVersion: v1
kind: Service
metadata:
labels:
app.kubernetes.io/name: load-balancer-dashboard
name: dashboard-service
namespace: kubernetes-dashboard
spec:
ports:
- port: 8080
protocol: TCP
targetPort: 8443
selector:
k8s-app: kubernetes-dashboard
type: LoadBalancerkubectl create -f kube-dashboard-service.yml
kubectl get all -AWith the command "kubectl get all -A" you will be able to find the external IP provided by metallb, only https is supported, use the token from the previous step to login to the dashboard.
(Heketi Install guide here: https://wiki.myhypervisor.ca/books/linux/page/glusterfs-using-ubuntu1604-c74)
Add Heketi for Dynamic Volumes
Create a file called heketi-storage.yml
apiVersion: v1
kind: Secret
metadata:
name: heketi-secret
namespace: default
type: "kubernetes.io/glusterfs"
data:
# base64 encoded password. E.g.: echo -n "password" | base64
key: cGFzc3dvcmQ=
---
apiVersion: storage.k8s.io/v1
kind: StorageClass
metadata:
name: gluster-vol-default
provisioner: kubernetes.io/glusterfs
parameters:
resturl: "http://10.10.11.161:8080"
restuser: "admin"
secretNamespace: "default"
secretName: "heketi-secret"
clusterid: "eba4f23d2eb41f894590cbe3ee05e51e"
allowVolumeExpansion: true
---
apiVersion: v1
kind: Endpoints
metadata:
name: glusterfs-cluster
subsets:
- addresses:
- ip: 10.10.11.200
ports:
- port: 5000
- addresses:
- ip: 10.10.11.201
ports:
- port: 5000
---
apiVersion: v1
kind: Service
metadata:
name: glusterfs-cluster
spec:
ports:
- port: 5000Install Glusterfs-Client, The version needs to be the same as the Glusterfs Server.
apt-get install software-properties-common
add-apt-repository ppa:gluster/glusterfs-7
apt install glusterfs-clientAdd a PVC to the storage (Example at the bottom is for a pihole deployment)
---
apiVersion: v1
kind: PersistentVolumeClaim
metadata:
name: pihole-dnsmasq-volume
annotations:
volume.beta.kubernetes.io/storage-class: gluster-vol-default
spec:
accessModes:
- ReadWriteMany
resources:
requests:
storage: 1Gi
---
apiVersion: v1
kind: PersistentVolumeClaim
metadata:
name: pihole-etc-volume
annotations:
volume.beta.kubernetes.io/storage-class: gluster-vol-default
spec:
accessModes:
- ReadWriteMany
resources:
requests:
storage: 1GiDeploy container
Deploy your application (example below is pihole)
---
apiVersion: apps/v1
kind: Deployment
metadata:
name: pihole
labels:
app: pihole
spec:
replicas: 1
selector:
matchLabels:
app: pihole
template:
metadata:
labels:
app: pihole
name: pihole
spec:
containers:
- name: pihole
image: pihole/pihole:latest
imagePullPolicy: Always
env:
- name: TZ
value: "America/New_York"
- name: WEBPASSWORD
value: "secret"
volumeMounts:
- name: pihole-etc-volume
mountPath: "/etc/pihole"
- name: pihole-dnsmasq-volume
mountPath: "/etc/dnsmasq.d"
volumes:
- name: pihole-etc-volume
persistentVolumeClaim:
claimName: pihole-etc-volume
- name: pihole-dnsmasq-volume
persistentVolumeClaim:
claimName: pihole-dnsmasq-volume
---
apiVersion: v1
kind: Service
metadata:
name: pihole-udp
spec:
type: LoadBalancer
ports:
- port: 53
targetPort: 53
protocol: UDP
name: dns-udp
selector:
app: pihole
---
apiVersion: v1
kind: Service
metadata:
name: pihole-tcp
spec:
type: LoadBalancer
ports:
- port: 53
targetPort: 53
protocol: TCP
name: dns-tcp
- protocol: TCP
name: web
port: 80
selector:
app: piholeInstall Helm Chart
curl https://raw.githubusercontent.com/helm/helm/master/scripts/get-helm-3 > get_helm.sh
chmod 700 get_helm.sh
./get_helm.sh
helm repo add stable https://kubernetes-charts.storage.googleapis.com/
helm repo updatetraefik
apiVersion: v1
kind: ServiceAccount
metadata:
namespace: default
name: traefik-ingress-controller
---
kind: Deployment
apiVersion: apps/v1
metadata:
namespace: default
name: traefik
labels:
app: traefik
spec:
replicas: 1
selector:
matchLabels:
app: traefik
template:
metadata:
labels:
app: traefik
spec:
serviceAccountName: traefik-ingress-controller
containers:
- name: traefik
image: traefik:v2.0
args:
- --api.insecure
- --accesslog
- --entrypoints.web.Address=:80
- --providers.kubernetescrd
ports:
- name: web
containerPort: 80
- name: admin
containerPort: 8080
---
kind: Deployment
apiVersion: apps/v1
metadata:
namespace: default
name: whoami
labels:
app: whoami
spec:
replicas: 2
selector:
matchLabels:
app: whoami
template:
metadata:
labels:
app: whoami
spec:
containers:
- name: whoami
image: containous/whoami
ports:
- name: web
containerPort: 80
---
apiVersion: apiextensions.k8s.io/v1beta1
kind: CustomResourceDefinition
metadata:
name: ingressroutes.traefik.containo.us
spec:
group: traefik.containo.us
version: v1alpha1
names:
kind: IngressRoute
plural: ingressroutes
singular: ingressroute
scope: Namespaced
---
apiVersion: apiextensions.k8s.io/v1beta1
kind: CustomResourceDefinition
metadata:
name: ingressroutetcps.traefik.containo.us
spec:
group: traefik.containo.us
version: v1alpha1
names:
kind: IngressRouteTCP
plural: ingressroutetcps
singular: ingressroutetcp
scope: Namespaced
---
apiVersion: apiextensions.k8s.io/v1beta1
kind: CustomResourceDefinition
metadata:
name: middlewares.traefik.containo.us
spec:
group: traefik.containo.us
version: v1alpha1
names:
kind: Middleware
plural: middlewares
singular: middleware
scope: Namespaced
---
apiVersion: apiextensions.k8s.io/v1beta1
kind: CustomResourceDefinition
metadata:
name: tlsoptions.traefik.containo.us
spec:
group: traefik.containo.us
version: v1alpha1
names:
kind: TLSOption
plural: tlsoptions
singular: tlsoption
scope: Namespaced
---
apiVersion: apiextensions.k8s.io/v1beta1
kind: CustomResourceDefinition
metadata:
name: traefikservices.traefik.containo.us
spec:
group: traefik.containo.us
version: v1alpha1
names:
kind: TraefikService
plural: traefikservices
singular: traefikservice
scope: Namespaced
---
kind: ClusterRole
apiVersion: rbac.authorization.k8s.io/v1beta1
metadata:
name: traefik-ingress-controller
rules:
- apiGroups:
- ""
resources:
- services
- endpoints
- secrets
verbs:
- get
- list
- watch
- apiGroups:
- extensions
resources:
- ingresses
verbs:
- get
- list
- watch
- apiGroups:
- extensions
resources:
- ingresses/status
verbs:
- update
- apiGroups:
- traefik.containo.us
resources:
- middlewares
verbs:
- get
- list
- watch
- apiGroups:
- traefik.containo.us
resources:
- ingressroutes
verbs:
- get
- list
- watch
- apiGroups:
- traefik.containo.us
resources:
- ingressroutetcps
verbs:
- get
- list
- watch
- apiGroups:
- traefik.containo.us
resources:
- tlsoptions
verbs:
- get
- list
- watch
- apiGroups:
- traefik.containo.us
resources:
- traefikservices
verbs:
- get
- list
- watchapiVersion: traefik.containo.us/v1alpha1
kind: IngressRoute
metadata:
name: simpleingressroute
namespace: default
spec:
entryPoints:
- web
routes:
- match: Host(`pihole.myhypervisor.ca`) && PathPrefix(`/`)
kind: Rule
services:
- name: pihole-web
port: 80
Docker Swarm (WIP)
On master
docker swarm initCopy/Paste docker swarm join on all other nodes
docker swarm join --token TOKEN IP_ADDRESS:2377Create a swarm service
docker service create --name weather-app --publish published=80,target=3000 --replicas=3 weather-appList Docker services
docker service lsUbuntu - Remove and Reinstall MySQL
Reason i am posting thing is because MySQL leaves to many file behind, this post can be helpful when you try to install mariadb but you ca not because of all the old MySQL files still on your Ubuntu system.
apt-get remove --purge mysql*
apt-get purge mysql*
apt-get autoremove
apt-get autoclean
apt-get remove dbconfig-mysql
apt-get dist-upgrade
apt-get install mysql-server
TargetCLI CentOS 7
Install targetcli
yum install targetcli -y
systemctl enable target
systemctl start targetConfigure targetlci
Use the "cd' command (no args) inside target cli to browse through the paths
The iqn names below are the ones from the nodes you will later connect the iSCSI
targetcli
cd /backstores/block/
create disk0 /dev/sdb
cd /iscsi
/iscsi> create
cd /iscsi/.../tpg1/acls
create iqn.1991-05.com.microsoft:node01.example.local
create iqn.1991-05.com.microsoft:node02.example.local
cd /iscsi/iqn..../tpg1/luns
create /backstores/block/disk0
exitConfigure firewall
systemctl start firewalld
firewall-cmd --list-all
firewall-cmd --permanent --zone=internal --add-interface=eth0
firewall-cmd --permanent --zone=public --add-interface=eth1
firewall-cmd --permanent --zone=internal --add-source=10.0.0.0/24
firewall-cmd --permanent --zone=internal --add-port=3260/tcp
firewall-cmd --permanent --zone=public --add-source=1.1.1.1/32
firewall-cmd --permanent --zone=public --add-port=22/tcp
firewall-cmd --reload
systemctl enable firewalld