Allow outside connections targeting TCP port 80 to redirect to internal port 8080.
``` object network obj-192.166.1.101-srv_8080 host 192.166.1.101 nat (inside,outside) static 192.166.1.101 service tcp 8080 http ``` ## DNAT In the example bellow, the subnet will be on a port channel named inside2 and will have a obj-group called net-local2 ``` interface port-channel 150 nameif inside2 security-level 100 ip address 172.10.10.0 255.255.255.0 ``` ``` object-group network net-local2 network-object 172.10.10.0 255.255.255.0 ``` ***after-auto*** Inserts the rule at the end of section. You can translate all addresses on the source interface by specifying source dynamic any mapped\_obj ```shell nat (inside2,outside) after-auto source dynamic net-local2 interface dns ``` PAT connections will be visible in ***show xlate*** > fw1# show xlate > TCP PAT from inside2:172.10.10.11/51995 to outside:199.199.199.100/51995 flags riD > idle 0:05:37 timeout 0:00:30 For more advanced configs, refer to article below: [https://www.cisco.com/c/en/us/td/docs/security/asa/asa-command-reference/I-R/cmdref2/n.html](https://www.cisco.com/c/en/us/td/docs/security/asa/asa-command-reference/I-R/cmdref2/n.html) ### Configuring Static PAT as a Twice NAT/Manual NAT ``` object network local-192.168.1.100 host 192.168.1.100 object network external-2.2.2.2 host 2.2.2.2 object service https service tcp source eq https object service tcp_8443 service tcp source eq 8443 nat (inside,outside) source static local-192.168.1.100 external-2.2.2.2 service tcp_8443 https ``` ## DHCP Server ``` dhcpd address 10.20.106.240-10.20.106.253 inside dhcpd dns 8.8.8.8 8.8.4.4 dhcpd enable inside ``` ## ASDM ``` asdm image disk0:/asdm-X.bin ``` ``` http server enable 8080 httpIn this example you will be able to connect to "192.168.3.0/24" from your local "192.168.2.0/24" subnet using the 192.168.1.2 port, the remote port will be on the same vlan using the IP 192.168.1.1
## Object Groups ASA ``` object-group service http-https tcp port-object eq www port-object eq https ``` ``` object-group network webservers network-object host 192.168.1.101 network-object host 192.168.1.102 network-object host 192.168.1.103 ``` ``` access-list OUTSIDE-IN extended permit tcp any object-group webservers object-group http-https access-group OUTSIDE-IN in interface outside ``` ## packet-tracer ``` packet-tracer input inside icmp 192.168.1.100 8 0 8.8.8.8 packet-tracer input outside tcp 8.8.8.8 80 192.168.1.100 80 ``` ## Backup/Restore Create a Backup ```shell copy running-config disk0:/backup-2017-00-00 ``` Restore a backup ```shell copy disk0:/backup-2017-08-18 startup-config reload ``` ## Allow FTP passive ports The firewall will block this data communication because it will start from a different source port (20 instead of 21). The purpose therefore of the inspect ftp command on the Cisco ASA is to listen for the initial Command FTP traffic (on port 21) and dynamically open a secondary Data connection between FTP server and client (from port 20). This will allow FTP communication to work. If you disable FTP inspection with the no inspect ftp command, outbound users can start connections only in passive mode, and all inbound FTP is disabled. ```shell policy-map global_policy class inspection_default no inspect ftp ``` ## Mitigating attack traffic ##### **DEFINE TRAFFIC** First of all we define which traffic the MPF policy will be applied to. In the example below we exclude the host 8.8.8.8 whilst inspecting all other traffic. ```codemulti access-list mpf-policy-acl extended permit ip any any ``` ##### **CREATE CLASS-MAP** Next we assign the previously created access-list to a class-map. ```codemulti class-map mpf-policy match access-list mpf-policy-acl ``` ##### **CREATE POLICY-MAP** Then a policy-map is created and the necessary connection limits defined. ```codemulti policy-map mpf-policy-map class mpf-policy set connection conn-max 9500 set connection embryonic-conn-max 5000 set connection per-client-embryonic-max 100 set connection per-client-max 300 ``` ## Allow LAN management over VPN ``` management-access inside nat (inside,any) source static obj-LANSUBNET obj-LANSUBNET destination static obj-VPNSUBNET obj-VPNSUBNET route-lookup httpTo run on the Standby FW
``` failover active ``` ## Licensing Info **Different ASA models have different licensing options. To see what the limits of the active license, use the following:** ``` sh version ``` ### **Links** [https://www.cisco.com/c/en/us/support/security/asa-5500-series-next-generation-firewalls/products-command-reference-list.html](https://www.cisco.com/c/en/us/support/security/asa-5500-series-next-generation-firewalls/products-command-reference-list.html) [https://wiki.myhypervisor.ca/books/networking/page/cisco-asa-site-to-site](https://wiki.myhypervisor.ca/books/networking/page/cisco-asa-site-to-site) [https://www.cisco.com/c/en/us/support/security/asa-5500-series-next-generation-firewalls/products-installation-and-configuration-guides-list.html](https://www.cisco.com/c/en/us/support/security/asa-5500-series-next-generation-firewalls/products-installation-and-configuration-guides-list.html) [https://www.cisco.com/c/en/us/support/security/asa-5500-series-next-generation-firewalls/products-configuration-examples-list.html](https://www.cisco.com/c/en/us/support/security/asa-5500-series-next-generation-firewalls/products-configuration-examples-list.html) # Cisco ASA Site to Site ##### Verification: NAT or transparent modeValue should return ( Firewall mode: Router )
**Always do a backup!!!**
```shell copy running-config disk0:/running-config-backup-DDMMYYYY ``` ## ACL / No NAT Rules Change net-local and and remote for local and remote IPYou do not need to create a object for the LAN if you already have one for another tunnel // You also **can not** have 2 tunnels with the same remote IP's
```shell object-group network net-local network-object 10.1.2.0 255.255.255.0 object-group network net-remote network-object 192.168.1.0 255.255.255.0 ``` Create a cryptomap ACL ```shell access-list outside_1_cryptomap extended permit ip object-group net-local object-group net-remote ``` Allow traffic between the two sites to bypass NATAlways check the name of interface on the port channel, the tunnel will not work if your interface is named inside3
```shell nat (inside,outside) source static net-local net-local destination static net-remote net-remote ``` ## IKEV1 - Route based ``` tunnel-group 199.168.1.100 type ipsec-l2l tunnel-group 199.168.1.100 ipsec-attributes ikev1 pre-shared-key ***** crypto ikev1 policy 10 authentication pre-share encryption aes-256 hash sha lifetime 3600 group 5 crypto ipsec ikev1 transform-set ESP-AES-256-MD5 esp-aes-256 esp-md5-hmac crypto ipsec profile vpn1 set ikev1 transform-set ESP-AES-256-SHA set security-association lifetime seconds 3600 interface Tunnel1 nameif int-vpn1 ip address 192.168.0.1 255.255.255.252 tunnel source interface outside tunnel destination 199.168.1.100 tunnel mode ipsec ipv4 tunnel protection ipsec profile vpn1 access-list vpn1-inbound extended permit ip any any access-list vpn1-outbound extended permit ip any any access-group vpn1-inbound in interface int-vpn1 access-group vpn1-outbound out interface int-vpn1 route int-vpn1 10.10.10.0 255.255.255.0 192.168.0.2 1 ``` ## IKEV1 - Policy based Create the tunnel group, and configure the pre-shared key. (In ex; 199.168.1.100 = Remote WAN) ```shell tunnel-group 199.168.1.100 type ipsec-l2l tunnel-group 199.168.1.100 ipsec-attributes pre-shared-key INSERT_SECURE_PRE_SHARED_KEY_HERE ``` Declare the most common transform sets (only do once). ```shell crypto ipsec ikev1 transform-set ESP-AES-128-SHA esp-aes esp-sha-hmac crypto ipsec ikev1 transform-set ESP-AES-128-MD5 esp-aes esp-md5-hmac crypto ipsec ikev1 transform-set ESP-AES-192-SHA esp-aes-192 esp-sha-hmac crypto ipsec ikev1 transform-set ESP-AES-192-MD5 esp-aes-192 esp-md5-hmac crypto ipsec ikev1 transform-set ESP-AES-256-SHA esp-aes-256 esp-sha-hmac crypto ipsec ikev1 transform-set ESP-AES-256-MD5 esp-aes-256 esp-md5-hmac crypto ipsec ikev1 transform-set ESP-3DES-MD5 esp-3des esp-md5-hmac crypto ipsec ikev1 transform-set ESP-DES-SHA esp-des esp-sha-hmac crypto ipsec ikev1 transform-set ESP-DES-MD5 esp-des esp-md5-hmac crypto ipsec ikev1 transform-set ESP-3DES-SHA esp-3des esp-sha-hmac ``` Phase 1 parameters ```shell crypto ikev1 policy 10 authentication pre-share encryption 3des hash sha group 2 lifetime 86400 ### Enable ikev1 on the outside interface - THIS JUST NEED TO BE CONFIGURED ONCE YOU SETUP THE FIRST VPN crypto ikev1 enable outside crypto ikev1 am-disable #(// Main mode remove this line for aggressive mode) ``` Enable ikev1 on the outside interface -**THIS JUST NEED TO BE DONE ON THE FIRST IKEV1 VPN** ``` crypto ikev1 enable outside ``` Set main mode // Do not include this line for aggressive modeThis is a global setting, if you add the line bellow in a ASA that contains a tunnel that uses aggressive mode, it will break the other tunnel
``` crypto ikev1 am-disable ``` Phase 2 parametersIf you remove the ACL used by a tunnel, it will **remove** the line crypto map outside\_map 1 match address ACL\_NAME // Only set **PFS** if configured on the remote side, else skip the line
```shell crypto map outside_map 1 match address outside_1_cryptomap crypto map outside_map 1 set peer 199.168.1.100 crypto map outside_map 1 set transform-set ESP-3DES-SHA crypto map outside_map 1 set pfs group2 crypto map outside_map 1 set security-association lifetime seconds 3600 ``` Enable the crypto map in the outside interface - **THIS JUST NEED TO BE DONE ON THE FIRST IKEV1 VPN** ```entry-title crypto map outside_map interface outside ``` ## IKEV2 Create the tunnel group, and configure the pre-shared key. (In ex; 199.168.1.100 = Remote WAN) ``` group-policy GroupPolicy_IKEv2 internal group-policy GroupPolicy_IKEv2 attributes vpn-idle-timeout none vpn-tunnel-protocol ikev2 tunnel-group 199.168.1.100 type ipsec-l2l tunnel-group 199.168.1.100 general-attributes default-group-policy GroupPolicy_IKEv2 tunnel-group 199.168.1.100 ipsec-attributes ikev2 remote-authentication pre-shared-key *** ikev2 local-authentication pre-shared-key *** ``` Declare the transform sets ``` crypto ipsec ikev2 ipsec-proposal ESP-AES-256-SHA protocol esp encryption aes-256 protocol esp integrity sha-1 ``` Phase 1 parameters ``` crypto ikev2 policy 20 encryption aes-256 integrity sha group 2 prf sha lifetime seconds 86400 ``` Phase 2 parameters ```entry-title crypto map outside_map 1 match address outside_1_cryptomap crypto map outside_map 1 set pfs crypto map outside_map 1 set peer 199.168.1.100 crypto map outside_map 1 set ikev2 ipsec-proposal ESP-AES-256-SHA crypto map outside_map 1 set security-association lifetime seconds 3600 crypto ikev2 enable outside ``` ## NAT If the request needs to go over the nated IP, do no use the ACL / Nat rules above, configure something like this: ``` nat (INSIDE,OUTSIDE) source static PRENAT_IP POSTNAT_IP destination static DESTINATION_IP DESTINATION_IP ``` ``` access-list outside_1_cryptomap extended permit ip host NATTED_SOURCE_IP host NATTED_DESTINATION_IP ``` # Troubleshooting/Debug Useful links: - [http://www.cisco.com/en/US/products/ps6120/products\_tech\_note09186a00807e0aca.shtml#solunf](http://www.cisco.com/en/US/products/ps6120/products_tech_note09186a00807e0aca.shtml#solunf) - [http://www.cisco.com/c/en/us/td/docs/security/asa/asa72/configuration/guide/conf\_gd/ike.html](http://www.cisco.com/c/en/us/td/docs/security/asa/asa72/configuration/guide/conf_gd/ike.html) - [http://www.cisco.com/c/en/us/td/docs/security/asa/asa90/configuration/guide/asa\_90\_cli\_config/vpn\_ike.html#pgfId-1042302](http://www.cisco.com/c/en/us/td/docs/security/asa/asa90/configuration/guide/asa_90_cli_config/vpn_ike.html#pgfId-1042302) Test connection (Run command 2x) ``` packet-tracer input inside icmp 10.1.2.100 8 0 192.168.1.100 ``` Check IKEV1 Logs ``` debug crypto ikev1 127 ``` Check IKEV2 Logs ``` debug crypto ikev2 protocal ``` Clear tunnel session ``` clear isakmp sa ``` Find pre-shared key ``` more system:running-config | grep pre-shared ``` Check basic VPN session information ``` sh isakmp sa ``` Check details on VPN session (Detailed) ``` show vpn-sessiondb detail ra-ikev1-ipsec ``` Capture traffic for the ACL related to the VPN ``` capture test access-list outside_1_cryptomap interface inside real-time ```Once you are done, always remember to save your config
# IPv4 Subnet Mask Cheat Sheet| **CIDR** | **Subnet Mask** | **Total IPs** | **Usable IPs** |
| /32 | 255.255.255.255 | 1 | 1 |
| /31 | 255.255.255.254 | 2 | 2\* |
| /30 | 255.255.255.252 | 4 | 2 |
| /29 | 255.255.255.248 | 8 | 6 |
| /28 | 255.255.255.240 | 16 | 14 |
| /27 | 255.255.255.224 | 32 | 30 |
| /26 | 255.255.255.192 | 64 | 62 |
| /25 | 255.255.255.128 | 128 | 126 |
| /24 | 255.255.255.0 | 256 | 254 |
| /23 | 255.255.254.0 | 512 | 510 |
| /22 | 255.255.252.0 | 1024 | 1022 |
| /21 | 255.255.248.0 | 2048 | 2046 |
| /20 | 255.255.240.0 | 4096 | 4094 |
| /19 | 255.255.224.0 | 8192 | 8190 |
| /18 | 255.255.192.0 | 16,384 | 16,382 |
| /17 | 255.255.128.0 | 32,768 | 32,766 |
| /16 | 255.255.0.0 | 65,536 | 65,534 |
| /15 | 255.254.0.0 | 131,072 | 131,070 |
| /14 | 255.252.0.0 | 262,144 | 262,142 |
| /13 | 255.248.0.0 | 524,288 | 524,286 |
| /12 | 255.240.0.0 | 1,048,576 | 1,048,574 |
| /11 | 255.224.0.0 | 2,097,152 | 2,097,150 |
| /10 | 255.192.0.0 | 4,194,304 | 4,194,302 |
| /9 | 255.128.0.0 | 8,388,608 | 8,388,606 |
| /8 | 255.0.0.0 | 16,777,216 | 16,777,214 |
| /7 | 254.0.0.0 | 33,554,432 | 33,554,430 |
| /6 | 252.0.0.0 | 67,108,864 | 67,108,862 |
| /5 | 248.0.0.0 | 134,217,728 | 134,217,726 |
| /4 | 240.0.0.0 | 268,435,456 | 268,435,454 |
| /3 | 224.0.0.0 | 536,870,912 | 536,870,910 |
| /2 | 192.0.0.0 | 1,073,741,824 | 1,073,741,822 |
| /1 | 128.0.0.0 | 2,147,483,648 | 2,147,483,646 |
If the active configuration is corrupted, the device will automatically load the filenamed rescue.gz in the `/config` directory as the active configuration:
``` file copy /config/juniper.conf.gz /config/rescue.gz ``` Completely replace the current candidate configuration with a previously stored file. ``` load override /var/tmp/router-config commit ``` Check configuration before a commit: ``` commit check ``` ### Rollback Show rollabcks ``` rollback ? ``` Compare active config with rollback X ``` show | compare rollback X ``` Compare candidate config with active configuration ``` show | compare ``` rollback 0 references the active configuration, so the following command is equivalent to the previous one ``` rollback X ```Replace candidate configuration with rollback X:
We start by loading rollback X ``` rollback X ``` Checking everything is fine ``` show show | compare ``` If everything is fine: ``` commit ``` ### Commit version during X minutes You need to confirm with a commit, or modification will be rollback after X minutes. ``` commit confirmed X ``` Show pending auto commits (and commits history): ``` show system commit ``` Auto commit at a particular time: ``` commit at 02:00:00 show system commit ``` ### Adding a Vlan ``` set vlans VLAN444 vlan-id 444 ```You will then need to add the vlan to an uplink, in this example the uplink is aggregated
``` set interfaces ae48 unit 0 family ethernet-switching vlan members 444 ``` ### Vlan SwitchingFor Ex33 switches, auto-negotiation is not required.
Setting port to access on a vlan ```shell delete interfaces xe-0/0/0 set interfaces xe-0/0/0 ether-options auto-negotiation set interfaces xe-0/0/0 unit 0 family ethernet-switching interface-mode access set interfaces xe-0/0/0 unit 0 family ethernet-switching vlan members 4082 set interfaces xe-0/0/0 unit 0 family ethernet-switching recovery-timeout 300 ``` Setting port to aggregated ```shell delete interfaces xe-0/0/0 set interfaces xe-0/0/0 description member-ae0 set interfaces xe-0/0/0 ether-options auto-negotiation set interfaces xe-0/0/0 ether-options 802.3ad ae0 ``` Configuring the LACP on the aggregated link ``` set interfaces ae0 description "aggregate-link" set interfaces ae0 aggregated-ether-options link-speed 10g set interfaces ae0 aggregated-ether-options lacp active set interfaces ae0 unit 0 family ethernet-switching interface-mode trunk set interfaces ae0 unit 0 family ethernet-switching vlan members 4040 set interfaces ae0 unit 0 family ethernet-switching vlan members 4041 set interfaces ae0 unit 0 family ethernet-switching storm-control default set interfaces ae0 unit 0 family ethernet-switching recovery-timeout 300 ``` ``` delete protocols rstp interface xe-0/0/0 delete protocols rstp interface xe-1/0/0 set protocols rstp interface ae0 edge set protocols rstp interface ae0 no-root-port ``` ### Firewall Rules ``` set interfaces vlan unit [VAN_ID] family inet filter input INBOUND-TRAFFIC set firewall family inet filter INBOUND-TRAFFIC term name-of-rule from source-address [IP]/32 set firewall family inet filter INBOUND-TRAFFIC term name-of-rule from destination-address [IP]/32 set firewall family inet filter INBOUND-TRAFFIC term name-of-rule from destination-port 22 set firewall family inet filter INBOUND-TRAFFIC term name-of-rule then accept ``` # SAN - Dell Equallogic CLI Notes ``` group1> member select MEMBERNAME eth sel 1 NEWIPADDRESS NETMASK group1> grpparams group-ipaddress IPADDRESS ``` Then go back and fix the other network. ``` group1> member select MEMBERNAME eth sel 0 NEWIPADDRESS NETMASK ``` Then set the new default gateway ``` group1> member select MEMBERNAME def-gateway IPADDRESS ``` Supported Update Paths [https://eqlsupport.dell.com/support/download.aspx?id=6442456361](https://eqlsupport.dell.com/support/download.aspx?id=6442456361) Reset ``` Press Ctrl/p setenv RESETPASSWORD 1 reload account select grpadmin passwd group1> reset ``` Change VLAN ``` grpparams dcb def-vlan-id 609 ``` Downgrade FWTHIS WILL WIPE THE SAN
Transfer FW, login as "root / grpadmin" ``` update.sh -override-downgrade ``` # Dell PowerConnect Switch CLI ## Adding a VLAN to a port-channel Add the VLAN to the DB ``` vlan database vlan 4082 ``` Check ARP respose from uplinks ``` show bridge address-table show bridge address-table vlannetplan apply does not require a service restart or a reboot
#### NetworkManager Configuring with wifi nic ``` network: version: 2 renderer: NetworkManager wifis: wlx7c8bca0d69b6: dhcp4: no addresses: [192.168.1.100/24] gateway4: 192.168.1.1 nameservers: addresses: [192.168.1.1,8.8.8.8] access-points: Raj: password: MyPass ``` ## Links: [https://netplan.io/](https://netplan.io/) # Cisco ASA - AnyConnect VPN #### Enable webvpn ``` webvpn enable outside anyconnect image disk0:/anyconnect-win-4.0.00061-k9.pkg 1 anyconnect image disk0:/anyconnect-macosx-i386-4.0.00061-k9.pkg 2 anyconnect image disk0:/anyconnect-linux-64-4.0.00061-k9.pkg 3 anyconnect enable tunnel-group-list enable cache disable error-recovery disable ``` ``` ip local pool webvpn-ippool 172.28.38.10-172.28.38.250 mask 255.255.255.0 ``` ``` object network anyconnect_subnet subnet 172.28.38.0 255.255.255.0 object network internal_subnet subnet 172.28.37.0 255.255.255.0 ``` ``` nat (any,outside) source static internal_subnet internal_subnet destination static anyconnect_subnet anyconnect_subnet ``` ``` group-policy SSLAccess internal group-policy SSLAccess attributes address-pools value webvpn-ippool vpn-tunnel-protocol ssl-client split-tunnel-policy tunnelspecified tunnel-group SSLAccess type remote-access tunnel-group SSLAccess general-attributes default-group-policy SSLAccess tunnel-group SSLAccess webvpn-attributes group-alias VPN ``` ``` username username password hhcZmvOYAh1el mschap privilege 0 username username attributes vpn-group-policy SSLAccess ``` #### SplitACL (optional) ``` group-policy SSLAccess attributes dns-server value 8.8.8.8 8.8.4.4 split-tunnel-network-list value Split-ACL ``` ``` access-list Split-ACL standard permit 172.28.38.0 255.255.255.0 ``` # Improve PFsense PPPOE +1Gbps To improve speeds from 500Mbps on PFsense, Change the following values: `vi /boot/loader.conf.local` > net.isr.dispatch=deferred > net.isr.maxthreads="-1" > net.isr.bindthreads="1" In System > Advanced > Miscellaneous Enable PowerD and AC Power to Maximum [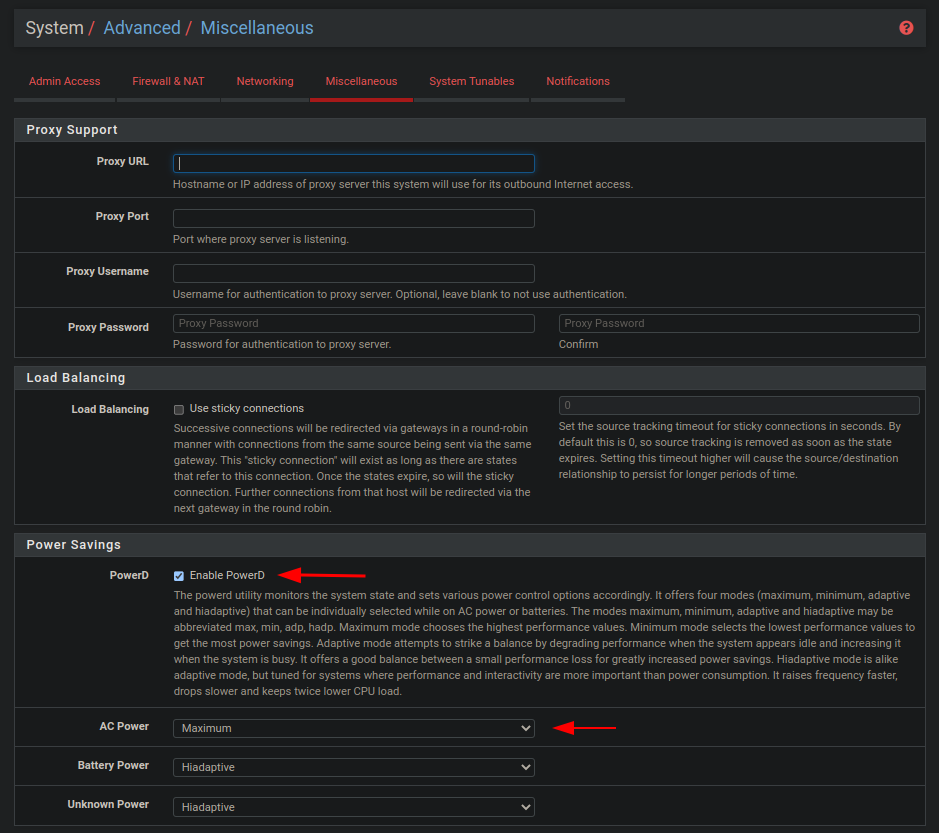](https://wiki.myhypervisor.ca/uploads/images/gallery/2022-11/a.png)