Hyper-V
- S2D Force remove a drive
- Add IP on vSwitch
- Adding Adapter on vSwitch
- AVMA - Hyper-V Automatic Virtual Machine Activation
- Configuring DR Replica
S2D Force remove a drive
To verify that all drives are healthy and operational :
Get-PhysicalDiskGet the FriendlyName of the device :
Get-PhysicalDisk | ft FriendlyNameRetire the disk :
Set-PhysicalDisk -FriendlyName "<DeviceName>" -Usage RetiredFind the name of the Virtual Disk :
Get-VirtualDiskIf the name is too long use :
Get-VirtualDisk | ft -AutoSizeFor every Virtual Disk in the storage pool do :
Repair-VirtualDisk -FriendlyName "YourVirtualDisk"Open a new PowerShell window to monitor the repairs with :
Get-StorageJobRemove the PhysicalDisk if all repairs are successfully done:
Get-PhysicalDisk | Where-Object { $_.Usage -eq ‘Retired’}Assign the disk to a variable:
$DiskToRemove = Get-PhysicalDisk | Where-Object { $_.Usage -eq ‘Retired’}Find the name of the storage pool:
Get-StoragePoolDelete the physical disk from the storage pool:
Remove-PhysicalDisk -PhysicalDisks $DiskToRemove -StoragePoolFriendlyName "Storage pool"Add IP on vSwitch
So you installed hyper-v and you need to configure your NIC with your public IP and your secondary IP's, let me show you how.
(Would recommend having physical access / KVM IP if anything fails)
First create a v-Switch in the hyper-v settings.
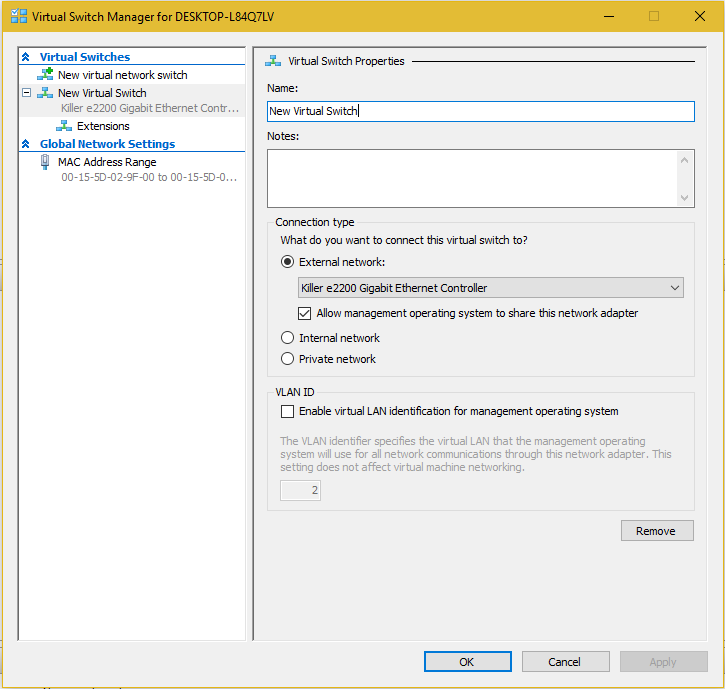
Then, go to the IPv4 settings of your new hyper-v vswitch and add your primary IP.
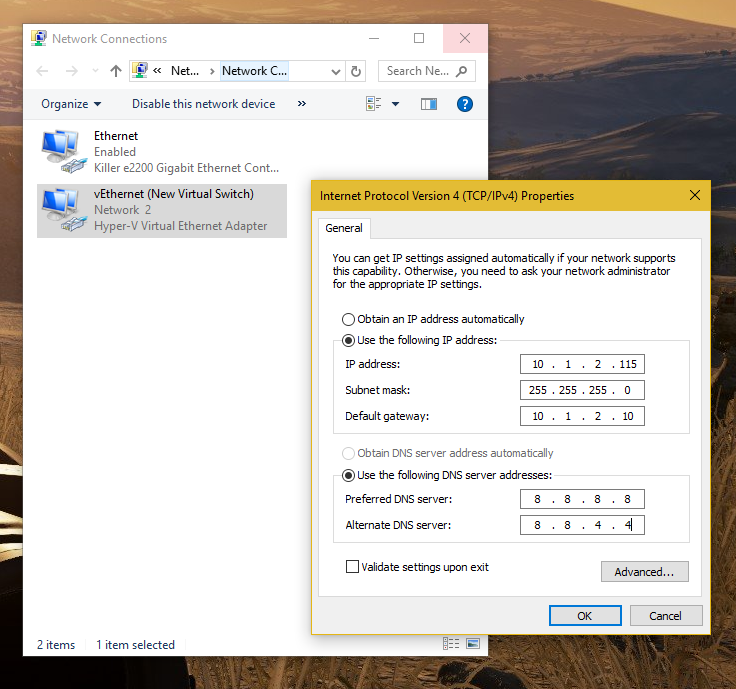
To add your secondary IP's, you will need to go the the advanced options and put in the first usable address of your secondary subnet, not the broadcast address but the first usable address and the subset below.
You will then use that address as the gateway for your VM's.

Last step will be to enable ip forwarding, open power-shell as admin and type the following commands :
netsh
netsh> interface ipv4
Then the following command to view the list of available interfaces
netsh interface ipv4> show intTo view the interface settings, replace "15" by the proper ID :
netsh interface ipv4> show int 15And finally, the following command to enable IP forwarding :
netsh interface ipv4> set int 15 forwarding=enabled 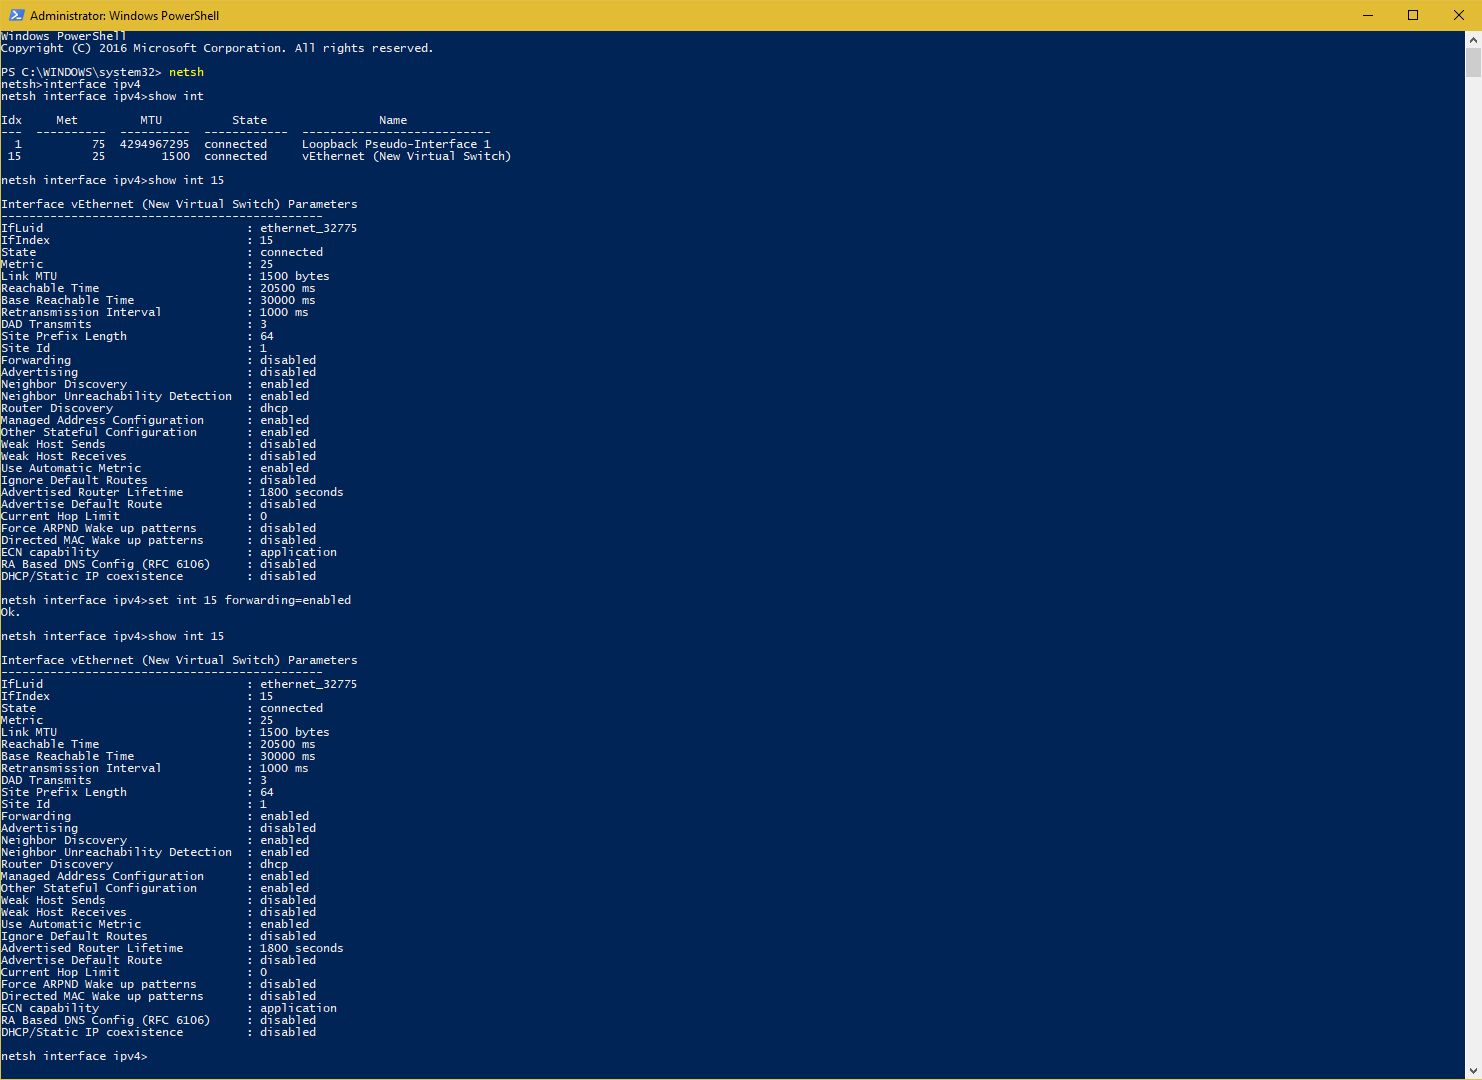
Adding Adapter on vSwitch
List Adapter
Get-VMNetworkAdapterVlan -ManagementOS Adding Adapter
Add-VMNetworkAdapter -ManagementOS -Name "Lan" -SwitchName "vSwitch"
Add-VMNetworkAdapter -ManagementOS -Name "Wan" -SwitchName "vSwitch"
Tagging vlan on Adapter
Set-VMNetworkAdapterVlan -ManagementOS -VMNetworkAdapterName "LAN" -Access -VlanId 3023
Set-VMNetworkAdapterVlan -ManagementOS -VMNetworkAdapterName "Wan" -Access -VlanId 2295
If you need to remove an Adapter
Remove-VMNetworkAdapter -ManagementOs -VMNetworkAdapterName LANAdd an IP to an Adapter
New-NetIPAddress -InterfaceAlias "vEthernet (LAN)" -IPAddress 10.10.10.10 -PrefixLength 24 -Type Unicast
New-NetIPAddress -InterfaceAlias "vEthernet (WAN)" -IPAddress 1.1.1.1 -PrefixLength 24 -DefaultGateway 2.2.2.2 -Type Unicast
AVMA - Hyper-V Automatic Virtual Machine Activation
Open CMD/Powershell
slui 3| Guest Operating System | Key |
|---|---|
| Windows Server 2012 R2 Essentials | K2XGM-NMBT3-2R6Q8-WF2FK-P36R2 |
| Windows Server 2012 R2 Standard | DBGBW-NPF86-BJVTX-K3WKJ-MTB6V |
| Windows Server 2012 R2 Datacenter | Y4TGP-NPTV9-HTC2H-7MGQ3-DV4TW |
| Windows Server 2016 Essentials | B4YNW-62DX9-W8V6M-82649-MHBKQ |
| Windows Server 2016 Standard | C3RCX-M6NRP-6CXC9-TW2F2-4RHYD |
| Windows Server 2016 Datacenter | TMJ3Y-NTRTM-FJYXT-T22BY-CWG3J |
| Windows Server 2019 Essentials | 2CTP7-NHT64-BP62M-FV6GG-HFV28 |
| Windows Server 2019 Standard | TNK62-RXVTB-4P47B-2D623-4GF74 |
| Windows Server 2019 Datacenter | H3RNG-8C32Q-Q8FRX-6TDXV-WMBMW |
Supported Activation
| Host |
Windows Server 2012 R2 will activate |
Windows Server 2016 will activate |
| Windows Server 2012 R2 Essentials Edition> |
Yes |
Yes |
| Windows Server 2012 R2 Standard Edition |
Yes |
Yes |
| Windows Server 2012 R2 Datacenter Edition |
Yes |
Yes |
| Windows Server 2016 Essentials Edition |
No |
Yes |
| Windows Server 2016 Standard Edition |
No |
Yes |
| Windows Server 2016 Datacenter Edition |
No |
Yes |
| Server host version | Windows Server 2019 | Windows Server 2016 | Windows Server 2012 R2 |
|---|---|---|---|
| Windows Server 2019 | X | X | X |
| Windows Server 2016 | X | X | |
| Windows Server 2012 R2 | X |
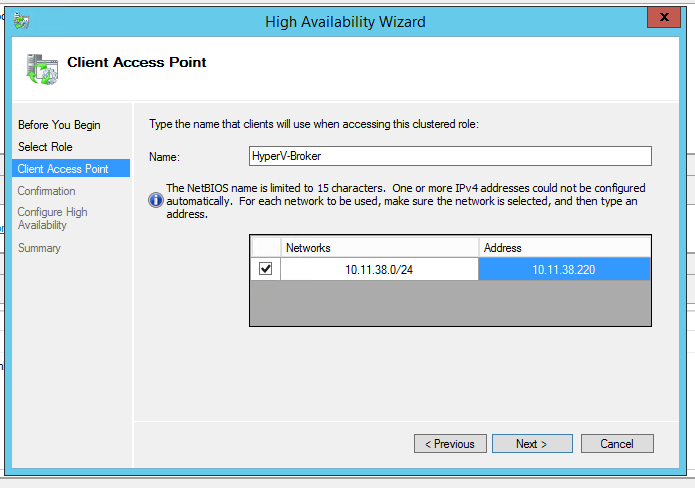
Configuring DR Replica
Fill in the information (Choose an available IP from his subnet)
Create SSL cert via Powershell
For this, you will need to download Windows SDK and install
https://msdn.microsoft.com/library/windows/desktop/aa386968.aspx
Create the ROOT certificate
& "C:\Program Files\Microsoft SDKs\Windows\v7.1\Bin\x64\makecert.exe" -pe -n “CN=PrimaryRootCA” -ss root -sr LocalMachine -sky signature -r “PrimaryRootCA.cer”
Create SSL with the hostname of DR
& "C:\Program Files\Microsoft SDKs\Windows\v7.1\Bin\x64\makecert.exe" -pe -n “CN=dr.domain.com” -ss my -sr LocalMachine -sky exchange -eku "1.3.6.1.5.5.7.3.1,1.3.6.1.5.5.7.3.2" -in “primaryRootCA” -is root -ir LocalMachine -sp “Microsoft RSA SChannel Cryptographic Provider” -sy 12 replicaCert.cer
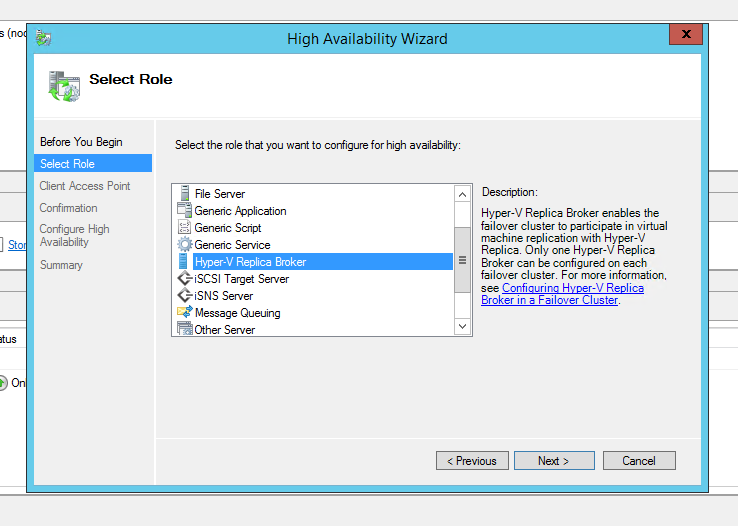
Create SSL with the name of the Hyper-V Replica Broker you created
Note, if you are in an AD, you will need to add the full FQDN of the broker
& "C:\Program Files\Microsoft SDKs\Windows\v7.1\Bin\x64\makecert.exe" -pe -n “CN=HyperV-Broker.domain.com” -ss my -sr LocalMachine -sky exchange -eku "1.3.6.1.5.5.7.3.1,1.3.6.1.5.5.7.3.2" -in “primaryRootCA” -is root -ir LocalMachine -sp “Microsoft RSA SChannel Cryptographic Provider” -sy 12 primaryCert.cerOn all hosts (nodes and DR) disable SSL revocation
reg add "HKLM\SOFTWARE\Microsoft\Windows NT\CurrentVersion\Virtualization\Replication" /v DisableCertRevocationCheck /d 1 /t REG_DWORD /f
Exporting the SSL
Open Certificate MMC console (simply search for certificate and click on "Manage Computer Certificates")
Under personal, click certificates
Right click ethe DR certificate -> all task -> export
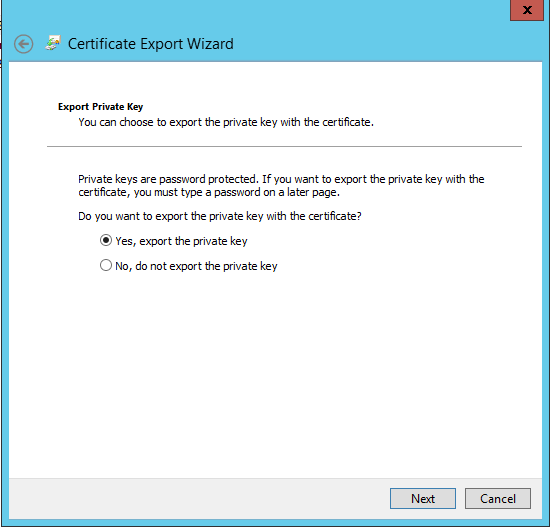
Click Next -> Select "Yes, export the private key"
Click Next -> Select "Password" and enter any password
Click Next -> Select where to save the certificate
Import the SSL ceritificate
The following steps have to be performed on the DR
Open Certificate MMC console with the snap-in to manage certs
Right click "Personal" -> Select "All Task" -> Select "Import"
Click Next (Local Machine) -> Browse the Certificate and import
Enter the password used during the export
Click Next -> Select "Place all certificates in the following store"
Click Next -> Click Finish
Once done, move the Root Certificate under "Certificates" of "Trusted Root Certificate Authorities"
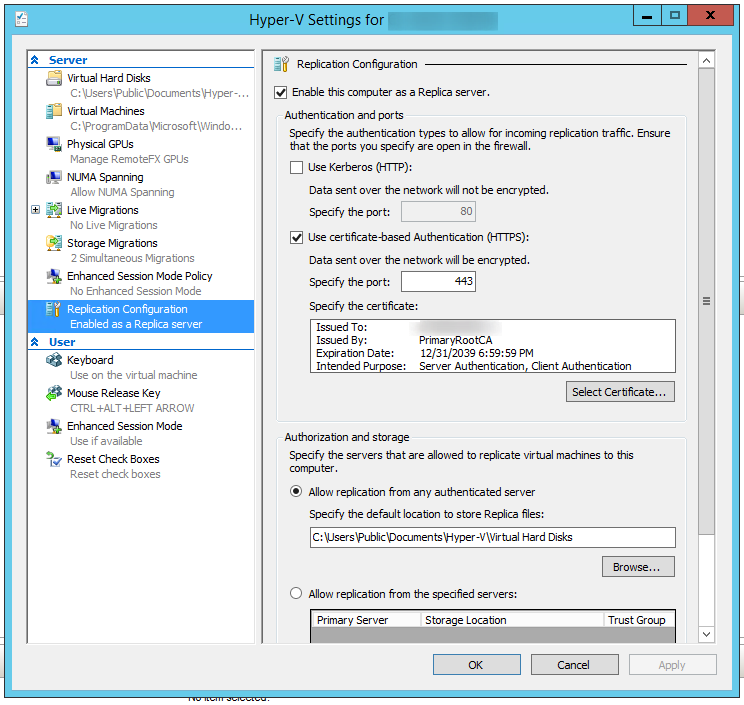
Configure the Replication Role in Hyper-V
In Hyper-V, right click the server -> Click on "Hyper-V Settings"
Select the "Replication Configuration" tab
Click "Enable this computer as Replica Server" -> Click "Use certificate-based authentication (HTTPS)" -> Select the Certificate
Enabling Replication for VM
Right click on the VM and select "Enable Replication"

Click Next -> Enter the hostname (that we put in the host file earlier)
Once it loads (can take a minute or 2), same thing as with the DR, select "Use certificate-based authentication (HTTPS)" and
select the certificate (make sure "Compress the data that is transmitted over the network"
Keep clicking next a select the options you want for the replication
Server 2016
Server 2016 is the same concept but you will need to create a cert for all nodes
Create root CA
New-SelfSignedCertificate `
-DnsName “HyperVReplicationRootCA” `
-CertStoreLocation Cert:\LocalMachine\My `
-KeyLength “4096" `
-Hash SHA256 `
-KeyFriendlyName “HyperVReplicationRootCA” `
-FriendlyName “HyperVReplicationRootCA” `
-NotAfter “2030-12-31 23:59:59” `
-NotBefore “2018-10-10 00:00:00" `
-KeyUsage CertSign,CRLSign,DigitalSignature
Create node cert ( 1 cert per node)
New-SelfSignedCertificate `
-DnsName Myfqdn.domain.com `
-CertStoreLocation Cert:\LocalMachine\My `
-KeyLength “4096" `
-Hash SHA256 `
-KeyFriendlyName hostname `
-FriendlyName hostname `
-NotBefore “2017-01-01 00:00:00" `
-NotAfter “2030-12-31 23:59:59” `
-Signer ( Get-ChildItem Cert:\LocalMachine\My | Where -Prop Subject -eq "CN=HyperVReplicationRootCA" )
Use same command for broker cert and export / import cert on all nodes / dr server as explained above