Windows
Windows
- Windows Server 2012 booting in recovery (GPT/UEFI FIX)
- IIS 7: Install a certificate
- Hyper-V
- S2D Force remove a drive
- Add IP on vSwitch
- Adding Adapter on vSwitch
- AVMA - Hyper-V Automatic Virtual Machine Activation
- Configuring DR Replica
- Powershell
- MS SQL
- DFS IIS [config + webroot]
- Repair BSOD/Raw partition [WinServer]
- Direct Routing IIS
- LAN Routing Remote Access Service (RAS)
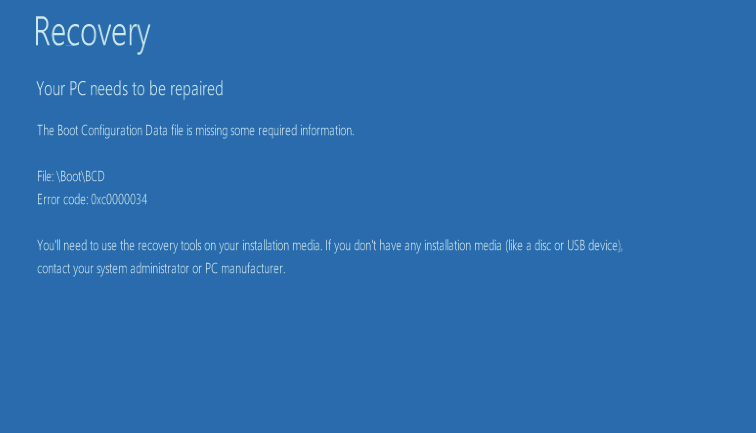
Windows Server 2012 booting in recovery (GPT/UEFI FIX)
If OS keeps booting in recovery, this is how you can fix it:
Open the CMD in the windows live cd and start diskpart and list the disks that are available:
diskpart
list disk
Select the disk for the OS
sel disk 0List the volumes inside that disk:
list volSelect the partition in FAT as it is you EFI boot partition
sel vol 4Assign a letter to the EFI partition so you can mount it
assign letter=G:Exit diskpart
exitcd in the EFI boot
cd /d G:\EFI\Microsoft\Boot\run a bootrec
bootrec /FixBootrename the BCD inside the path G:\EFI\Microsoft\Boot\
ren BCD BCD.oldRecreate the BCD file using bcdboot
bcdboot c:\Windows /l en-us /s G: /f AllYou can also run a SFC scan as it might fix some errors
sfc /scannow /offbootdir=g:\ /offwindir=c:\windowsThen exit reboot and check if the OS can boot
A common error after reboot could be a system file is corrupted such as the error below:
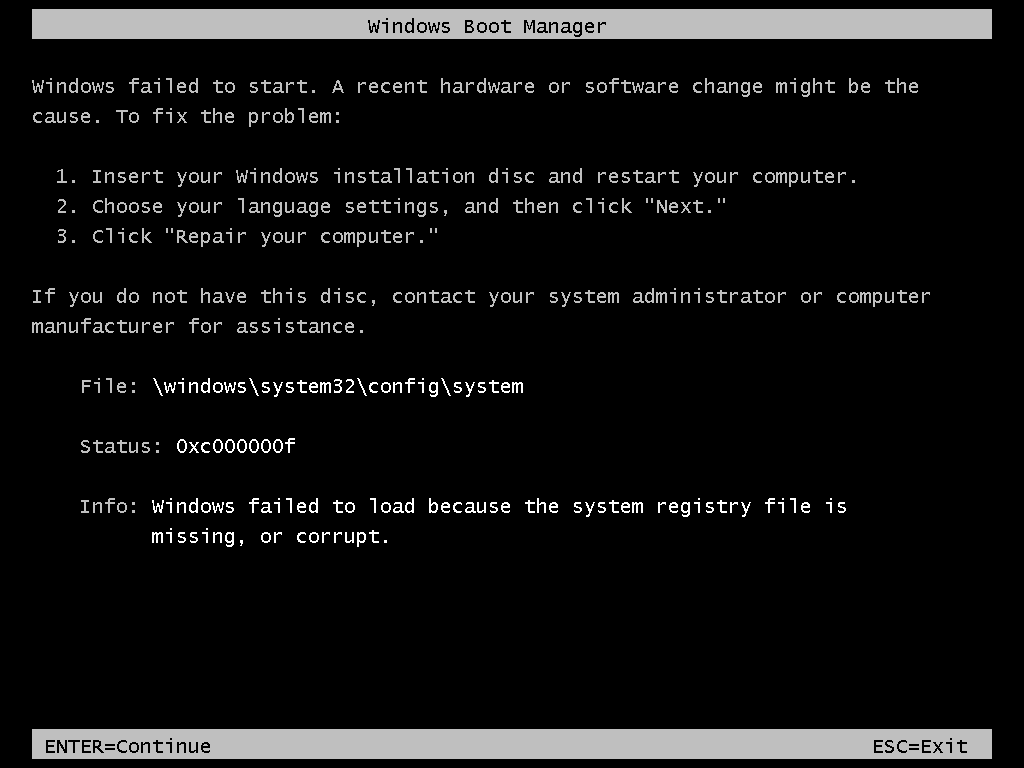
To fix it boot back in the live CD and open a CMD and rename the system file as old:
cd /d C:\Windows\System32\config\
ren system system.old
The RegBack contains a working version of the system file so just copy it over.
copy C:\Windows\System32\config\RegBack\system C:\Windows\System32\config\Then exit reboot and check if everything is working :)
IIS 7: Install a certificate
If you have 2 files, a key and a crt, you can use the following command in linux/osx or cygwin with openssl:
openssl pkcs12 -export -out ssl_cert.pfx -inkey priv_key.key -in the_crt_file.crt
To Install an Intermediate Certificate in Microsoft IIS 7
- Click Start, and then click Run....
- Type mmc, and then click OK. The Microsoft Management Console (Console) window opens.
- In the Console1 window, click the File menu, and then select Add/Remove Snap-in.
- In the Add or Remove Snap-in window, select Certificates, and then click Add.
- In the Certificates snap-in window, select Computer Account, and then click Next.
- In the Select Computer window, select Local Computer, and then click Finish.
- In the Add or Remove Snap-in window, click OK.
- In the Console1 window, click + to expand the folder.
- Right-click Intermediate Certification Authorities, mouse-over All Tasks, and then click Import.
- In the Certificate Import Wizard window, click Next.
- Click Browse to find the intermediate certificate file.
- In the Open window, change the file extension filter to PKCS #7 Certificates (*.spc;*.p7b), select the *_iis_intermediates.p7b file, and then click Open.
Do not install your Leaf Certificate in this area. Doing so removes your certificate from the list, and you must reinstall to correct the problem.
- In the Certificate Import Wizard window, click Next.
- Select Place all certificates in the following store, and then click Browse.
- In the Select Certificate Store window, select Intermediate Certification Authorities, and then click OK.
- In the Certificate Import Wizard window, click Next.
- Click Finish.
- Click OK.
- Close the Console 1 window, and then click No to remove the console settings.
To Install an SSL Certificate in Microsoft IIS 7
- Click Start, mouse-over Administrative Tools, and then click Internet Services Manager.
- In the Internet Information Services (IIS) Manager window, select your server.
- Scroll to the bottom, and then double-click Server Certificates.
- From the Actions panel on the right, click Complete Certificate Request....
- To locate your certificate file, click ....
- In the Open window, select *.* as your file name extension, select your certificate (it might be saved as a .txt, .cer, or .crt), and then click Open.
- In the Complete Certificate Request window, enter a Friendly name for the certificate file, and then click OK.
For Wildcard SSL certificates make sure your Friendly Name to matches your Common Name (i.e. *.coolexample.com).
- In the Internet Information Services (IIS) Manager window, select the name of the server where you installed the certificate.
- Click + beside Sites, select the site to secure with the SSL certificate.
- In the Actions panel on the right, click Bindings....
- Click Add....
- In the Add Site Binding window:
- For Type, select https.
- For IP address, select All Unassigned, or the IP address of the site.
- For Port, type 443.
- For SSL Certificate, select the SSL certificate you just installed, and then click OK.
- Close the Site Bindings window.
- Close the Internet Information Services (IIS) Manager window. Your SSL certificate installation is complete
Hyper-V
S2D Force remove a drive
To verify that all drives are healthy and operational :
Get-PhysicalDiskGet the FriendlyName of the device :
Get-PhysicalDisk | ft FriendlyNameRetire the disk :
Set-PhysicalDisk -FriendlyName "<DeviceName>" -Usage RetiredFind the name of the Virtual Disk :
Get-VirtualDiskIf the name is too long use :
Get-VirtualDisk | ft -AutoSizeFor every Virtual Disk in the storage pool do :
Repair-VirtualDisk -FriendlyName "YourVirtualDisk"Open a new PowerShell window to monitor the repairs with :
Get-StorageJobRemove the PhysicalDisk if all repairs are successfully done:
Get-PhysicalDisk | Where-Object { $_.Usage -eq ‘Retired’}Assign the disk to a variable:
$DiskToRemove = Get-PhysicalDisk | Where-Object { $_.Usage -eq ‘Retired’}Find the name of the storage pool:
Get-StoragePoolDelete the physical disk from the storage pool:
Remove-PhysicalDisk -PhysicalDisks $DiskToRemove -StoragePoolFriendlyName "Storage pool"Add IP on vSwitch
So you installed hyper-v and you need to configure your NIC with your public IP and your secondary IP's, let me show you how.
(Would recommend having physical access / KVM IP if anything fails)
First create a v-Switch in the hyper-v settings.
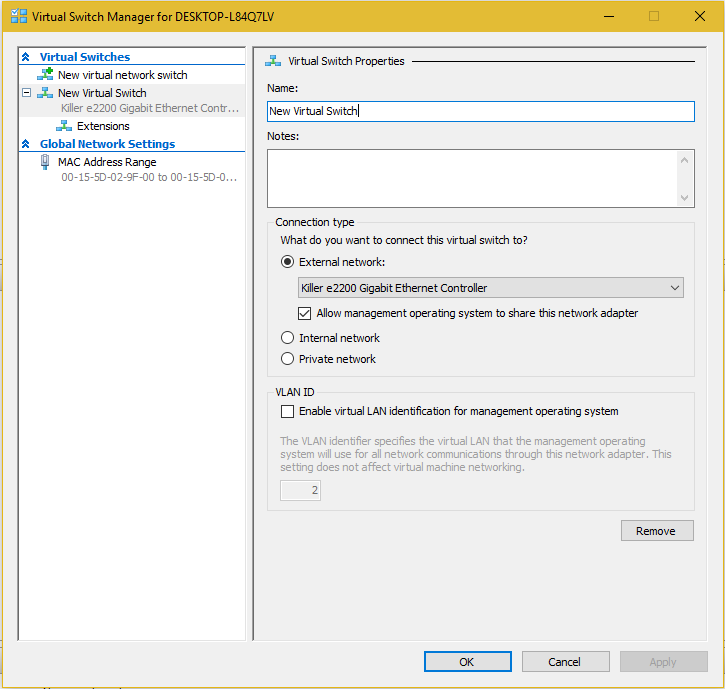
Then, go to the IPv4 settings of your new hyper-v vswitch and add your primary IP.
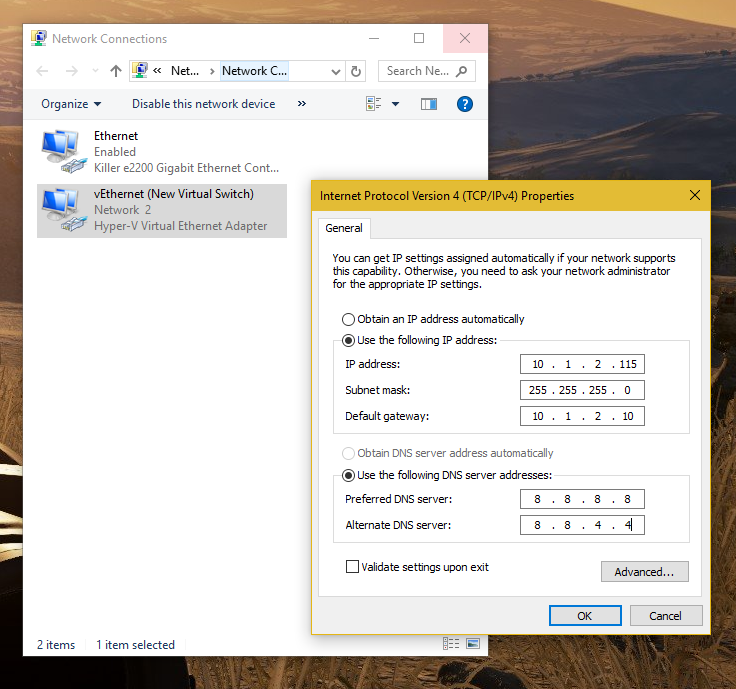
To add your secondary IP's, you will need to go the the advanced options and put in the first usable address of your secondary subnet, not the broadcast address but the first usable address and the subset below.
You will then use that address as the gateway for your VM's.

Last step will be to enable ip forwarding, open power-shell as admin and type the following commands :
netsh
netsh> interface ipv4
Then the following command to view the list of available interfaces
netsh interface ipv4> show intTo view the interface settings, replace "15" by the proper ID :
netsh interface ipv4> show int 15And finally, the following command to enable IP forwarding :
netsh interface ipv4> set int 15 forwarding=enabled 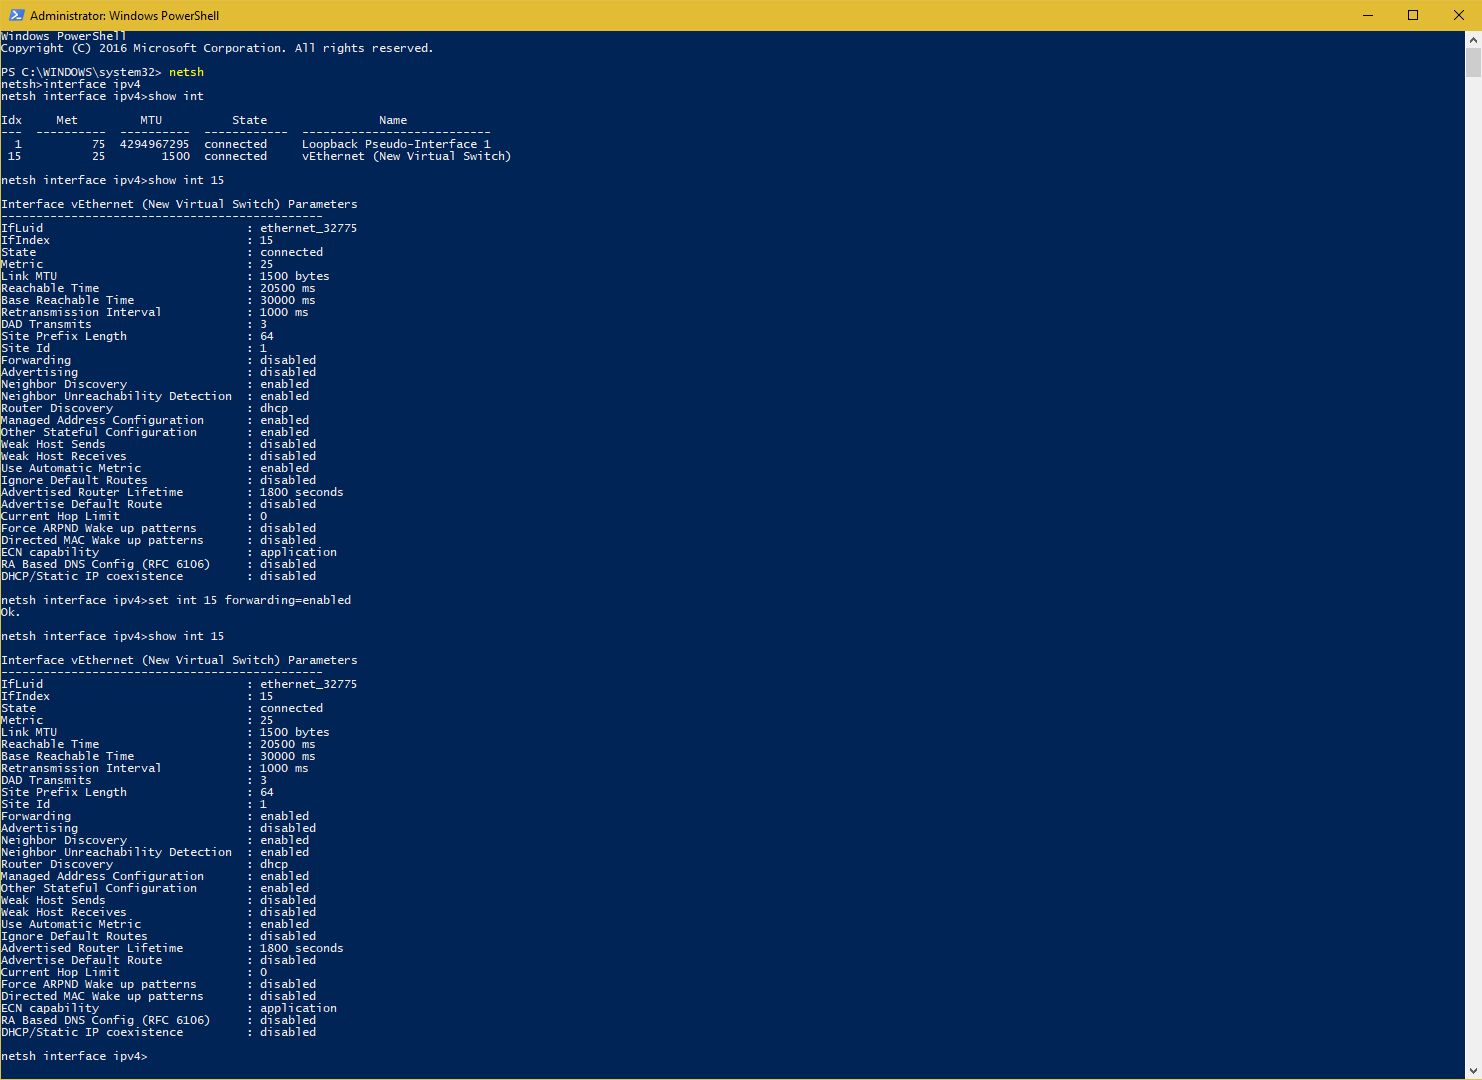
Adding Adapter on vSwitch
List Adapter
Get-VMNetworkAdapterVlan -ManagementOS Adding Adapter
Add-VMNetworkAdapter -ManagementOS -Name "Lan" -SwitchName "vSwitch"
Add-VMNetworkAdapter -ManagementOS -Name "Wan" -SwitchName "vSwitch"
Tagging vlan on Adapter
Set-VMNetworkAdapterVlan -ManagementOS -VMNetworkAdapterName "LAN" -Access -VlanId 3023
Set-VMNetworkAdapterVlan -ManagementOS -VMNetworkAdapterName "Wan" -Access -VlanId 2295
If you need to remove an Adapter
Remove-VMNetworkAdapter -ManagementOs -VMNetworkAdapterName LANAdd an IP to an Adapter
New-NetIPAddress -InterfaceAlias "vEthernet (LAN)" -IPAddress 10.10.10.10 -PrefixLength 24 -Type Unicast
New-NetIPAddress -InterfaceAlias "vEthernet (WAN)" -IPAddress 1.1.1.1 -PrefixLength 24 -DefaultGateway 2.2.2.2 -Type UnicastAVMA - Hyper-V Automatic Virtual Machine Activation
Open CMD/Powershell
slui 3| Guest Operating System | Key |
|---|---|
| Windows Server 2012 R2 Essentials | K2XGM-NMBT3-2R6Q8-WF2FK-P36R2 |
| Windows Server 2012 R2 Standard | DBGBW-NPF86-BJVTX-K3WKJ-MTB6V |
| Windows Server 2012 R2 Datacenter | Y4TGP-NPTV9-HTC2H-7MGQ3-DV4TW |
| Windows Server 2016 Essentials | B4YNW-62DX9-W8V6M-82649-MHBKQ |
| Windows Server 2016 Standard | C3RCX-M6NRP-6CXC9-TW2F2-4RHYD |
| Windows Server 2016 Datacenter | TMJ3Y-NTRTM-FJYXT-T22BY-CWG3J |
| Windows Server 2019 Essentials | 2CTP7-NHT64-BP62M-FV6GG-HFV28 |
| Windows Server 2019 Standard | TNK62-RXVTB-4P47B-2D623-4GF74 |
| Windows Server 2019 Datacenter | H3RNG-8C32Q-Q8FRX-6TDXV-WMBMW |
Supported Activation
| Host |
Windows Server 2012 R2 will activate |
Windows Server 2016 will activate |
| Windows Server 2012 R2 Essentials Edition> |
Yes |
Yes |
| Windows Server 2012 R2 Standard Edition |
Yes |
Yes |
| Windows Server 2012 R2 Datacenter Edition |
Yes |
Yes |
| Windows Server 2016 Essentials Edition |
No |
Yes |
| Windows Server 2016 Standard Edition |
No |
Yes |
| Windows Server 2016 Datacenter Edition |
No |
Yes |
| Server host version | Windows Server 2019 | Windows Server 2016 | Windows Server 2012 R2 |
|---|---|---|---|
| Windows Server 2019 | X | X | X |
| Windows Server 2016 | X | X | |
| Windows Server 2012 R2 | X |
Configuring DR Replica
Fill in the information (Choose an available IP from his subnet)
Create SSL cert via Powershell
For this, you will need to download Windows SDK and install
https://msdn.microsoft.com/library/windows/desktop/aa386968.aspx
Create the ROOT certificate
& "C:\Program Files\Microsoft SDKs\Windows\v7.1\Bin\x64\makecert.exe" -pe -n “CN=PrimaryRootCA” -ss root -sr LocalMachine -sky signature -r “PrimaryRootCA.cer”
Create SSL with the hostname of DR
& "C:\Program Files\Microsoft SDKs\Windows\v7.1\Bin\x64\makecert.exe" -pe -n “CN=dr.domain.com” -ss my -sr LocalMachine -sky exchange -eku "1.3.6.1.5.5.7.3.1,1.3.6.1.5.5.7.3.2" -in “primaryRootCA” -is root -ir LocalMachine -sp “Microsoft RSA SChannel Cryptographic Provider” -sy 12 replicaCert.cer
Create SSL with the name of the Hyper-V Replica Broker you created
Note, if you are in an AD, you will need to add the full FQDN of the broker
& "C:\Program Files\Microsoft SDKs\Windows\v7.1\Bin\x64\makecert.exe" -pe -n “CN=HyperV-Broker.domain.com” -ss my -sr LocalMachine -sky exchange -eku "1.3.6.1.5.5.7.3.1,1.3.6.1.5.5.7.3.2" -in “primaryRootCA” -is root -ir LocalMachine -sp “Microsoft RSA SChannel Cryptographic Provider” -sy 12 primaryCert.cerOn all hosts (nodes and DR) disable SSL revocation
reg add "HKLM\SOFTWARE\Microsoft\Windows NT\CurrentVersion\Virtualization\Replication" /v DisableCertRevocationCheck /d 1 /t REG_DWORD /f
Exporting the SSL
Open Certificate MMC console (simply search for certificate and click on "Manage Computer Certificates")
Under personal, click certificates
Right click ethe DR certificate -> all task -> export
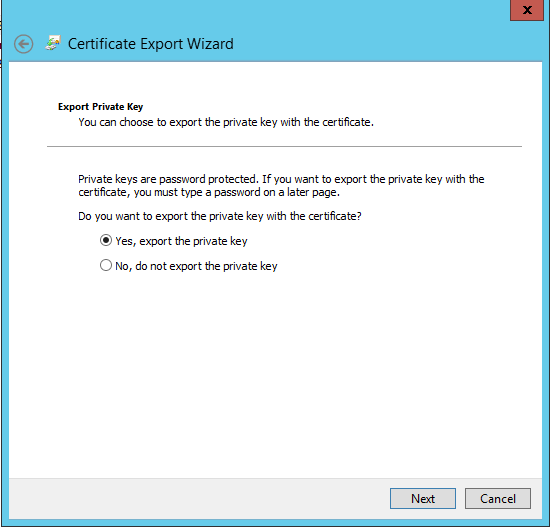
Click Next -> Select "Yes, export the private key"
Click Next -> Select "Password" and enter any password
Click Next -> Select where to save the certificate
Import the SSL ceritificate
The following steps have to be performed on the DR
Open Certificate MMC console with the snap-in to manage certs
Right click "Personal" -> Select "All Task" -> Select "Import"
Click Next (Local Machine) -> Browse the Certificate and import
Enter the password used during the export
Click Next -> Select "Place all certificates in the following store"
Click Next -> Click Finish
Once done, move the Root Certificate under "Certificates" of "Trusted Root Certificate Authorities"
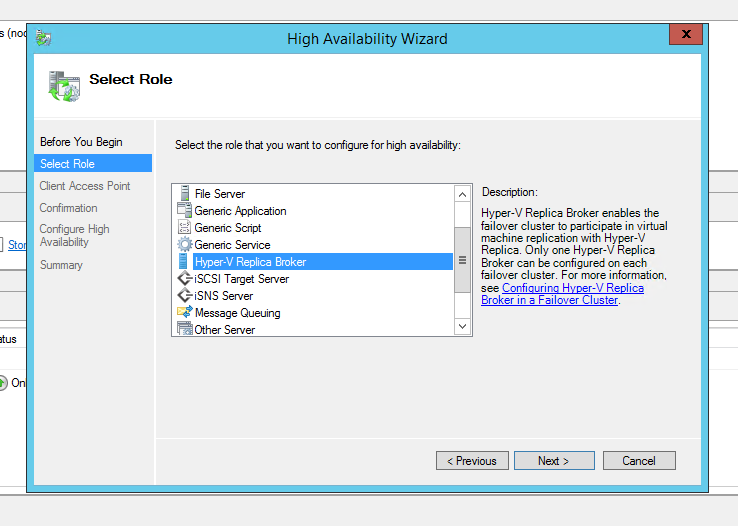
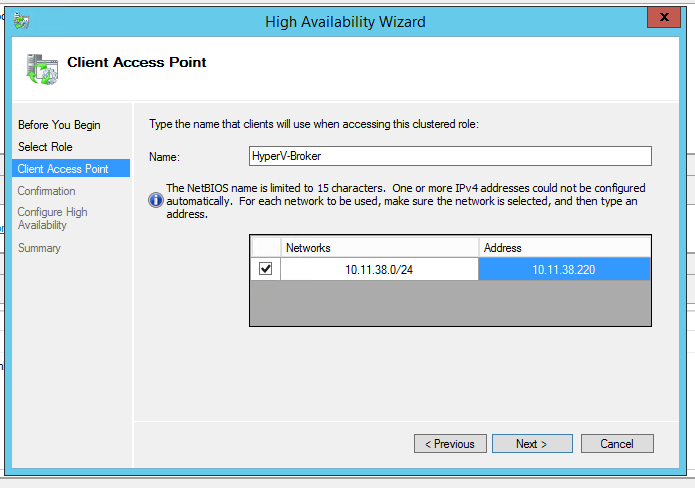
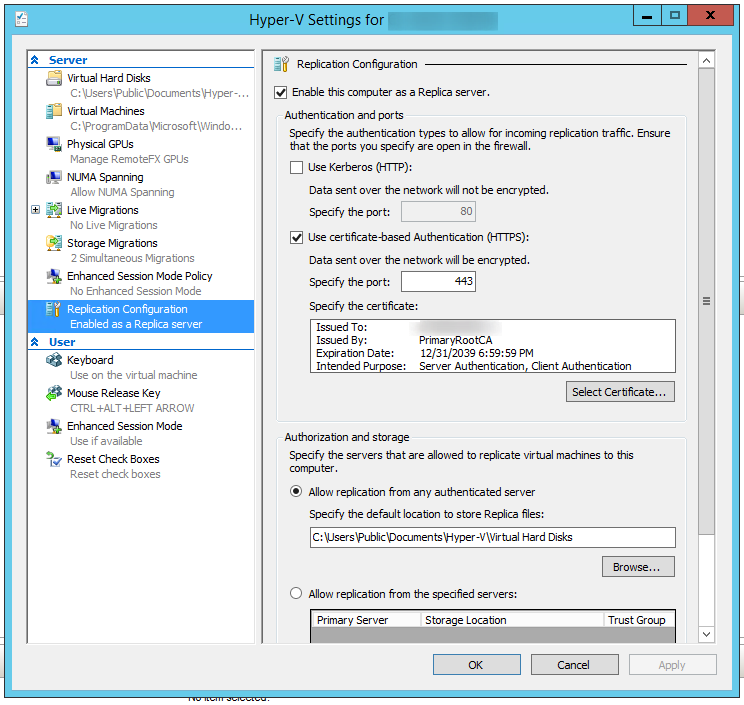
Configure the Replication Role in Hyper-V
In Hyper-V, right click the server -> Click on "Hyper-V Settings"
Select the "Replication Configuration" tab
Click "Enable this computer as Replica Server" -> Click "Use certificate-based authentication (HTTPS)" -> Select the Certificate
Enabling Replication for VM
Right click on the VM and select "Enable Replication"

Click Next -> Enter the hostname (that we put in the host file earlier)
Once it loads (can take a minute or 2), same thing as with the DR, select "Use certificate-based authentication (HTTPS)" and
select the certificate (make sure "Compress the data that is transmitted over the network"
Keep clicking next a select the options you want for the replication
Server 2016
Server 2016 is the same concept but you will need to create a cert for all nodes
Create root CA
New-SelfSignedCertificate `
-DnsName “HyperVReplicationRootCA” `
-CertStoreLocation Cert:\LocalMachine\My `
-KeyLength “4096" `
-Hash SHA256 `
-KeyFriendlyName “HyperVReplicationRootCA” `
-FriendlyName “HyperVReplicationRootCA” `
-NotAfter “2030-12-31 23:59:59” `
-NotBefore “2018-10-10 00:00:00" `
-KeyUsage CertSign,CRLSign,DigitalSignature
Create node cert ( 1 cert per node)
New-SelfSignedCertificate `
-DnsName Myfqdn.domain.com `
-CertStoreLocation Cert:\LocalMachine\My `
-KeyLength “4096" `
-Hash SHA256 `
-KeyFriendlyName hostname `
-FriendlyName hostname `
-NotBefore “2017-01-01 00:00:00" `
-NotAfter “2030-12-31 23:59:59” `
-Signer ( Get-ChildItem Cert:\LocalMachine\My | Where -Prop Subject -eq "CN=HyperVReplicationRootCA" )
Use same command for broker cert and export / import cert on all nodes / dr server as explained above
Powershell
Change vswitch from internal to external
Set-VMSwitch -Name vSwitch -NetAdapterName bond0If you have a duplicate
Get-VMNetworkAdapter -VMName svtest | ? MacAddress -eq '000000000000' | Remove-VMNetworkAdapterRoles&Features
Install
List
Get-WindowsFeatureInstall
Install-WindowsFeature -name <name>Remove
Remove-WindowsFeature -name <name>Update OS
Install-Module PSWindowsUpdate
Get-Command –module PSWindowsUpdate
Then you will need to register to use the Microsoft Update Service not just the default Windows Update Service.
Add-WUServiceManager -ServiceID 7971f918-a847-4430-9279-4a52d1efe18dGet-WUInstall –MicrosoftUpdate –AcceptAll –AutoRebootList Updates
Get-WUInstall –MicrosoftUpdate –ListOnlyor
Get-WUList –MicrosoftUpdateFirewall
Disable unwanted ports
(Replace 1.1.1.1 with public IP)
TCP
New-NetFirewallRule -DisplayName "Block EXTERNAL AD PORTS TCP" -Action Block -Description "Block non secure ports" -Enabled True -LocalAddress 1.1.1.1/30 -Protocol TCP -LocalPort 53, 135-139, 389, 445 -RemotePort Any -Program Any -RemoteAddress AnyUDP
New-NetFirewallRule -DisplayName "Block EXTERNAL AD PORTS UDP" -Action Block -Description "Block non secure ports" -Enabled True -LocalAddress 1.1.1.1/30 -Protocol UDP -LocalPort 53, 135-139, 389, 445 -RemotePort Any -Program Any -RemoteAddress AnyActive Directory DC
Setup a primary domain controller
Rename-Computer -NewName "ad01"

Restart-Computer

Install-WindowsFeature -Name AD-Domain-Services -IncludeManagementTools

Install-ADDSForest -domainname testdomain.local -SafeModeAdministratorPassword (ConvertTo-SecureString "current-user-password" -AsPlainText -Force)

Restart-Computer

REG.exe ADD "HKLM\SYSTEM\CurrentControlSet\Services\Tcpip6\Parameters" /V DisabledComponents /t REG_DWORD /D 0xFFFFFFFF /F
REG.exe ADD "HKLM\SYSTEM\CurrentControlSet\Services\Tcpip\Parameters" /V IPAutoconfigurationEnabled /t REG_DWORD /D 0 /F
REG.exe ADD "HKLM\Software\Policies\Microsoft\Windows NT\Terminal Services" /V fDisableCpm /t REG_DWORD /D 1 /F

Get-WuInstall -Install -AcceptAll -IgnoreReboot -Verbose

Restart-Computer

New-NetFirewallRule -DisplayName "Block EXTERNAL AD PORTS TCP" -Action Block -Description "Block non secure ports" -Enabled True -LocalAddress {WAN/SUBNET} -Protocol TCP -LocalPort 53, 135-139, 389, 636, 445 -RemotePort Any -Program Any -RemoteAddress Any


New-NetFirewallRule -DisplayName "Block EXTERNAL AD PORTS UDP" -Action Block -Description "Block non secure ports" -Enabled True -LocalAddress {WAN/SUBNET} -Protocol UDP -LocalPort 53, 135-139, 389, 636, 445 -RemotePort Any -Program Any  -RemoteAddress Any

$DNS = get-dnsserversetting -all
$DNS.listeningIpAddress = @("{LAN-IP}")
Set-DnsServersetting -inputobject $DNS
Clear-DnsServerCache -force

Get-NetAdapter -Name "Ethernet 0" | Set-DnsClient -RegisterThisConnectionsAddress:$false
Setup a secondary domain controller
Add role
Add-WindowsFeature AD-Domain-ServicesInstall and configure role
Install-ADDSDomainController -NoGlobalCatalog:$false -CreateDnsDelegation:$false -Credential (Get-Credential domain.local\Administrator) -CriticalReplicationOnly:$false -DatabasePath "C:\Windows\NTDS" -DomainName "domain.local" -InstallDns:$true -LogPath "C:\Windows\NTDS" -NoRebootOnCompletion:$false -SiteName "Default-First-Site-Name" -SysvolPath "C:\Windows\SYSVOL" -SafeModeAdministratorPassword (ConvertTo-SecureString 'D0M@INP@SSW0RD' -AsPlainText -Force) -Force:$trueSync AD and check status
repadmin /syncall /A
repadmin /replsummary
IIS
List Domains / Bindings
Import-Module Webadministration
Get-ChildItem -Path IIS:\Sites
DFS
Create new replication group
DFSNew-DfsReplicationGroup -GroupeName "Group-Name" -Description "Replication DFSR" -DomainName "AD-DOMAIN.com" -WhatIf Add Members
Add-DfsrMember -GroupeName "Group-Name" -ComputerName "SERVER1","SERVER2" -WhatIfFolderName : List of folders to replicate
ContentPath : Local path of destination of the files that will be replicated
ComputerName : Primary Serve
Set-DfsrMembership -GroupName "Group-Name" -DomainName "AD-DOMAIN.com" -FolderName "List/Folder/To/Replicate" -ContentPath "C:\Local\Path\To\Replicate" -ComputerName "SERVER01" -PrimaryMember $True -Force -WhatIf | Format-Table *name,*path,primary* -auto -wrapFailover Cluster
List all VM's on a VLAN
$ClusterNodes = Get-Cluster | Get-ClusterNode
foreach ($ClusterNode in $ClusterNodes)
{
	Get-VM -ComputerName $ClusterNode | Where {$_.NetworkAdapters.VlanSetting.AccessVlanId -eq "2603"}
}
WMI Test (Failover Cluster)
Script for cluster WMI status
Set-ExecutionPolicy unrestricted

cls

If(import-module failoverclusters)
{

Write-Host "Imported Cluster module"

}

Write-Host "Getting the cluster nodes…" -NoNewline
$nodes = Get-ClusterNode
Write-host "Found the below nodes "
Write-host " "
$nodes
Write-host ""
Write-host "Running the WMI query…."
Write-host " "
ForEach ($Node in $nodes)
{
         Write-Host -NoNewline $node

              if($Node.State -eq "Down")
            {

                    Write-Host -ForegroundColor White    " : Node down skipping"
             }

        else
            {

           Try
           {
            #success

              $result = (get-wmiobject -class "MSCluster_CLUSTER" -namespace "root\MSCluster" -authentication PacketPrivacy               -computername $Node -erroraction stop).__SERVER
               Write-host -ForegroundColor Green      " : WMI query succeeded "
           }
           Catch
           {

              #Failure

              Write-host -ForegroundColor Red -NoNewline  " : WMI Query failed "
              Write-host  "//"$_.Exception.Message
            }
      }

   }
Allow WMI firewall
netsh advfirewall firewall set rule group="remote administration" new enable=yes
netsh advfirewall firewall set rule group="Windows Remote Management" new enable=yes
netsh advfirewall firewall set rule group="windows management instrumentation (wmi)" new enable=yes
Replication
Check replicartion
foreach-object {Measure-VMReplication | Select VMName, ReplicationHealth, AvgReplSize, PrimaryServerName, CurrentReplicaServerName | ft}Reboot in recovery mode
Reboot in recovery mode
shutdown /r /o /f /t 00 Networking Stuff
#Removing a bond
Get-NetLbfoTeam
Remove-NetLbfoTeam -name bond0

#Find Adpt Names
Get-NetAdapter

Remove-NetIPAddress -InterfaceAlias "OnBoard LAN 2"
Remove-NetIPAddress -InterfaceAlias "OnBoard LAN 1"
Remove-NetIPAddress -IPAddress 10.1.2.10

New-NetIPAddress -InterfaceAlias "OnBoard LAN 1" -IPAddress 10.1.2.120 -PrefixLength 24 -DefaultGateway 10.1.2.10 -Type Unicast
Check Hyper-V replication health
$ClusterName = "<Name of your cluster>"
Get-ClusterNode -Cluster $ClusterName
Get-ClusterNode -Cluster $ClusterName | foreach-object {Measure-VMReplication -ComputerName $_ | Select VMName, AvgReplSize, PrimaryServerName, CurrentReplicaServerName | ft}
Convert VHD/VHDX
Convert-VHD –Path c:\VM\my-vhdx.vhdx –DestinationPath c:\New-VM\new-vhdx.vhdsor
Convert-VHD –Path c:\VM\my-vhdx.vhdx –DestinationPath c:\New-VM\new-vhdx.vhdx –VHDType DynamicRepair WMI Repo
Stop-Service Winmgmt -Force; winmgmt /resetrepositoryMS SQL
MS SQL Commands
Rename a domain user:
ALTER LOGIN [OLD_DOMAIN\Administrator] WITH NAME = [NEW_DOMAIN\Administrator];
SQL Server 2016 Step by Step: Creating AlwaysOn Availability Group
Table of Contents
- Prerequisites:
- This environment:
- SQL Server Installation
- Failover Cluster Installation
- Windows Failover Clustering Configuration for Always On Availability Groups
- Configure Cluster Quorum Settings
- Listener
Always On Availability Groups is an enterprise-level high-availability and disaster recovery solution introduced in SQL Server 2012 to enable you to maximize availability for one or more user databases. Always On Availability Groups requires that the SQL Server instances reside on Windows Server Failover Clustering (WSFC) nodes.
Prerequisites:
- Ensure that the system is not a domain controller.
- Ensure that each computer is running Windows Server 2012 or later versions.
- Ensure that each computer is a node in a Windows Server Failover Clustering (WSFC) cluster.
This environment:
OS - Windows 2012 R2
SQL Server - SQL Server 2016 Enterprise Edition (Eval)
SQL Server Installation
Failover Cluster Installation
First, we need to add the Windows Failover Cluster Feature to all the nodes running the SQL Server instances that we will configure as replicas.
Install-WindowsFeature -Name Failover-Clustering
Install-windowsfeature RSAT-Clustering -IncludeAllSubFeature
Windows Failover Clustering Configuration for Always On Availability Groups
Create Cluster
Test-Cluster -Node SQL01, SQL02
New-Cluster -Name cluster-sql -Node SQL01, SQL02 -StaticAddress 192.168.1.250 -NoStorage
Configure Cluster Quorum Settings
Quorum is that it is a configuration database for the cluster and is stored on a shared location, accessible to all of the nodes in a cluster.
In Case of Even number of nodes (but not a multi-site cluster) Node and Disk Majority Quorum configuration is recommended. If you don't have a shared storage Node and File Share Majority is recommended. Here it will be configuring a FileShare Witness quorum.
It is recommended that you configure the quorum size to be 500 MB. This size is the minimum required for an efficient NTFS partition. Larger sizes are allowable but are not currently needed.
Set-ClusterQuorum -Cluster cluster-sql-ent -NodeMajority
Set-ClusterQuorum -Cluster cluster-sql-ent -FileShareWitness \\fileshare\quorum
Enable AlwaysOn Availability Groups Feature on SQL Server 2016
We can now proceed with enabling the AlwaysOn Availability Groups feature in SQL Server 2016. This is possible after install and configuring the Windows Failover Cluster on all the nodes.
Open SQL Server Configuration Manager - > SQL Server Properties - [SQL Server (SQLAG01)]
In the Properties dialog box, select the AlwaysOn High Availability tab. Check the Enable AlwaysOn Availability Groups check box. This will prompt you to restart the SQL Server service. Click OK.
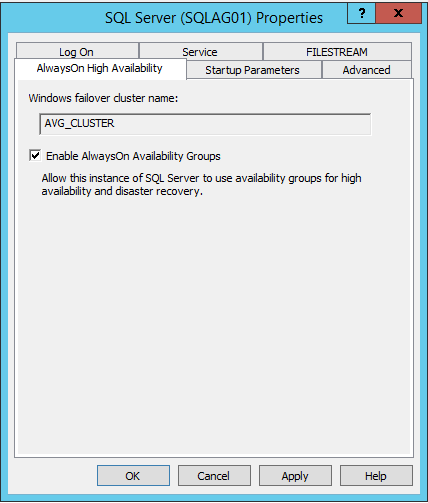
Restart the SQL Server service.
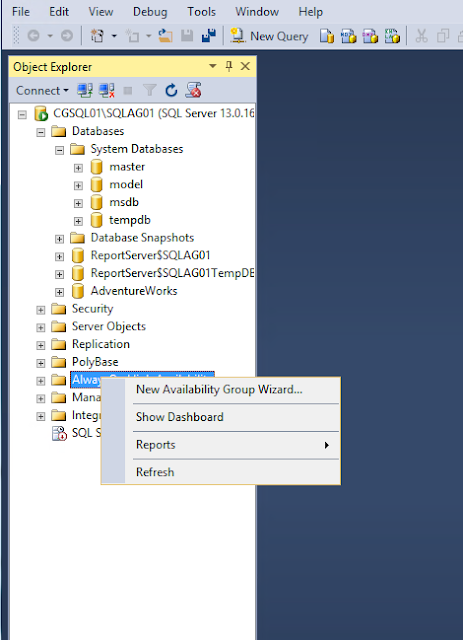
Configure SQL Server 2016 AlwaysOn Availability Groups
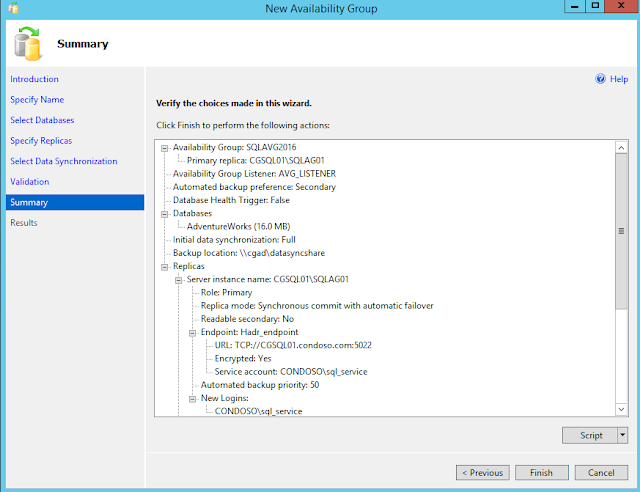
Go to Management Studio, right click Availability Groups and click New Availability Group Wizard.
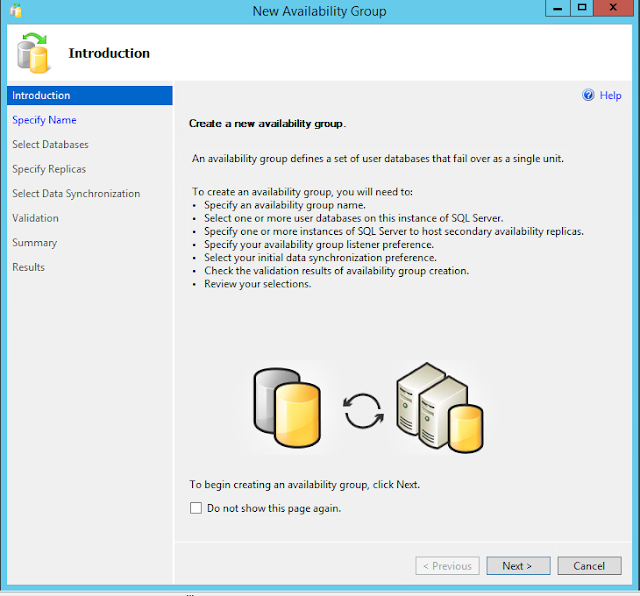
Specify Availability Group Name . This group name is SQLAVG2016. Then click Next.

Choose Database
Here you can see whether the DB meets the prerequisites
- Database should be in full recovery mode.
- You should make a full backup to add the DB into the Availability Group

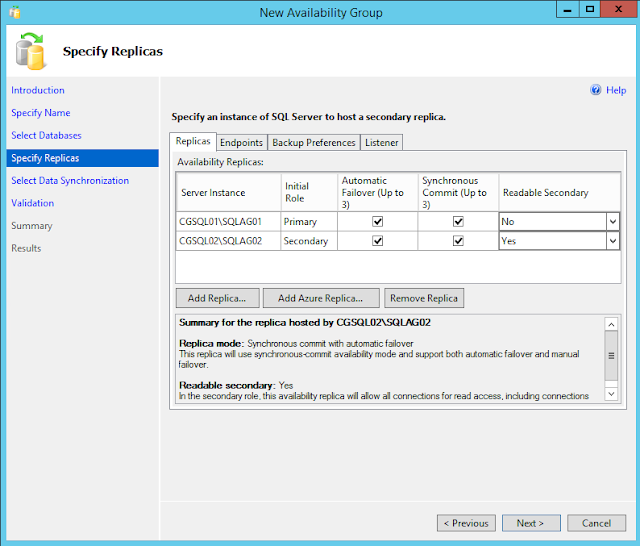
Specify Replicas
This page applies to the New Availability Group Wizard and the Add Replica to Availability Group Wizard of SQL Server 2016.
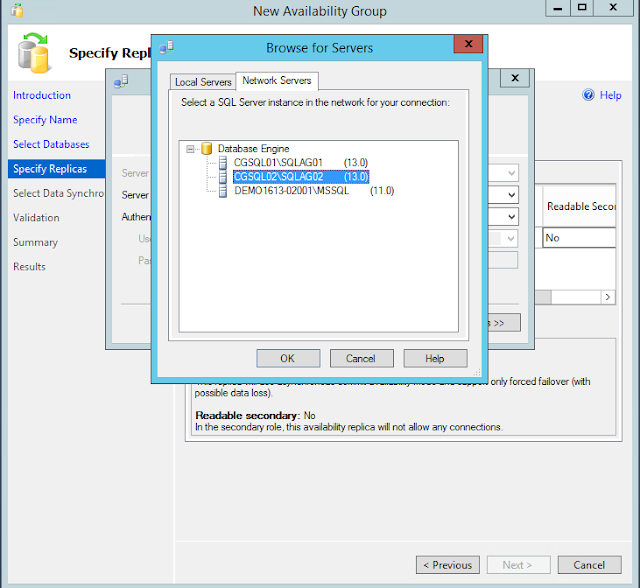
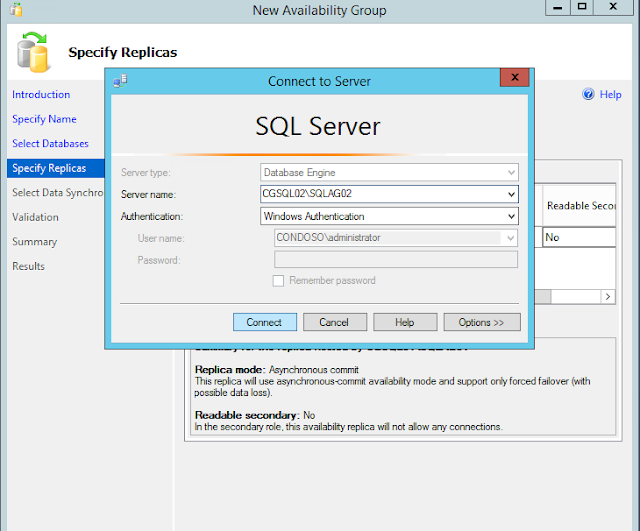
If a server instance that you to use to host a secondary replica is not listed by the Availability Replicas grid, click the Add Replica button.
Add Azure Replica button to create virtual machines with secondary replicas in Windows Azure.
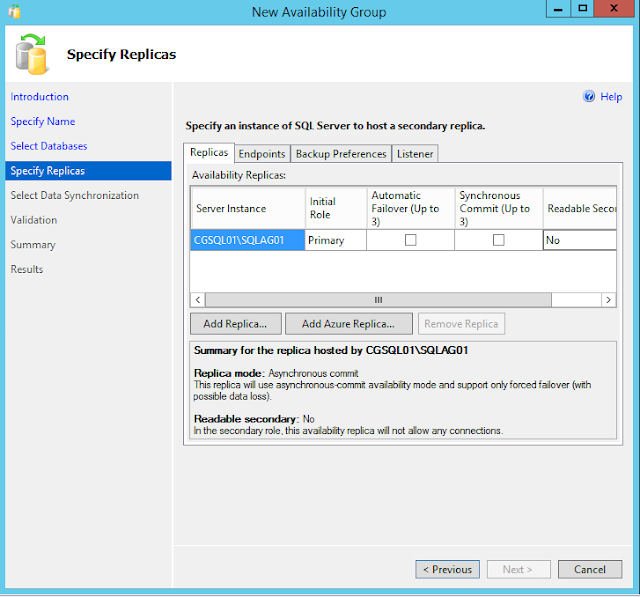
Adding Secondary Replica
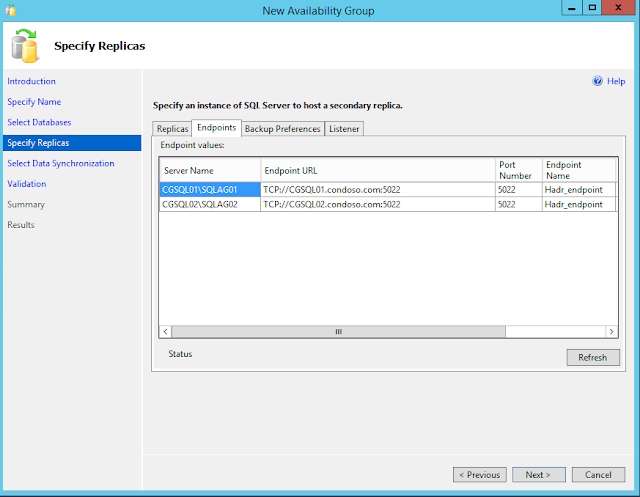
Endpoints
Use this tab to verify any existing database mirroring endpoints and also, if this endpoint is lacking on a server instance whose service accounts use Windows Authentication, create the endpoint automatically.
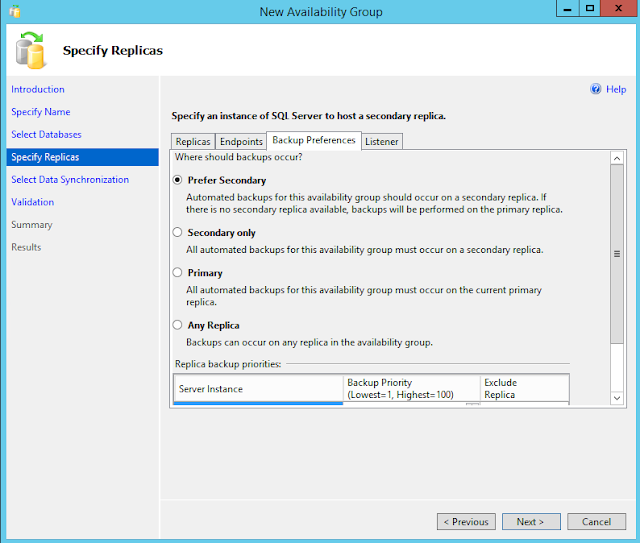
Backup Preference
Use this tab to specify your backup preference for the availability group as a whole and your backup priorities for the individual availability replicas.
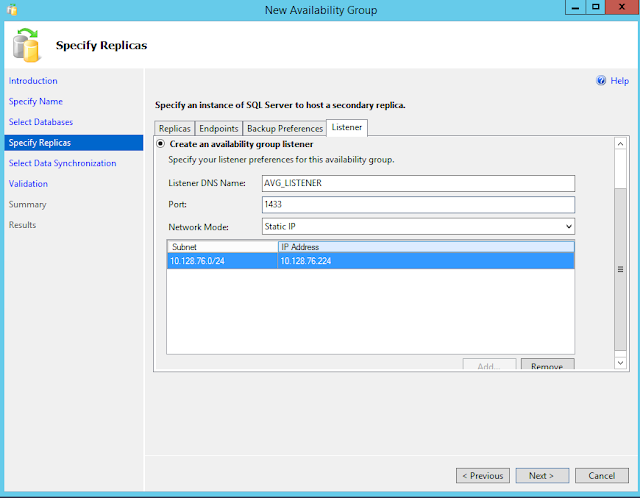
Listener
An availability group listener is a virtual network name (VNN) to which clients can connect in order to access a database in a primary or secondary replica of an AlwaysOn availability group. You point applications to the listener (which is registered with DNS) and directs traffic in the AG.
Select Data Synchronization
Use the Always On Select Initial Data Synchronization page to indicate your preference for initial data synchronization of new secondary databases. This page is shared by three wizards—the New Availability Group Wizard, the Add Replica to Availability Group Wizard, and the Add Database to Availability Group Wizard.
The possible choices include Full, Join only, or Skip initial data synchronization. Before you select Full or Join only ensure that your environment meets the prerequisites.
For each primary database, the Full option performs several operations in one workflow: create a full and log backup of the primary database, create the corresponding secondary databases by restoring these backups on every server instance that is hosting a secondary replica, and join each secondary database to availability group.
Select this option only if your environment meets the following prerequisites for using full initial data synchronization, and you want the wizard to automatically start data synchronization.

Source:
DFS IIS [config + webroot]
DFS
Install DFS namespaces and replication on both servers:
Server Manager>>Add roles and features

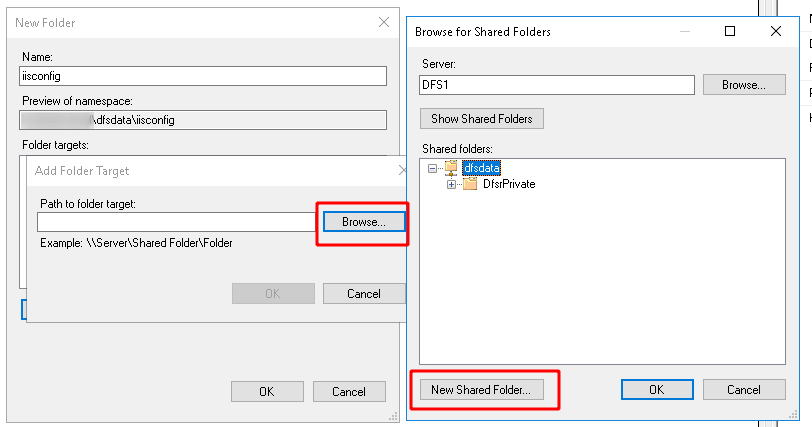
1) Create new Namespace
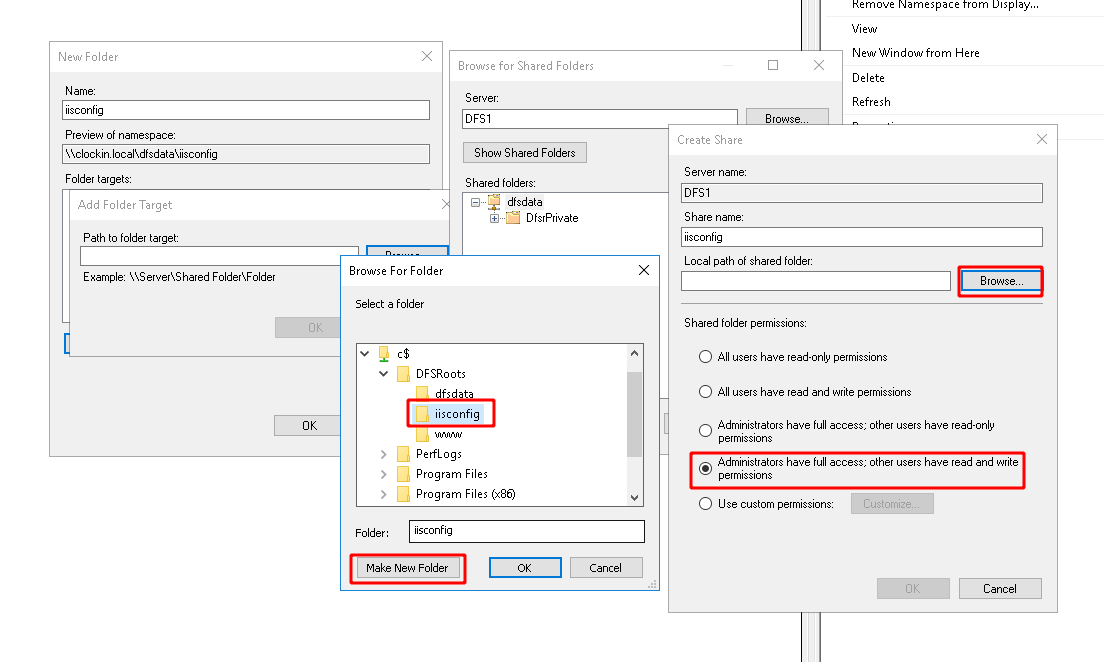
In dfs management, right click on Namespaces and select New Namespace. Enter the name of your dfs1 server and click next, enter dfsdata as the name for your Namespace, click on edit setting and change the permission to "Administrators have full access; other users have read and write permissions". Review the setting and create the Namespace.
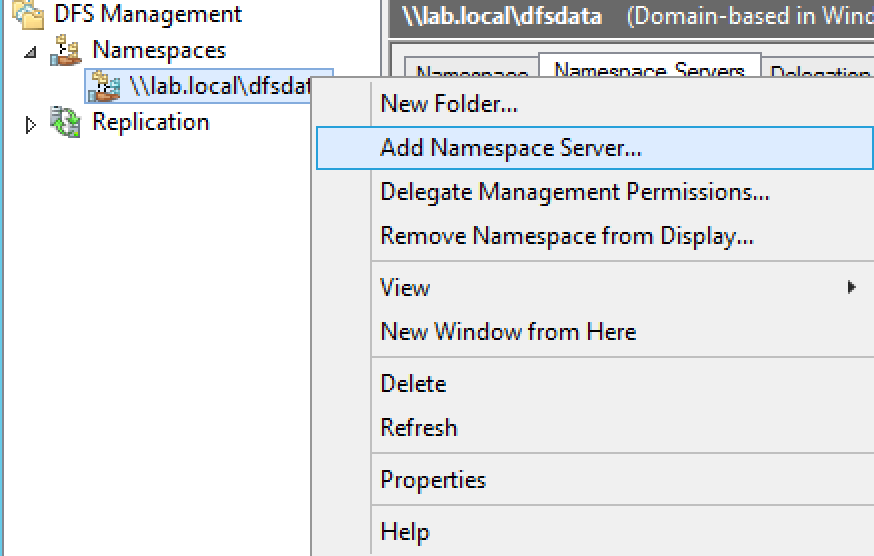
2) Right click on your Namespace and select Add Namespace Server, Enter the name of dfs2 server and click next. Dont forget to edit setting and change the permission to "Administrators have full access; other users have read and write permissions".
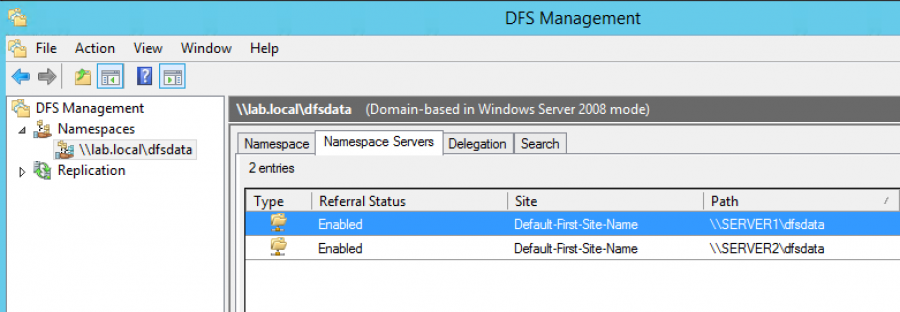
Make sure that both servers are listed in Namespac servers as below:
3) Create new Folder
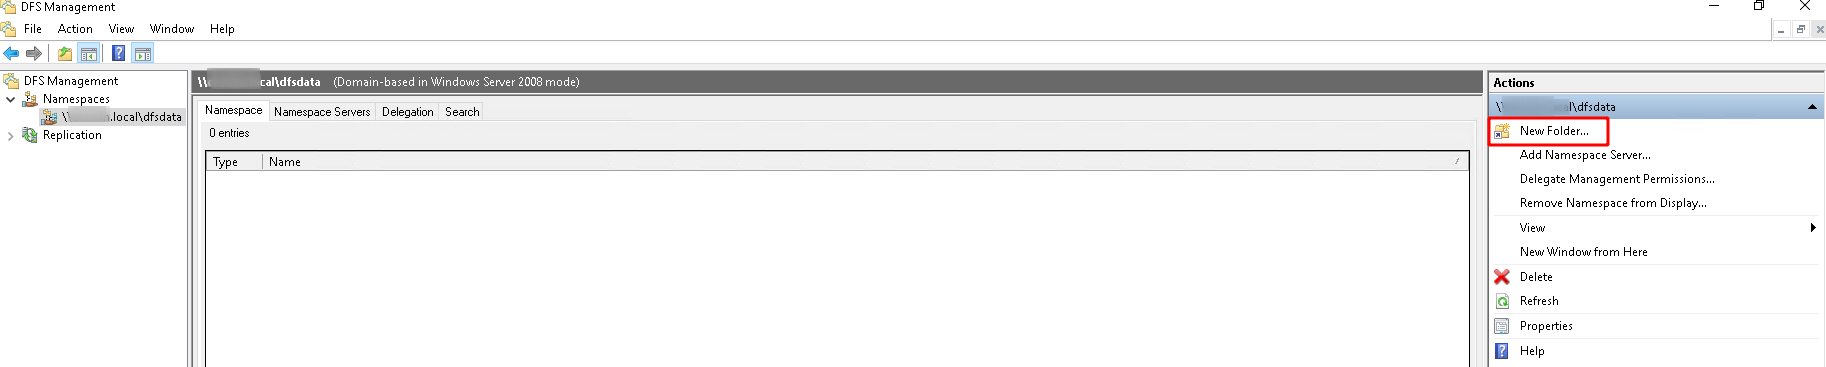
Right click on dfsdata Namespace that we just created and select new folder, we need to create two folders www and iisconfig:
Set www as Name and click on Add and then browse, click on New Shared Folder, set www as Name and change the permission to "Administrators have full access; other users have read and write permissions". Click on browse and select partition C, click on Make New Folder, set www, select ok and ok once again. Select www in the shared folders list, then select okay and okay again and create.


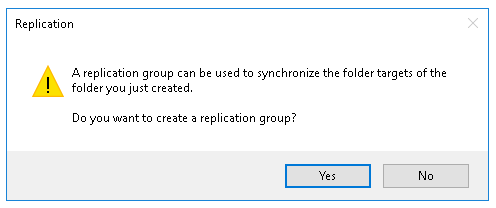
4) Create new Replication Group
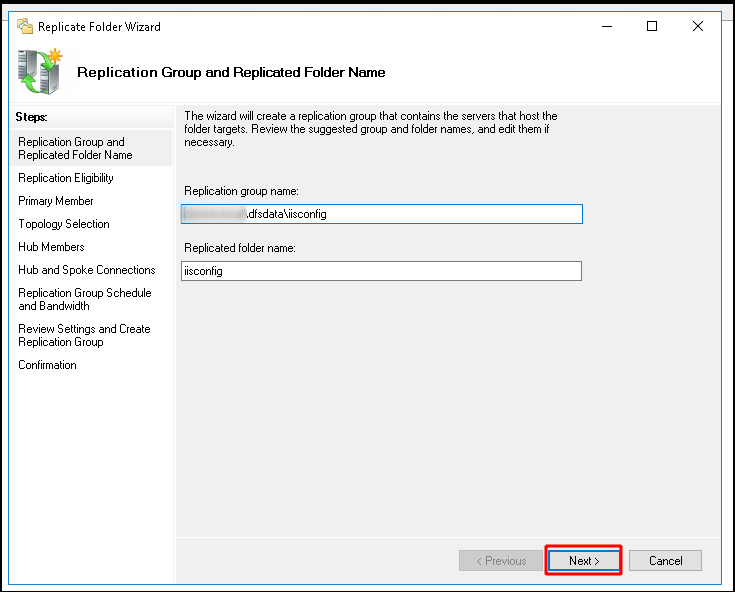
Select yes once "do you want to add another folder target now" pops up. Do the same configuration on dfs1 but enter your dfs2's ID and click on Show Shared Folders. Click on shared folders(don't forget about correct permissions). Once "Do you want to create a replication group" pops up click yes. Keep the replicated folder name and click next. Select Your dfs1 as primary, and choose Full mesh topology and full bandwidth. Validate the creation and click ok.
Do the same for issconfig folder. To confirm that your configuration is correct, create a text file on dfs1 on the shared folder and see if it exists on dfs2.
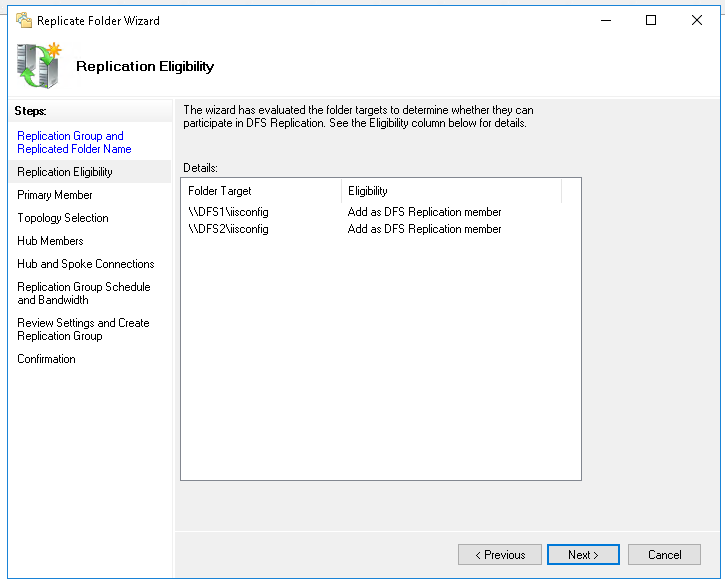
(Repeat same steps for www folder)

5) Staging quota(this was not part of the exam)
Under replication, click on the first node and Under Membership tab, right click on first member and select properties. Under Staging, you can change the quota for the replicated folder. 
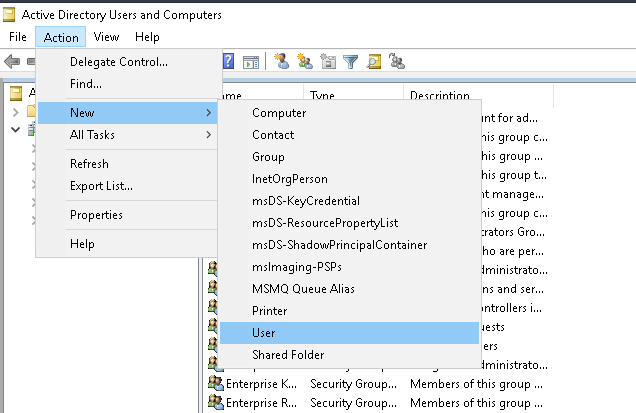
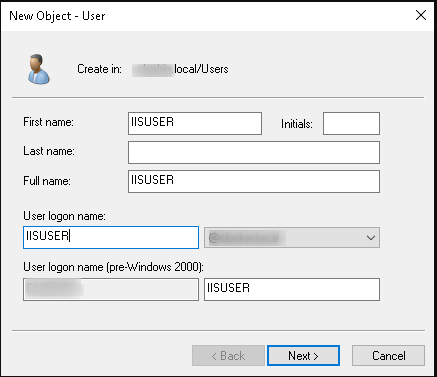
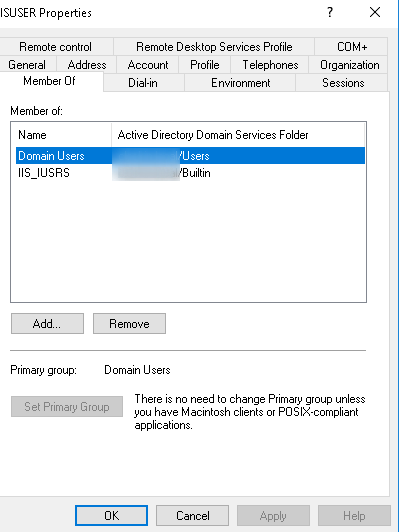
Create a IIS user account
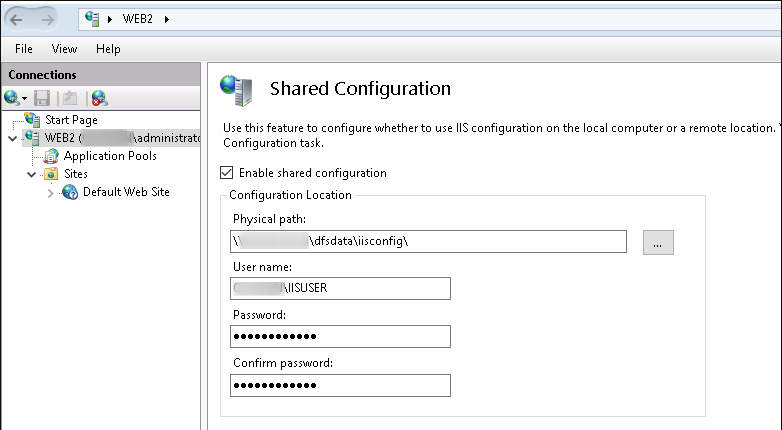
In IIS, click on the server and select Shared Configuration:
Click on export configuration, set the physical path to the shared folder:
You also need to set a Encryption keys password which requires at least one symbol character.
Click on "enable shared configuration" and set the path to the shared folder and enter the encrypted key on pop-up window. Then enable shared configuration on server2 as well.
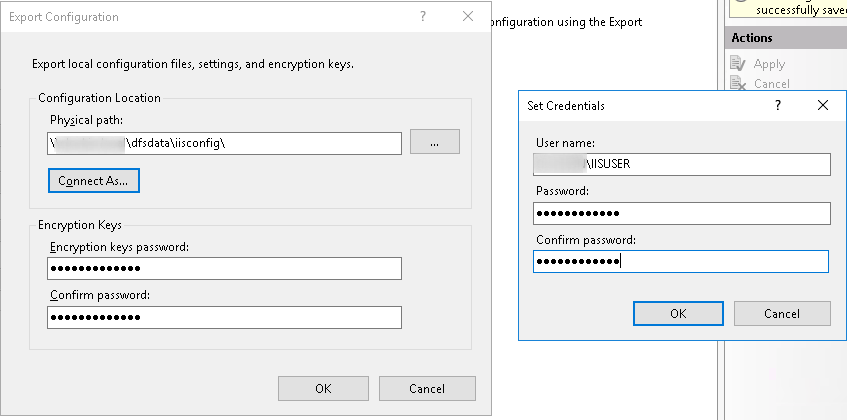
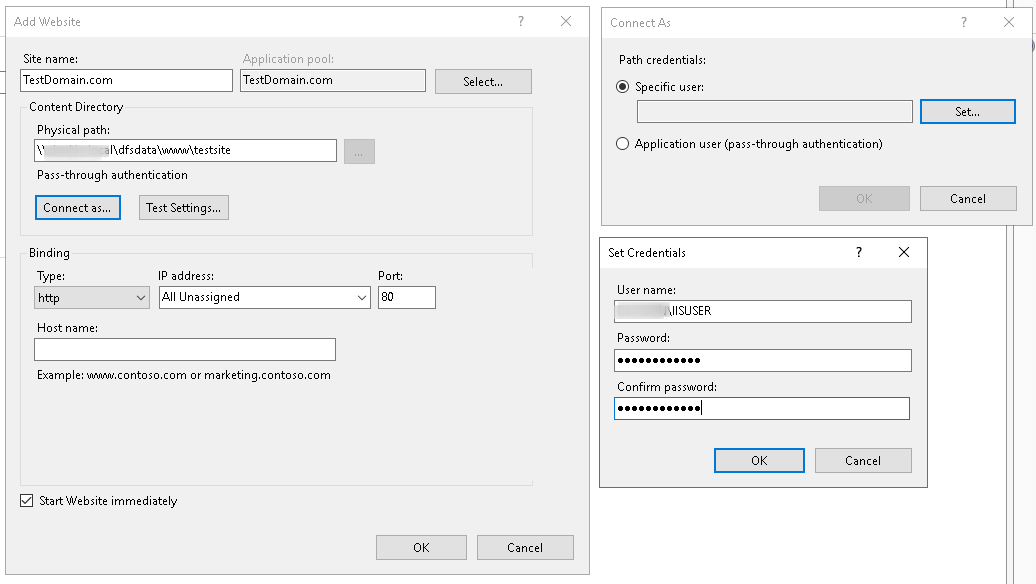
Add a domain and connect as IISUSER

Repair BSOD/Raw partition [WinServer]
Boots into the rescue:
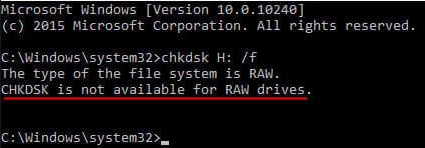
Step 1: Check if you can mount the windows partition on a windows live cd
If you are unable run: "chkdsk C: /f"
If you see this error go to Step 2, if you do not, keep googling, this page is not for you.
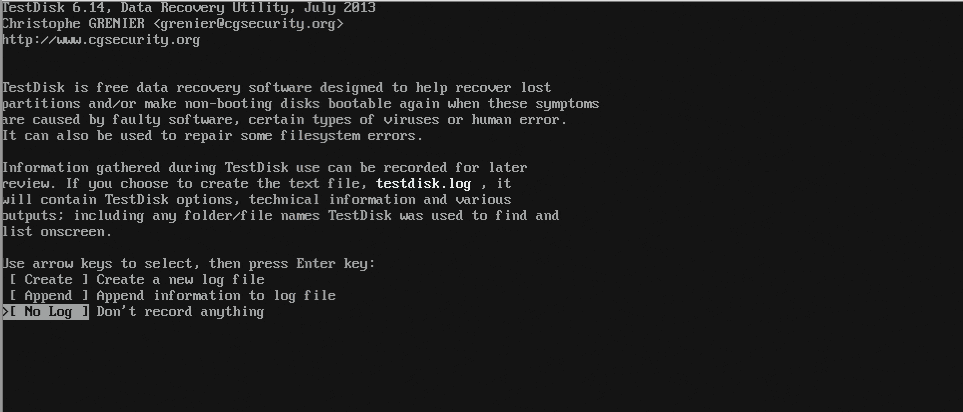
Step 2: Boot in rescue and install testdisk
Run testdisk, select "no log"
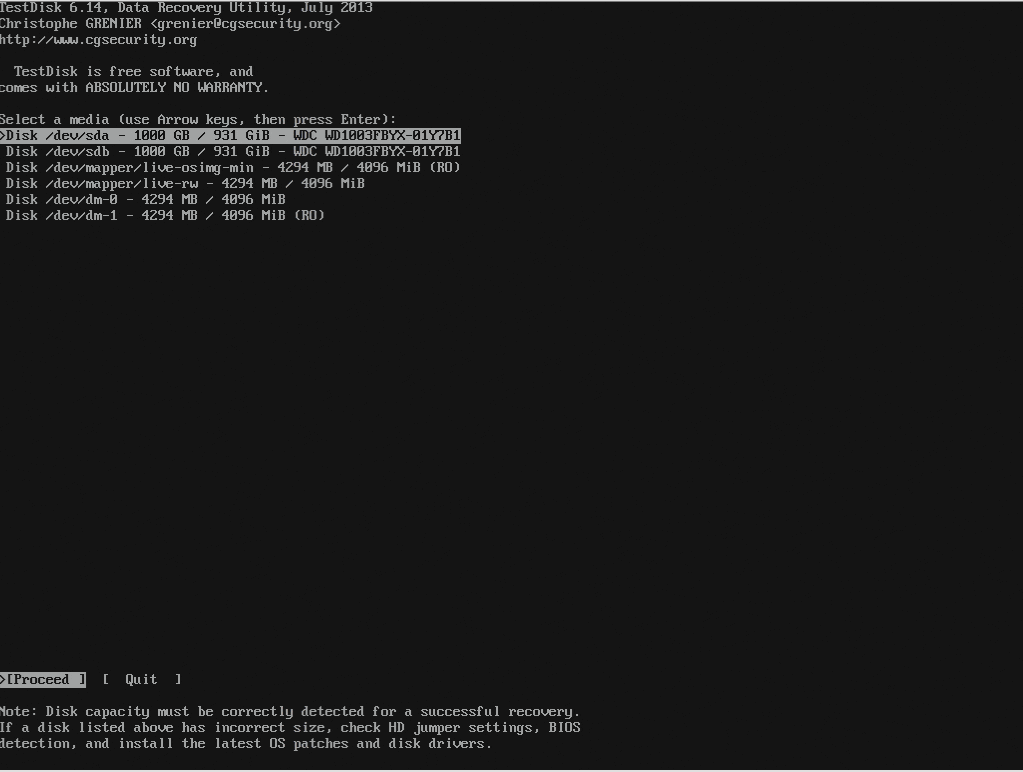
Select windows Drive
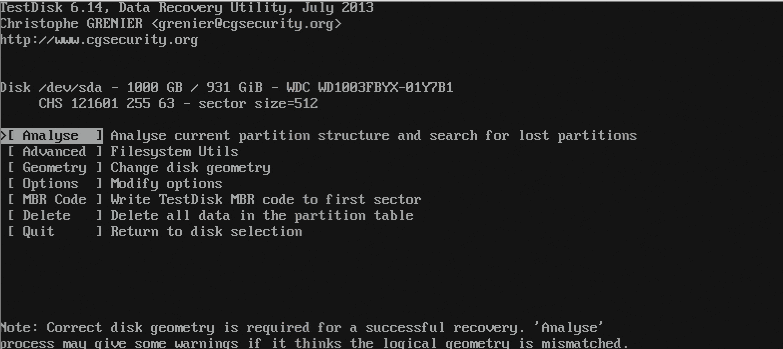
Select Intel

Select Analyse
Run a quick scan
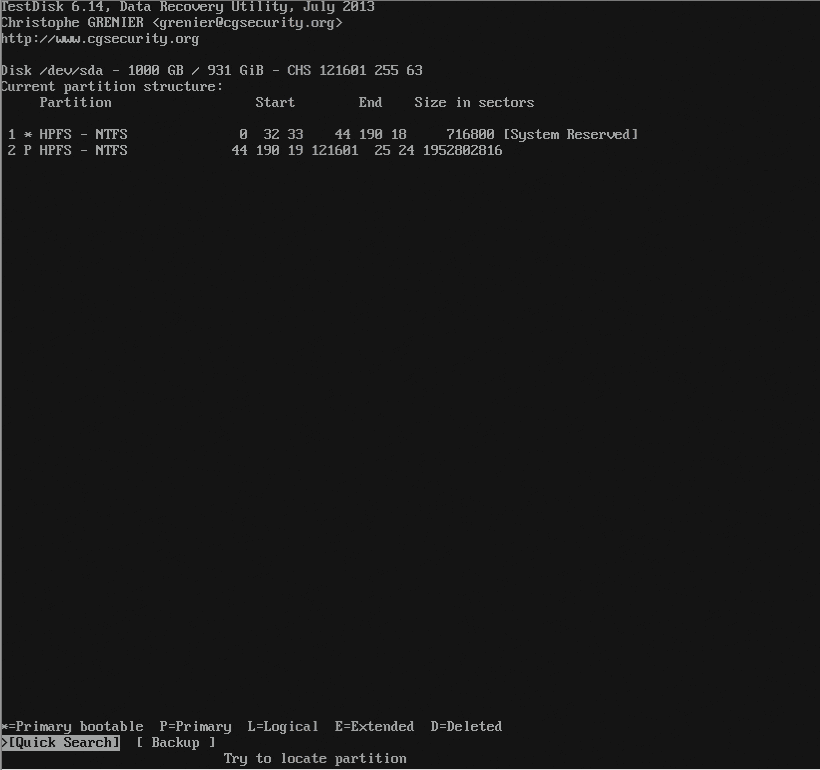
Press enter

Select write, press enter
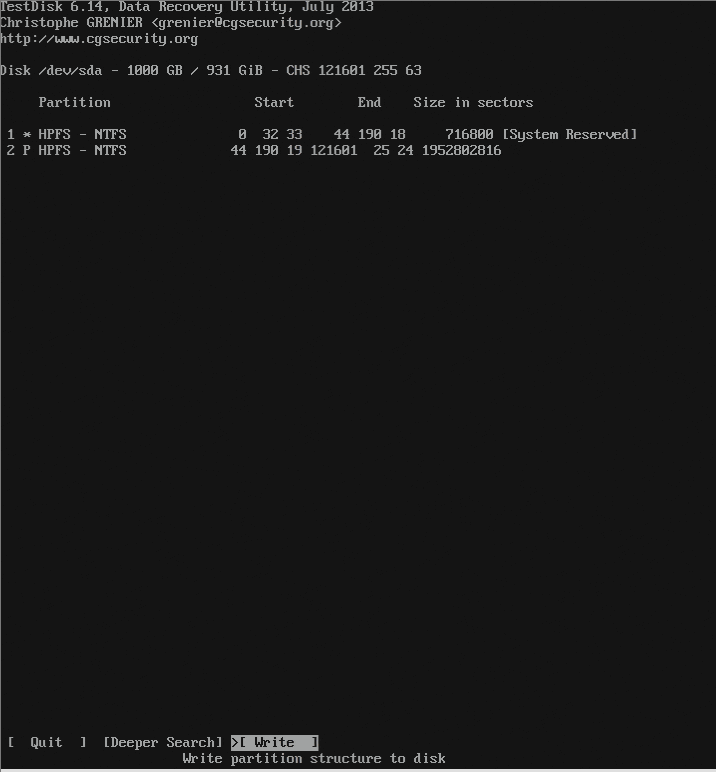
Confirm with Y

Then reboot
Step 3: If the Drive letter you booted on comes back with the incorrect drive letter, run taskmgr on the booted server, start regedit:
Locate the following registry key:
HKEY_LOCAL_MACHINE\SYSTEM\MountedDevices
Find the drive letter you want to change to (new). Look for "\DosDevices\C:".
Right-click \DosDevices\C:, and then click Rename.
Rename it to an unused drive letter "\DosDevices\Z:".
This frees up drive letter C.
Find the drive letter you want changed. Look for "\DosDevices\D:".
Right-click \DosDevices\D:, and then click Rename.
Rename it to the appropriate (new) drive letter "\DosDevices\C:".
open a CMD:
bootsect /nt60 ALL /mbr
bcdboot c:\windows
Reboot Again
Direct Routing IIS
Configure wan/lan interface to allow receive
Change bond 101 to whatever you nic name is, use "netsh interface ipv4 show interfaces" to display names
PS C:\Users\Administrator> netsh interface ipv4 set interface "bond0" weakhostreceive=enabled
PS C:\Users\Administrator> netsh interface ipv4 set interface "bond0 - VLAN 101" weakhostreceive=enabled
PS C:\Users\Administrator> netsh interface ipv4 set interface "bond0 - VLAN 102" weakhostreceive=enabled
PS C:\Users\Administrator> netsh interface ipv4 set interface "Loopback Pseudo-Interface 1" weakhostreceive=enabled
PS C:\Users\Administrator> netsh interface ipv4 set interface "Loopback Pseudo-Interface 1" weakhostsend=enabled
PS C:\Users\Administrator> netsh interface ipv4 show interfacesIdx Met MTU State Name
--- ---------- ---------- ------------ ---------------------------
1 50 4294967295 connected Loopback Pseudo-Interface 1
3 15 1500 connected bond0
8 15 1500 connected bond0 - VLAN 101
7 15 1500 connected bond0 - VLAN 102
Add WAN IP to loopback interface, replace <VIP-WAN> for the interface IP
PS C:\Users\Administrator> netsh interface ip set address "Loopback Pseudo-Interface 1" static <VIP-WAN> 255.255.255.255
PS C:\Users\Administrator> netsh interface ipv4 add address “Loopback Pseudo-Interface 1” 127.0.0.1 255.0.0.0
PS C:\Users\Administrator> Get-NetIPInterfaceifIndex InterfaceAlias AddressFamily NlMtu(Bytes) InterfaceMetric Dhcp ConnectionState PolicyStore
------- -------------- ------------- ------------ --------------- ---- --------------- -----------
7 bond0 - VLAN 101 IPv4 1500 15 Disabled Connected ActiveStore
8 bond0 - VLAN 102 IPv4 1500 15 Disabled Connected ActiveStore
3 bond0 IPv4 1500 15 Enabled Connected ActiveStore
1 Loopback Pseudo-Interface 1 IPv4 4294967295 50 Disabled Connected ActiveStore
Replace "1" for the ID of the loopback in your output
Set-NetIPInterface -InterfaceIndex 1 -InterfaceMetric 254PS C:\Users\Administrator> netsh interface ipv4 show configYour config showed look like below
Configuration for interface "Loopback Pseudo-Interface 1"
DHCP enabled: No
IP Address: <VIP-WAN>
Subnet Prefix: <VIP-WAN>/32 (mask 255.255.255.255)
IP Address: 127.0.0.1
Subnet Prefix: 127.0.0.0/8 (mask 255.0.0.0)
InterfaceMetric: 50
Statically Configured DNS Servers: None
Register with which suffix: Primary only
Statically Configured WINS Servers: None
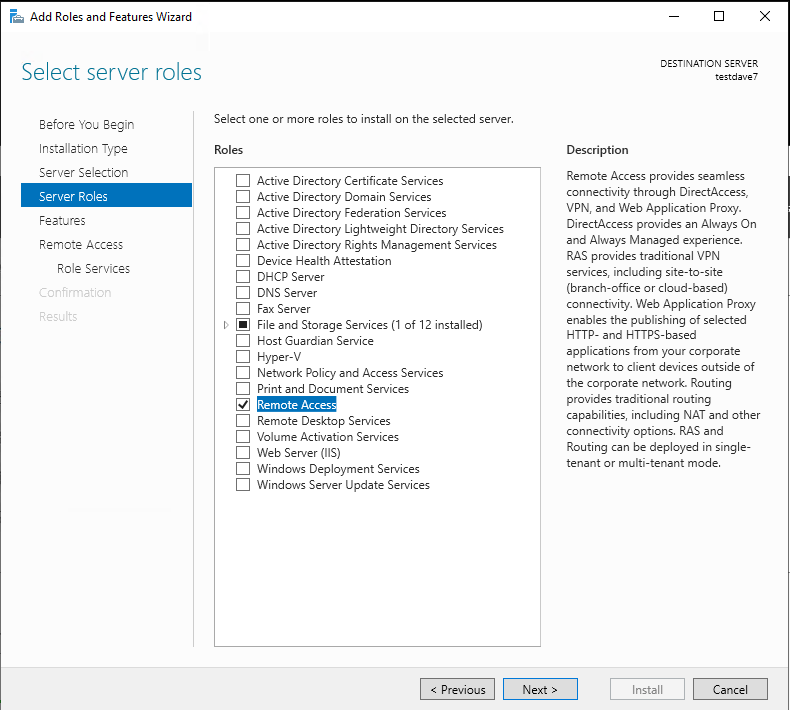
LAN Routing Remote Access Service (RAS)
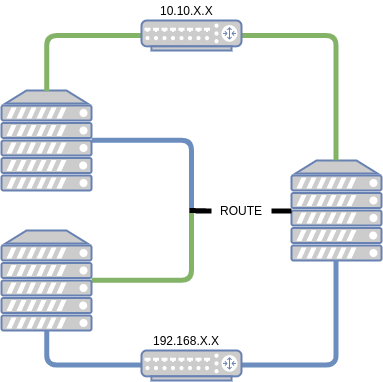
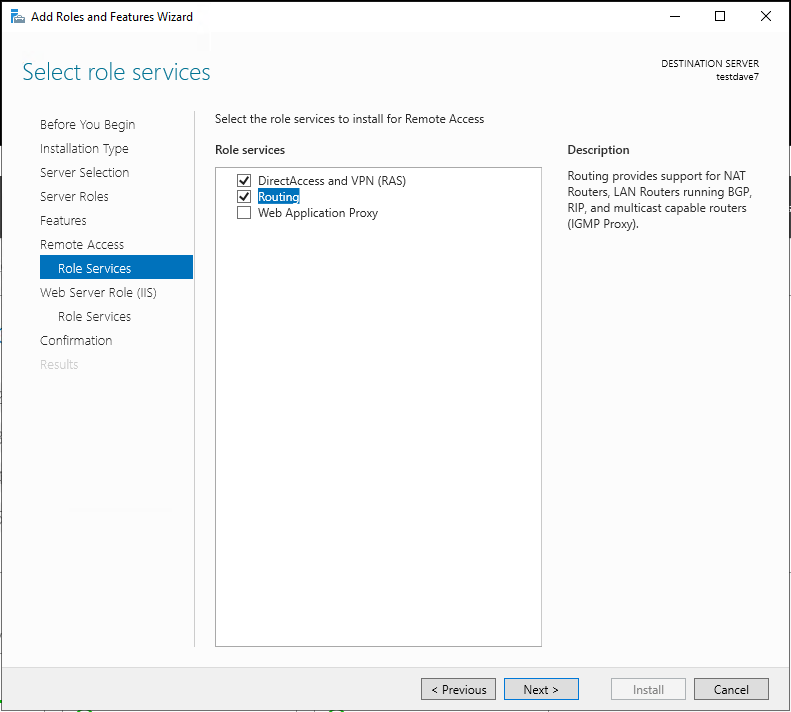
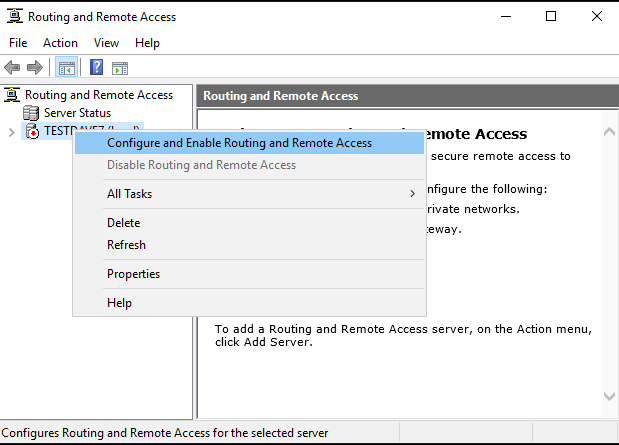

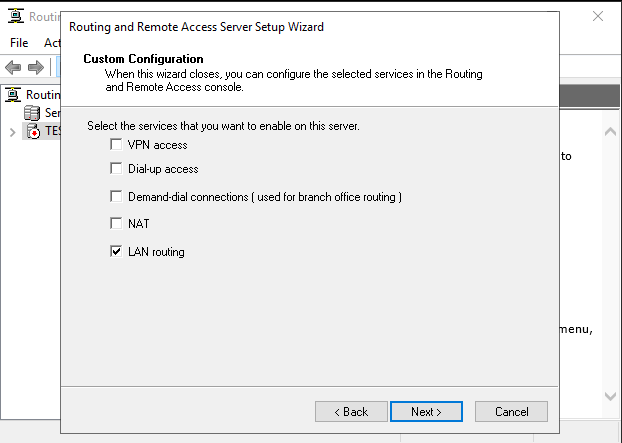

Once done add routes on each hosts
route ADD -p <destination_network> MASK <subnet_mask> <ras_ip>